
Struts2,经典前端框架,学习笔记
[TOC]
Struts2框架引言
什么是框架(FrameWork)
软件开发过程中的半成品,解决软件开发中的通用问题,从而提高开发效率。
eg:
Struts2框架的概念
典型的MVC框架,人为的把一个软件分为3个层次从而提高开发效率。
M(Model | 模型层)Service + DAO + Entity
V(View | 视图层) JSP(freemarker velocity)
C(Controller | 控制层) (Servlet)
MVC设计思想的优点
- 解耦合,利于代码维护
- 有利于分工,提高代码开发效率
现有的MVC控制层所存在的问题
1
2
3
4
5
6
7
8
9
10
11
12
13
14
15
16
17
18
19
| Servlet {
String age = request.getParamter("age");
request.getParamter("password");
Interger.parseInt();
Service
request.getRequestDispatcher("/a.jsp").forward(request, response);
redirect;
response.sendredirect("/b.jsp");
|
Struts2的实战开发思路
Struts2代码:
1
2
3
4
5
6
7
8
9
10
| Struts2 {
MyStruts2 implements Action {
public String execute() throws Exception {
return "hibiscidai"
}
}
}
|
对于WEBAPPLICATION的配置文件web.xml要声明映射
1
2
3
4
5
6
7
8
9
| <servlet>
<servlet-name>A</servlet-name>
<servlet-class>xxx.servlet</servlet-class>
</servlet>
<servlet-mapping>
<servlet-name>A</servlet-name>
<url-pattern>/A</url-pattern>
</servlet-mapping>
|
对于Struts.xml的配置
1
2
3
4
| <action name="A" class="xxx.action">
<result name="hibiscidai">
</result>
</action>
|
第一个Struts2程序的开发
搭建开发环境
引入核心jar包
struts2-core-2.3.15.1.jar
引入第三方jar包
引入Struts.xml配置文件
配置Struts2核心过滤器
在web.xml中声明
1
2
3
4
5
6
7
8
| <filter>
<filter-name>struts2</filter-name>
<filter-class>org.apache.struts2.dispatcher.ng.filter.StrutsPrepareAndExecuteFilter</filter-class>
</filter>
<filter-mapping>
<filter-name>struts2</filter-name>
<url-pattern>/*</url-pattern>
</filter-mapping>
|
对于不同版本会有兼容问题,注意 filter-class 标签映射类
开发步骤
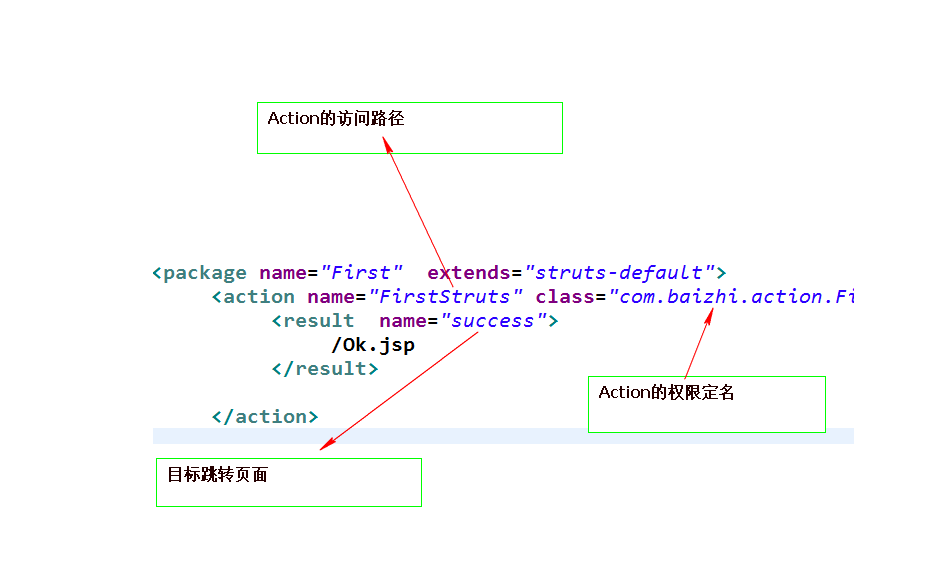
实现Action接口
配置文件配置
8254
ServletActionContext类的使用
在 servlet-api.jar 包中
1
2
3
| HttpServletRequest request = ServletActionContext.getRequest();
HttpServletResponse response =ServletActionContext.getResponse();
HttpSession session = request.getSession();
|
Strtus2的另一种访问方式
直接在项目路径下输入action名字或者 xxx.action
eg:
http://localhost:8080/ProjectName/MyAction
http://localhost:8080/ProjectName/MyAction.action
Struts2的跳转(4种|重点)
Action跳转JSP
默认Forward跳转
1
2
3
4
5
| <action name="FirstStruts" class="fancylab.hibiscidai.action.MyAction">
<result name="success" type="dispatcher">
/ok.jsp
</result>
</action>
|
Redirect跳转
1
2
3
4
5
| <action name="FirstStruts" class="fancylab.hibiscidai.action.MyAction">
<result name="success" type="redirect">
/ok.jsp
</result>
</action>
|
Action跳Action
Forward跳转
1
2
3
4
5
6
7
8
9
10
| <action name="A" class="fancylab.hibiscidai.action.AAction">
<result name="B" type="chain">
B
</result>
</action>
<action name="B" class="fancylab.hibiscidai.action.BAction">
<result name="success">
/ok.jsp
</result>
</action>
|
Redirect跳转
1
2
3
4
5
6
7
8
9
10
| <action name="A" class="fancylab.hibiscidai.action.AAction">
<result name="B" type="redirectAction">
B
</result>
</action>
<action name="B" class="fancylab.hibiscidai.action.BAction">
<result name="success">
/ok.jsp
</result>
</action>
|
包 < PACKAGE >
使配置文件当中的配置信息模块化,便于配置信息的管理。
1
| <package name="xxx" extends="struts-default">
|
命名空间 < NAMESPACE >
使用户的请求模块化,便于随后过滤器的使用。
原 web.xml配置
1
2
3
4
5
6
7
8
9
10
11
12
13
14
15
16
17
18
19
| <servlet>
<servlet-name>A</servlet-name>
<servlet-class>fancylab.hibiscidai.action.AAction</servlet-class>
</servlet>
<servlet-mapping>
<servlet-name>A</servlet-name>
<url-pattern>/User/A</url-pattern>
</servlet-mapping>
<servlet>
<servlet-name>A</servlet-name>
<servlet-class>fancylab.hibiscidai.action.AAction</servlet-class>
</servlet>
<servlet-mapping>
<servlet-name>A</servlet-name>
<url-pattern>/User/B</url-pattern>
</servlet-mapping>
<filter>
/User/*
</filter>
|
访问方式:localhost:[port]/ProjectName/A
Struts2 包空间加入后
struts.xml配置
1
2
3
4
5
6
| <package name="user" extends="strust-default" namespace="/First">
<action name="A" class="fancylab.hibiscidai.action.AAction">
</package>
<package name="Admin" extends="strust-default">
<action name="A" class="fancylab.hibiscidai.action.AAction">
</package>
|
访问方式:localhost:[port]/ProjectName/namespace/A
跨包间的跳转
1
2
3
4
| <result name="D" type="chain">
<param name="namespace">/second</param>
<param name="actionName">D</param>
</result>
|
全局跳转
当许多Action跳转到相同路径时,可以定义全局跳转,减少配置文件当中的配置信息冗余。
1
2
3
4
5
| <global-results>
<result name="success">
/ok.jsp
</result>
</global-results>
|
注意事项
STRUTS2接收CLIENT的参数(重点)
收集客户端的零散数据
login.jsp
1
2
3
| <input type="text" name="username">
<input type="password" name="password">
<input type="submit" value="login">
|
1
2
3
4
5
6
7
8
9
10
| xxxAction implements Action {
private String username;
private String password;
public String execute() {
UserService.login(username, password);
}
}
|
好处
1
2
3
| HttpServletRequest request = ServletActionContext.getRequest();
String username = request.getParameter("username
");
|
- 对于通用数据进行自动类型转换。
- 针对于post提交数据的方式,自动解决字符集编码问题。
通过对象收集客户端的数据
register.jsp
1
2
3
4
5
| 用户名<input type="text" name="user.username">
密码<input type="password" name="user.password">
年龄<input type="text" name="user.age">
日期<input type="date" name="user.birthdate">
<input type="submit">
|
User.java
1
2
3
4
5
6
7
8
| class User {
private String username;
private String password;
private int age;
private Date birthdate;
}
|
RegisterAction.java
1
2
3
4
5
6
7
| RegisterAction implements Action {
private User user;
public String execute() {
UserService.register(user);
}
}
|
通过数组或集合的形式收集客户端的数据
1
2
3
4
5
| <input type="checkbox" value="1" name="a">
<input type="checkbox" value="2" name="a">
<input type="checkbox" value="3" name="a">
private List a;//以数组的形式接收数据
|
STRUTS2中ACTION的第二种开发方式
1
| MyAction extends ActionSupport
|
DMI(DYNAMIC METHOD INVOKE 动态方法调用)(实战)
在一个Action中提供多个方法应对用户不同需求
编码
extends ActionSupport(建议)
语法要求:DMI中Action中的方法,方法名随便写
修饰符 返回值 参数列表 与execute中方法保持一致
配置
第一种配置
method 标签中设置方法
优点:可读性好
缺点:配置信息冗余
1
| <action name="addUser" class="fancylab.hibiscidai.action.UserAction" method="add"></action>
|
第二种配置
采用通配符进行
优点:配置信息不再冗余
缺点:可读性极差
1
| <action name="user_" class="fancylab.hibiscidai.action.UserAction" method="{1}"></action>
|
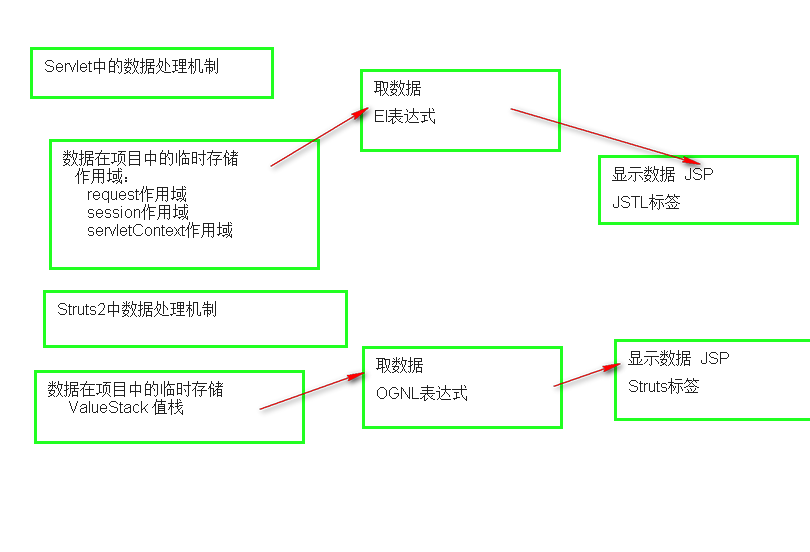
STRUTS2中的数据处理机制
数据处理机制:数据在网站中的流转
33648
OGNL表达式
OGNL表达式:是一种独立的表达式语言,不依赖于任何的框架
OGNL表达式特点: 从root区,ContextMap区取数据
从Root区取数据
从Root区中取所存对象的属性值
从Root去中取所存对象的属性值语法:直接属性名的方式
1
2
3
4
5
6
7
8
9
10
11
| @Test
public void test1() throws Exception{
Person person = new Person();
person.setUsername("laowang");
person.setPassword("12345");
person.setAge(30);
System.out.println(Ognl.getValue("username",person));
System.out.println(Ognl.getValue("password",person));
System.out.println(Ognl.getValue("age",person));
}
|
从root区中取某一个对象中的关联对象的属性值:关联引用名.属性
1
2
3
4
5
6
7
8
9
10
11
12
13
14
| @Test
public void test2() throws Exception{
Person person = new Person();
person.setUsername("laowang");
person.setPassword("12345");
person.setAge(30);
Address address = new Address();
address.setStreet("文化路");
person.setAddress(address);
System.out.println(Ognl.getValue("address.addressname",person));
System.out.println(Ognl.getValue("address.street",person));
}
|
从root区中取某一个对象当中的List集合中的元素:List集合引用名[下标]
1
2
3
4
5
6
7
8
9
10
11
12
13
14
| @Test
public void test3() throws Exception{
Person person = new Person();
person.setUsername("laowang");
person.setPassword("12345");
person.setAge(30);
List<String> tels = person.getTels();
tels.add("xjr");
tels.add("whp");
System.out.println(Ognl.getValue("tels[0]",person));
System.out.println(Ognl.getValue("tels[1]",person));
}
|
从root区中取某一个对象当中的Map集合中的某一个元素:map集合的引用名[键]
1
2
3
4
5
6
7
8
9
10
11
12
| @Test
public void test4() throws Exception{
Person person = new Person();
person.setUsername("laowang");
person.setPassword("12345");
person.setAge(30);
Map<String, String> qqs = person.getQqs();
qqs.put("kuaige","562471794");
qqs.put("zpf","7654321");
System.out.println(Ognl.getValue("qqs['kuaige']",person));
System.out.println(Ognl.getValue("qqs['zpf']",person));
}
|
ognl表达式中的运算
- 算数运算
+ - * / %
- 比较运算
> < >= <= !=
- 逻辑运算
&& || !
1
2
3
4
5
6
7
8
9
10
| @Test
public void test5() throws Exception{
Person person = new Person();
person.setUsername("laowang");
person.setPassword("12345");
person.setAge(30);
System.out.println(Ognl.getValue("age<10",person));
System.out.println(Ognl.getValue("username=='laowang'",person));
}
|
OGNL表达式可以调用某种数据类型的方法
1
2
3
4
5
6
7
8
9
| @Test
public void test6() throws Exception{
Person person = new Person();
person.setUsername("laowang");
person.setPassword("12345");
person.setAge(30);
System.out.println(Ognl.getValue("username.toUpperCase()",person));
System.out.println(Ognl.getValue("username.equals('laowang')",person));
}
|
从ContextMap区取数据
contextmap本身是个map,在单独测试ognl时需要提供一个map集合
语法:#key的方式取值
1
2
3
4
5
6
7
8
9
10
11
|
@Test
public void test1() throws Exception{
Map<String,Person> contextmap = new HashMap<String,Person>();
Person person = new Person();
person.setUsername("laowang");
person.setPassword("12345");
person.setAge(30);
contextmap.put("A", person);
System.out.println(Ognl.getValue("#A.age+10", contextmap,new Object()));
}
|
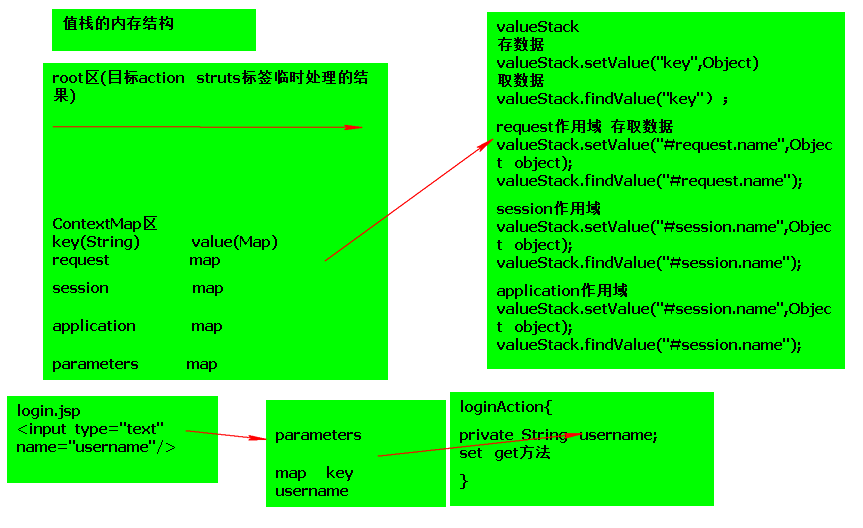
VALUESTACK
作用:管理(存储)一次请求有效的数据
- 客户端传来的数据
- 作用域中的数据
- request
- session
- application
好处
与视图层(view层)解耦合
获取值栈
1
2
| ActionContext ac = ActionContext.getContext();
ValueStack vs = ac.getValueStack();
|
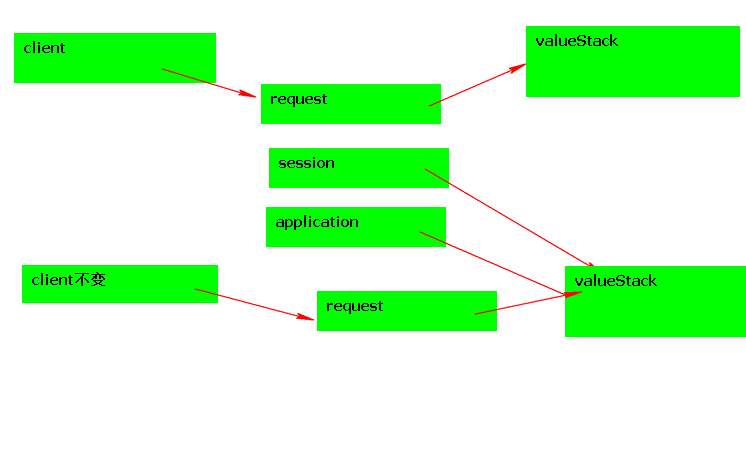
值栈的生命周期(request作用域)
一次请求有效,请求变化则值栈变化
值栈的内存结构
请求格式
1
2
3
| request.setAttribute("name", "laowang");
request.getAttribute("name");
request.setAttribute("n", "feige");
|
user类
1
2
3
4
| class User {
private String username;
}
|
request作用域底层
1
2
3
4
5
6
7
8
9
10
11
12
| class request {
private Map attribute;
public void setAttribute(String name, String object) {
attribute.put(name, object);
}
public Object getAttribute(String name) {
Object = attrbute.get("name");
return object;
}
}
|
对于作用域
request—map
session—map
application—map
值栈的内存结构
50883
值栈的注意事项
问题:值栈是一次请求有效,为什么可以管理session application作用域?
51145
STRUTS中的标签(上)
作用:配合值栈在视图层显示数据
引用:
JSTL标签:
1
| <%@ taglib prefix="c" uri="http://java.sun.com/jsp/jstl/core" %>
|
Strtus标签:
1
| <%@taglib prefix="s" uri="/struts-tags"%>
|
显示数据
显示单个数据
1
| <s:property value="OGNL表达式" />
|
1
2
3
4
| <s:if test="OGNL表达式" />
</s:if>
<s:else>
</s:else>
|
1
2
3
4
5
6
| <s:if test="OGNL表达式">
</s:if>
<s:elseif test="OGNL表达式" />
</s:elseif>
<s:else>
</s:else>
|
显示多个数据
语法:
1
2
| <s:iterator value="OGNL表达式">
</s:iterator>
|
从数组或集合中显示数据(对象类型)
List或Set数组
1
2
3
4
5
| <s:iterator value="#request.users">
<h1><s:property value="username"/></h1>
<h1><s:property value="password"/></h1>
<h1><s:property value="age"/></h1>
</s:iterator>
|
Map
1
2
3
4
5
6
7
| <s:iterator value="#request.users">
<h1><s:property value="key"/></h1>
<h1>==========</h1>
<h1><s:property value="value"/></h1>
</s:iterator>
|
从数组或集合中显示数据(String类型和8种基本类型)
1
2
3
| <s:iterator value="#request.s">
<s:property/>
</s:iterator>
|
遍历状态
1
2
3
4
5
6
7
8
| <s:iterator value="OGNL" status="s">
#s.count 遍历次数
#s.index 遍历的下标
#s.odd 是否是奇数遍历
#s.even 是否是偶次遍历
</s:iterator>
<s:iterator value="OGNL" begin="" end="" Step="">
</s:iterator>
|
begin:从某一个下标开始遍历
end:以某一个下标结束
step:步幅
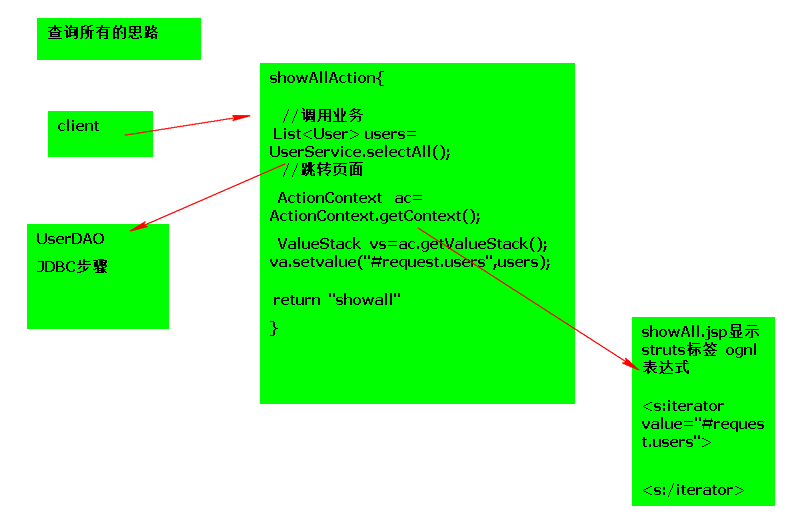
查询所有的思路:
60321
STRUTS2数据处理机制的补充
Action中的成员变量替换request作用域
60576
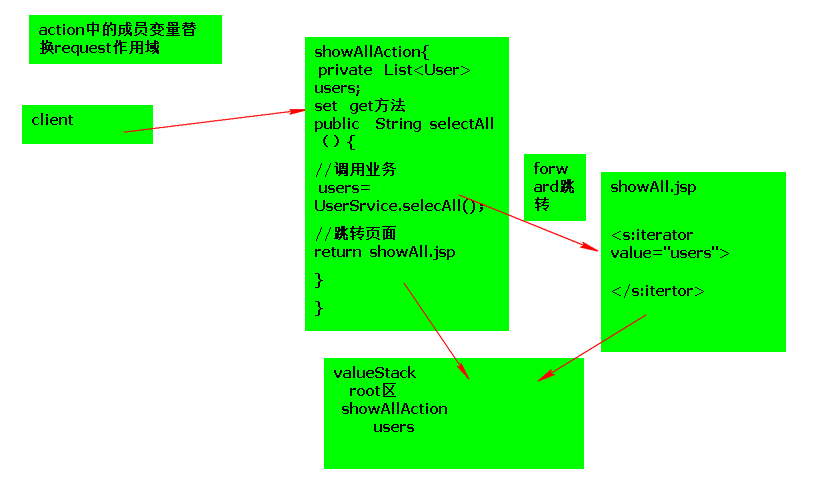
Action中成员变量的作用:
- 收集客户端的参数(零散变量,对象,数组或集合)
- 替换request作用域
简化值栈操作session作用域,application作用域的开发
Struts2ScopeUtil工具类的开发
1
2
3
4
5
6
7
8
9
10
11
12
13
14
15
16
17
18
19
20
21
22
23
24
25
26
27
28
29
30
31
32
33
34
| import com.opensymphony.xwork2.ActionContext;
import com.opensymphony.xwork2.util.ValueStack;
public class Struts2ScopeUtil {
public static void setSessionAttribute(String OGNL, Object value) {
ActionContext context = ActionContext.getContext();
ValueStack valueStack = context.getValueStack();
valueStack.setValue("#session." + OGNL, value);
}
public static Object getSessionAttribute(String OGNL) {
ActionContext context = ActionContext.getContext();
ValueStack valueStack = context.getValueStack();
return valueStack.findValue("#session." + OGNL);
}
public static void setApplicationAttribute(String OGNL, Object value) {
ActionContext context = ActionContext.getContext();
ValueStack valueStack = context.getValueStack();
valueStack.setValue("#application." + OGNL, value);
}
public static Object getApplicationAttribute(String OGNL) {
ActionContext context = ActionContext.getContext();
ValueStack valueStack = context.getValueStack();
return valueStack.findValue("#application." + OGNL);
}
}
|
为什么叫值栈?值栈体现在哪个区呢?
栈:先进后出
DEBUG使用
- 打断点
- tomcat以debug模式启动
- F5进入方法内部/F6不进入方法内部,只显示程序流程/F8推出debug模式/类似于ArrayList的内存结构
66279

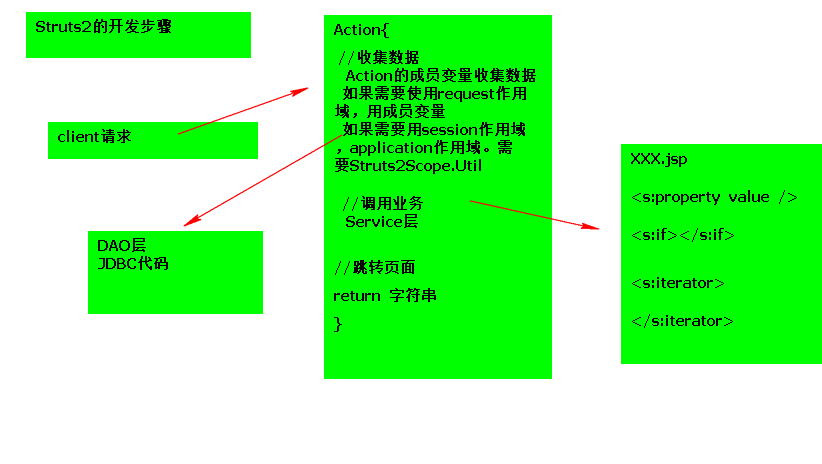
总结:现有STRUTS2的开发步骤
66507
STRUTS标签(续)
<s:date/>
语法:<s:date name="OGNL" format="自定义日期类型" />
作用:自定义日期的格式
1
| <s:date name="#request.date" format="yyyy-MM-dd hh:mm:ss" />
|
<s:url/>
语法:<s:url action="" namespace=""/> 、<s:url value=""/>
作用:防止用户禁用Cookie,自动进行url重写。加载第三方资源。
注意:传值<s:url action="" namespace=""/>?id=41
s标签中与html相关的UI标签
<s:form></s:form>—————><form></form>
<s:head/> —————><head></head>
<s:text name=""></s:text>—————><input type="text"/>
<s:date name=""/>—————><input type="date"/>
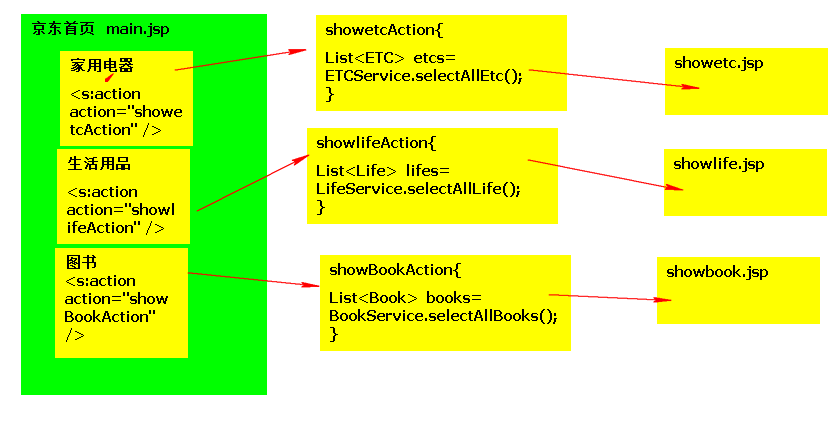
<s:action />
语法:<s:action name="" namespace="" executeResult="" />
作用:把多个Action的处理结果作整合
针对于前台视图
传统思路
67794
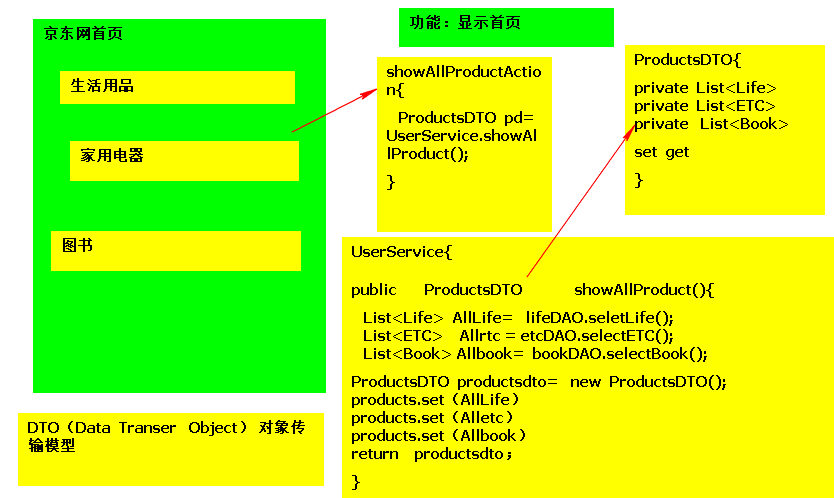
Struts解决方案
68013
STRUTS2中的拦截器
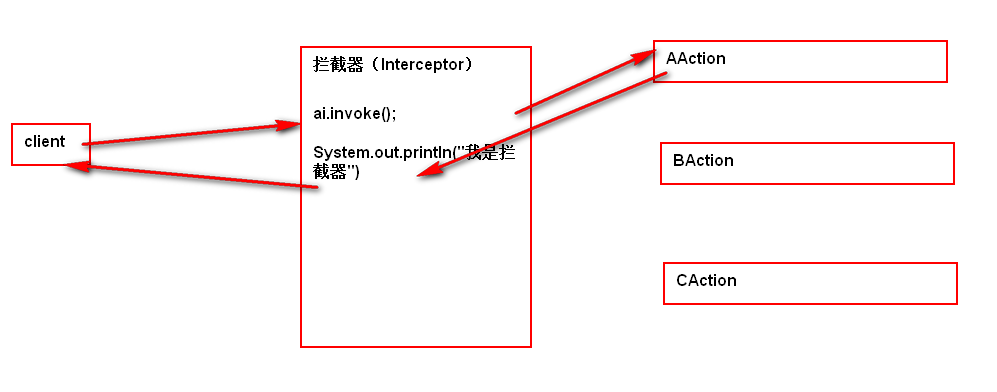
拦截器的作用:把多个ACTION中的冗余代码,抽取到拦截器中,解决代码冗余问题
使用
编码implements Interceptor接口
- 方法作用:
把多个Action中的冗余代码,写入次方法中,解决代码冗余问题
- 参数的作用:
ai.getAction();//获取目标的Action
ai.getStack();//获取值栈
ai.invoke();//控制请求的流程走向
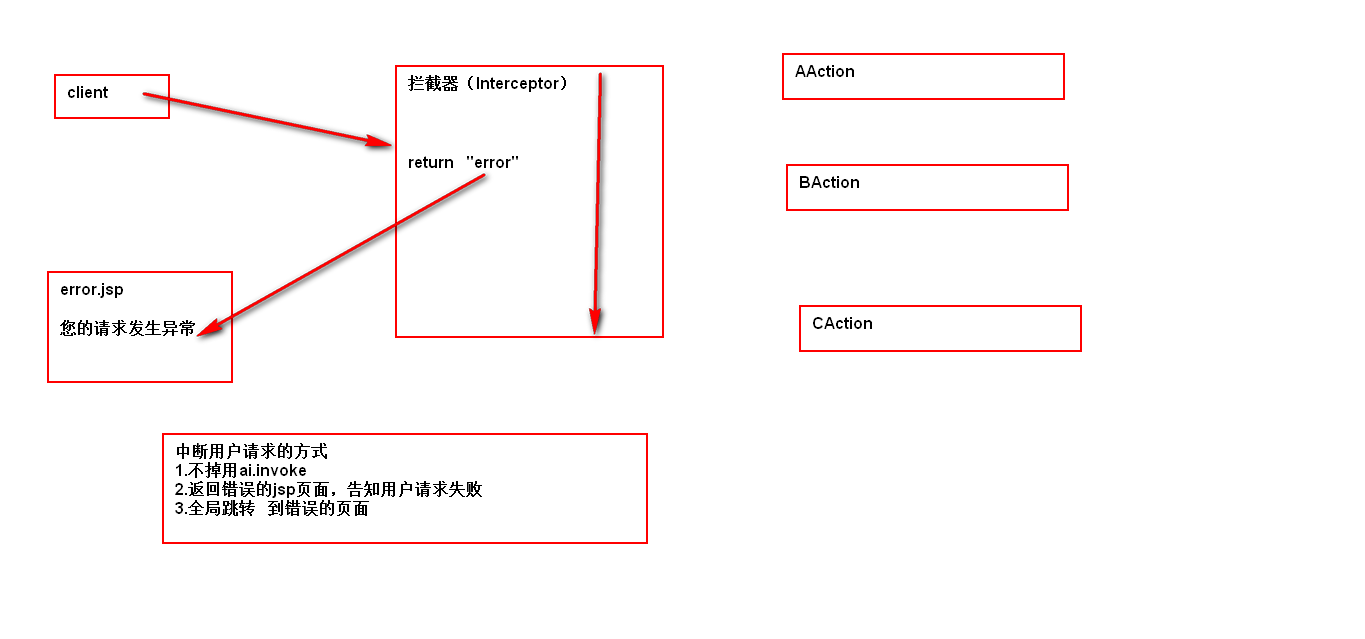
- 返回值的作用:
中断用户请求时,指向跳转的目标JSP页面
1
2
3
4
5
6
7
8
9
10
11
12
13
| public class checkloginInterceptor extends AbstractInterceptor {
@Override
public String intercept(ActionInvocation ai) throws Exception {
String flag = (String) Struts2ScopeUtil.getSessionAttribute("flag");
if (flag == null) {
return "login";
} else {
ai.invoke();
}
return null;
}
}
|
配置
1
2
3
4
5
6
| <interceptors>
<interceptor name="myInterceptor" class="fancylab.hibiscidai.interceptor.MyInterceptor">
</interceptors>
<action name="A" class="fancylab.hibiscidai.action.AAction" method="A">
<interceptor-ref name=myinterceptor"></interceptor-ref>
</action>
|
注意:
拦截响应
72101
中断请求
72327
拦截器只在本包中有效
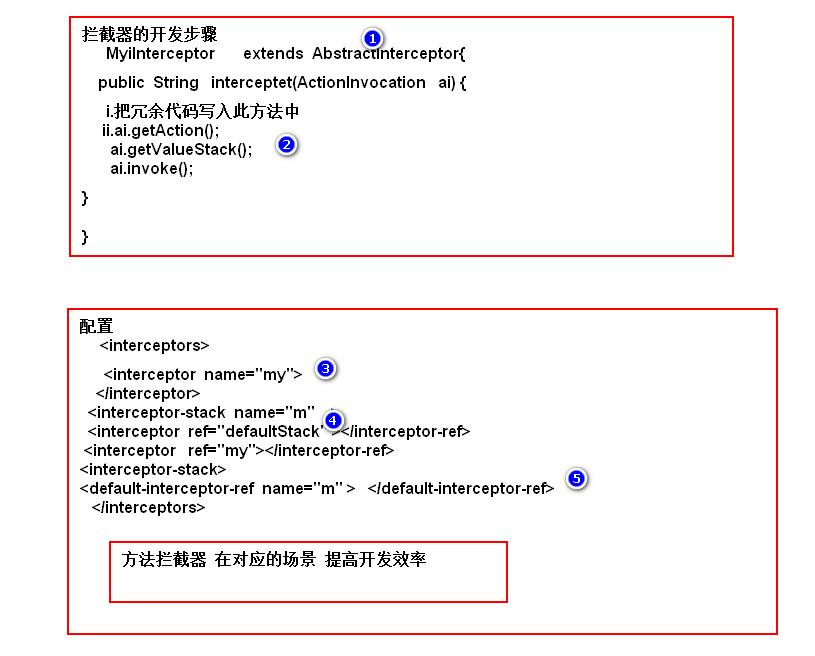
简化拦截器开发 继承AbstractInterceptor类
拦截器栈
作用:管理多个拦截器
使用:不编码,只需配置
1
2
3
4
5
|
<interceptor-stack name="my">
<interceptor-ref name="myInterceptor"></interceptor-ref>
<interceptor-ref name="myInterceptor2"></interceptor-ref>
</interceptor-stack>
|
默认拦截器栈
作用:可以指定一个拦截器栈为默认拦截器栈,可以拦截所有的目标Action
1
| <default-interceptor-ref name="my"></default-interceptor-ref>
|
注意:默认拦截器栈放置的位置必须在全局跳转的前边,每个包中只能配置一个默认拦截器,局部配置优先。
Struts2中的拦截器体系
自定义拦截器
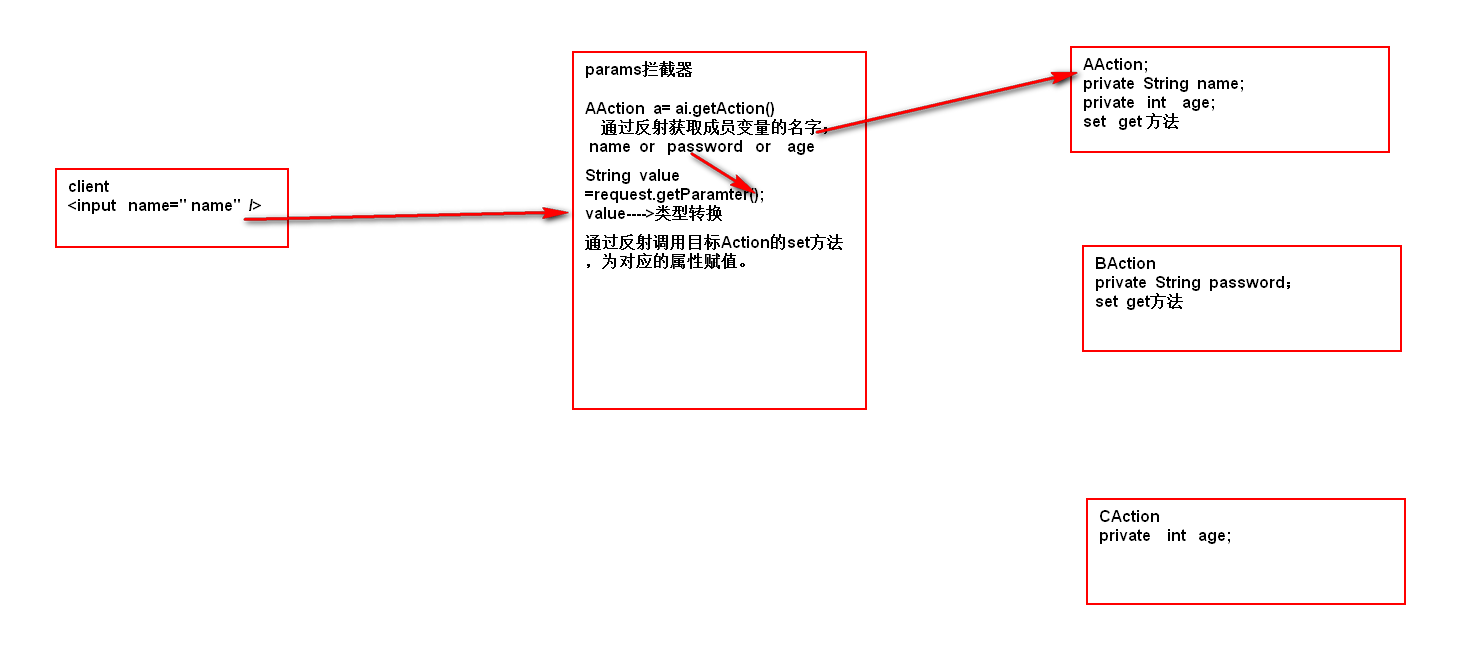
默认拦截器(系统拦截器)了解
目的:接收客户端的请求参数
74527
- fileupload
- Exception
- workflow
默认拦截器放置的位置
Struts2-core.jar ——>Struts-default.xml
74832
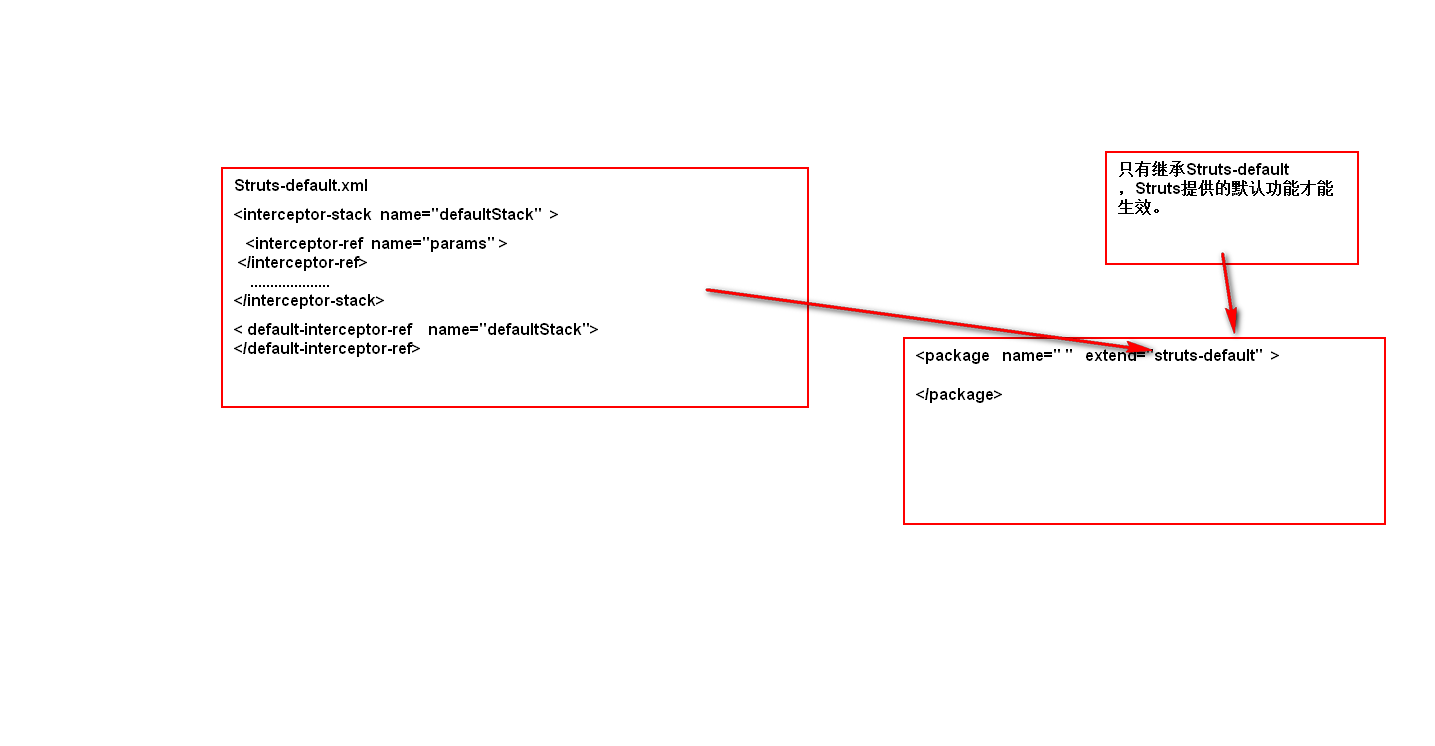
注意:如果自定义了默认拦截器栈,Struts2中的系统拦截器栈将失效
1
2
3
4
5
6
7
| <interceptors>
<interceptor-stack name="my">
<interceptor-ref name="defalutStack"></interceptor-ref>
<interceptor-ref name="myInterceptor"></interceptor-ref>
<interceptor-ref name="myInterceptor2"></interceptor-ref>
</interceptor-stack>
</interceptors>
|
注意:如果自定义拦截器,系统拦截器将失效
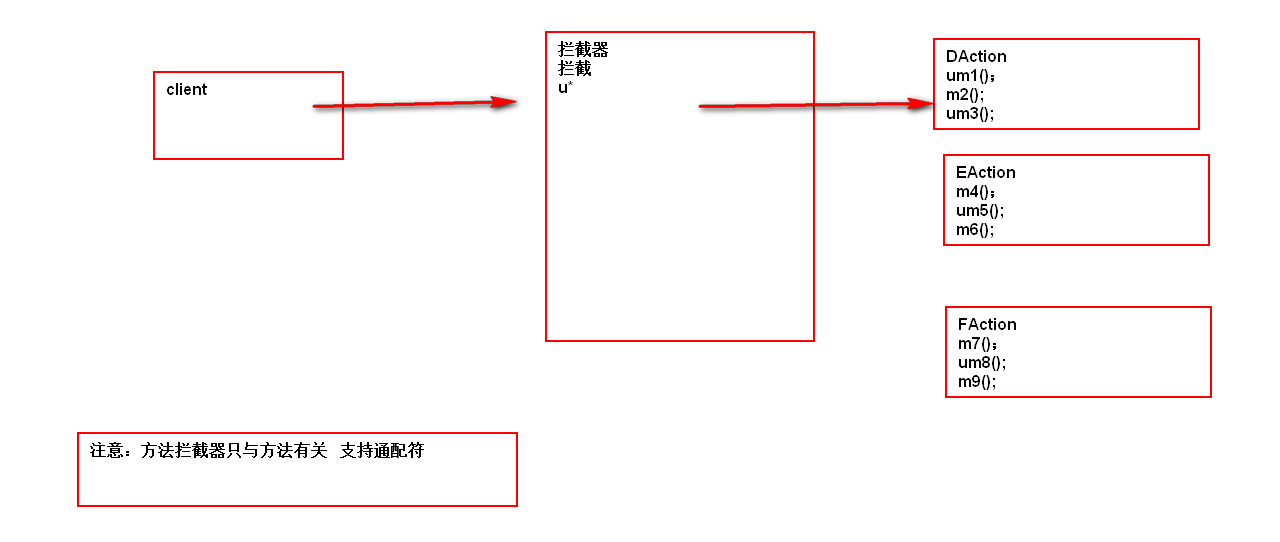
方法拦截器
- 作用
在DMI中,如果使用者采用的是通配符的配置方式,可以通过方法拦截器,拦截对应的方法。
- 编码
extends MethodFilterInterceptor
1
2
3
4
5
6
7
8
| public class MethodInterceptor extends MethodFilterInterceptor {
@Override
public String doIntercept(ActionInvocation ai) throws Exception {
System.out.println("我是方法拦截器");
ai.invoke();
return null;
}
}
|
1
2
3
| <param name="includeMethod">
拦截器拦截哪些方法
</param>
|
1
2
3
4
5
6
7
8
9
10
11
12
13
| <interceptors>
<interceptor name="methodinterceptor" class="fancylab.hibiscidai.interceptor.MethodInterceptor">
<param name="excludeMethods">
m4
</param>
</interceptor>
<interceptor-stack name="my">
<interceptor-ref name="defaultStack"></interceptor-ref>
<interceptor-ref name="methodinterceptor"></interceptor-ref>
</interceptor-stack>
</interceptors>
<defalut-interceptor-ref name="my">
</defalut-interceptor-ref>
|
拦截器的应用
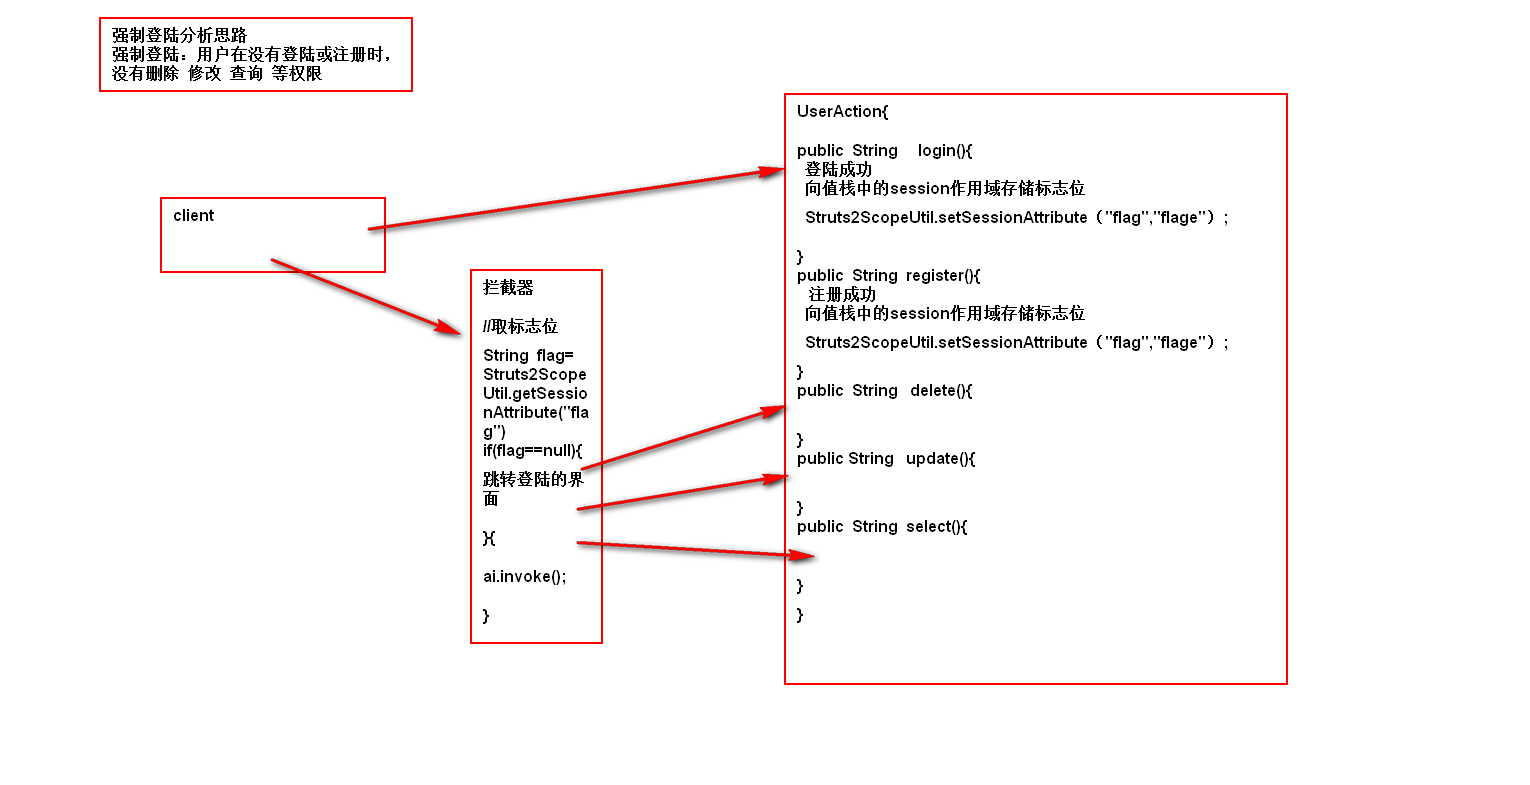
强制登陆
81986
防止用户重复提交(令牌环)
- 发生场景
在用户进行表单提交时,因为网络通信等问题,产生重复的表单提交
- 解决方案
令牌环
- 令牌环实现原理
82280
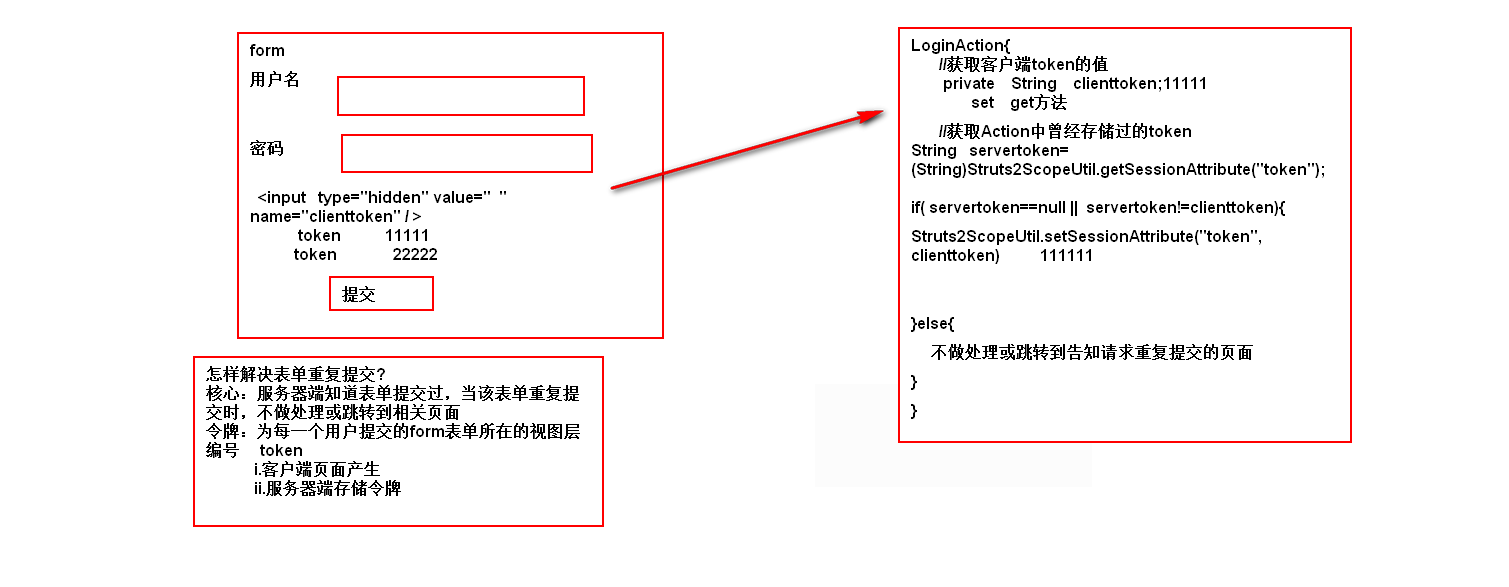
Struts2令牌环解决思路
客户端生成随机数
配置token拦截器
引入Struts2提供的token拦截器
1
2
3
4
| <interceptor-stack name="my1">
<interceptor-ref name="token"></interceptor-ref>
<interceptor-ref name="defaultStack"></interceptor-ref>
</interceptor-stack>
|
提供跳转目标页面
1
2
3
| <result name="invalid.token">
/error.jsp
</result>
|
STRUTS2中的高级部分
上传
文件上传核心思路
- client问题
- 服务器端如何获得文件上传的内容
- 服务器端如何存储文件上传的内容
84748
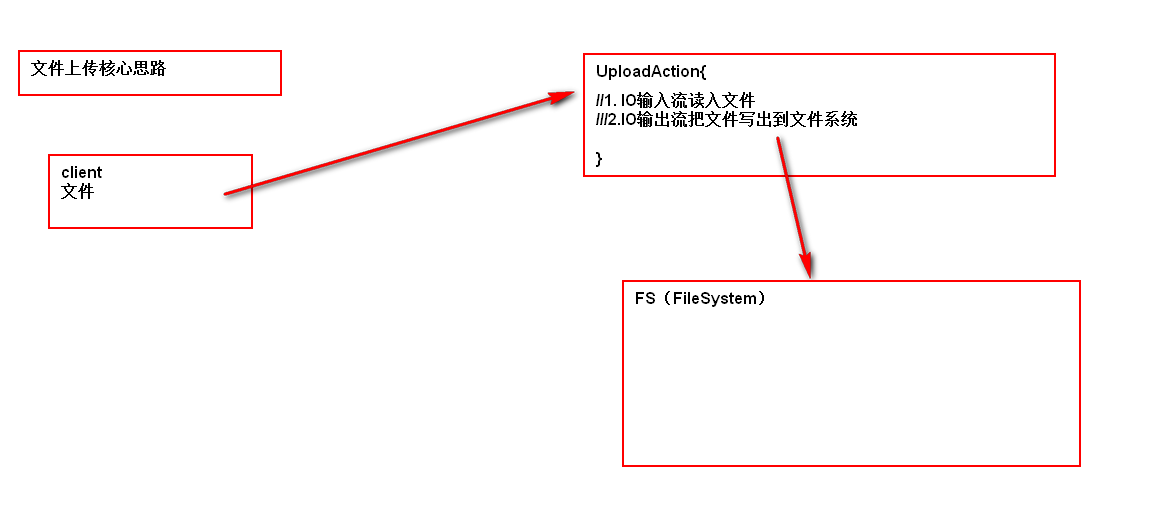
文件上传开发步骤
客户端的处理
enctype="application/x-www-form-urlencoded" 把表单中的文本中的内容,提交到服务器中
1
2
| <form method="post" action="" enctype="application/x-www-form-urlencoded">
</form>
|
enctype="multipart/form-data" 告知服务器端识别客户端传入的文件内容
1
2
3
4
| <form method="post" action="" enctype="multipart/form-data">
<input type="file" name="upload" />
<input type="submit" value="上传" />
</form>
|
服务器端创建一个文件夹,用于保存用户上传的文件
处理客户端上传的文件
1
2
3
4
5
6
7
8
9
10
11
12
13
14
15
16
17
18
19
20
21
22
23
24
25
26
27
28
29
30
31
32
33
34
35
36
37
38
39
40
41
42
43
44
45
46
47
48
49
50
51
52
53
54
55
56
57
58
59
60
61
62
63
64
65
66
67
68
69
70
71
72
73
74
75
76
77
78
79
80
81
82
83
84
85
86
87
88
89
90
91
92
93
94
95
| public class uploadAction extends ActionSupport {
private File upload;
private String uploadFileName;
private String uploadContentType;
private String directory;
public String getDirectory() {
return directory;
}
public void setDirectory(String directory) {
this.directory = directory;
}
public String getUploadContentType() {
return uploadContentType;
}
public void setUploadContentType(String uploadContentType) {
this.uploadContentType = uploadContentType;
}
public String getUploadFileName() {
return uploadFileName;
}
public void setUploadFileName(String uploadFileName) {
this.uploadFileName = uploadFileName;
}
public File getUpload() {
return upload;
}
public void setUpload(File upload) {
this.upload = upload;
}
public String upload() {
try {
System.out.println(uploadContentType);
System.out.println(directory);
FileUtils.copyFile(upload, new File(getRealPath(directory) + "\\" + uploadFileName));
return "uploadOK";
} catch (Exception e) {
e.printStackTrace();
return "uploadError";
}
}
public String getRealPath(String path) {
ServletContext servletContext = ServletActionContext.getServletContext();
String realPath = servletContext.getRealPath(path);
return realPath;
}
}
|
文件上传(重构)
IO操作过于频繁,希望简化IO的处理
Commons-io.jar 提供文件操作的工具类
1
| FileUtils.copyFile(upload, new File(getRealPath(directory) + "\\" + uploadFileName));
|
文件名
如何获得用户上传的文件名
1
2
3
4
5
| private File upload;
private String uploadFileName;
private String uploadContentType;
|
文件路径
如何在web开发中通过相对路径获取绝对路径
1
2
3
| ServletContext sc = ServletActionContext.getServletContext();
String RealPath = ac.getRealPath(“相对路径”);
String RealPath = ac.getRealPath(“/upload”);
|
维护性差
文件目录转移到配置文件中进行配置
1
2
3
| <action name="upload" class="fancylab.hibiscidai.Action.uploadAction" method="upload">
<param name="directory>/upload</param>
</action>
|
Action中声明成员变量即可
1
| private String directory;
|
Struts2中上传的文件默认大小为2M
101838

1
2
|
<constant name="struts.multipart.maxSize" value="2097152000"></constant>
|
下载
/struts-2.3.15.1/docs/WW/docs/stream-result.html stream-result
文件下载的核心思路
102842
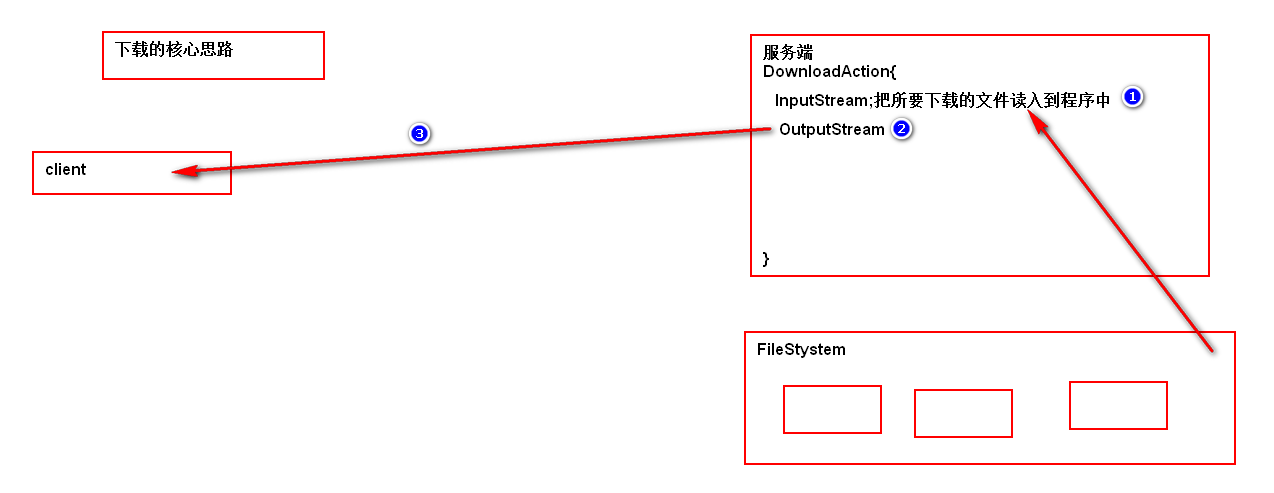
Struts2下载的步骤
extends ActionSupport
1
2
3
4
|
public InputStream getInputStream() throws Exception {
return new FileInputStream(getRealPath(directory) + "\\" + filename);
}
|
1
2
3
4
5
6
| <result type="stream">
<param name="contentType">text/plain</param>
<param name="contentDisposition">attachment;filename=${filename}</param>
</result>
|
文件下载重构(优化)
完成路径的修改
通过getRealPath()方法与Action中为成员变量赋值的方式,完成路径的修改。
下载中如何处理用户需要下载的文件名字
客户通过传递参数的形式,向Action中传递数据,Action中通过成员变量接收数据。
1
2
3
4
5
6
7
8
9
10
11
12
| <ul>
<li>
<a href="<s:url action='download' namespace='/user' />?filename=z.txt">
z.txt
</a>
</li>
<li>
<a href="<s:url action='download' namespace='/user' />?filename=zkf.txt">
zkf.txt
</a>
</li>
</ul>
|
1
2
|
private String filename;
|
解决用户下载之后的文件名
1
2
|
private String filename;
|
1
2
3
4
5
6
7
8
9
| <action name="download" class="com.baizhi.Action.downloadAction">
<param name="directory">/upload</param>
<result type="stream">
<param name="contentType">text/plain</param>
<param name="contentDisposition"> attachment;filename=${filename}</param>
</result>
</action>
|


