Spring,轻量级JavaEE解决方案,是众多优秀设计模式的整合,学习笔记
[TOC]
Spring框架
引言
什么是Spring
轻量级JavaEE解决方案,是众多优秀设计模式的整合
设计模式(公式)
解决一些特定问题的经典代码
Spring框架中主要的设计模式
工厂
代理
模板
工厂模式简介
- 作用:生产对象
- 耦合:代码之间具有强关联性
- 好处:解耦合
- 工厂设计思路:建立一个工厂类,有工厂类负责对象的创建
Spring开发步骤(通过工厂设计模式创建对象)
搭建环境
引入jar包
引入Spring配置文件
放置位置随意,命名随意,默认 ApplicationContext.xml
核心API
ApplicationContext(工厂)
重量级资源,内存多,功能强,一个应用只创建一个,线程安全
接口的实现类
Srping工厂的开发步骤
创建类
配置文件
1
2
| <bean id="userService" class="fancylab.hibiscidai.service.UserServiceImpl">
</bean>
|
通过Spring的工厂类创建对象
1
2
3
4
5
6
7
8
9
10
| @Test
public void testSpring() {
ApplicationContext ac = new ClassPathXmlApplicationContext("/applicationContext.xml");
UserService us = (UserService)ac.getBean("userService");
us.register();
}
|
Spring工厂创建对象的原理
- 读取配置文件
- 获得全限定名
- 通过反射获取对象
1
2
| Class clazz = Class.forName("全限定名");
clazz.newInstance();
|
注入(Injection)
通过Spring的配置文件为对象的成员变量赋值
Set注入
原理
- 通过Spring工厂创建对象
- 调用兑现给的set方法通过配置文件映射进行设值
配置文件中 < property name="id" > 属性要和类的成员变量名对应,并一定要在类中书写setter和getter方法
JDK类型成员变量
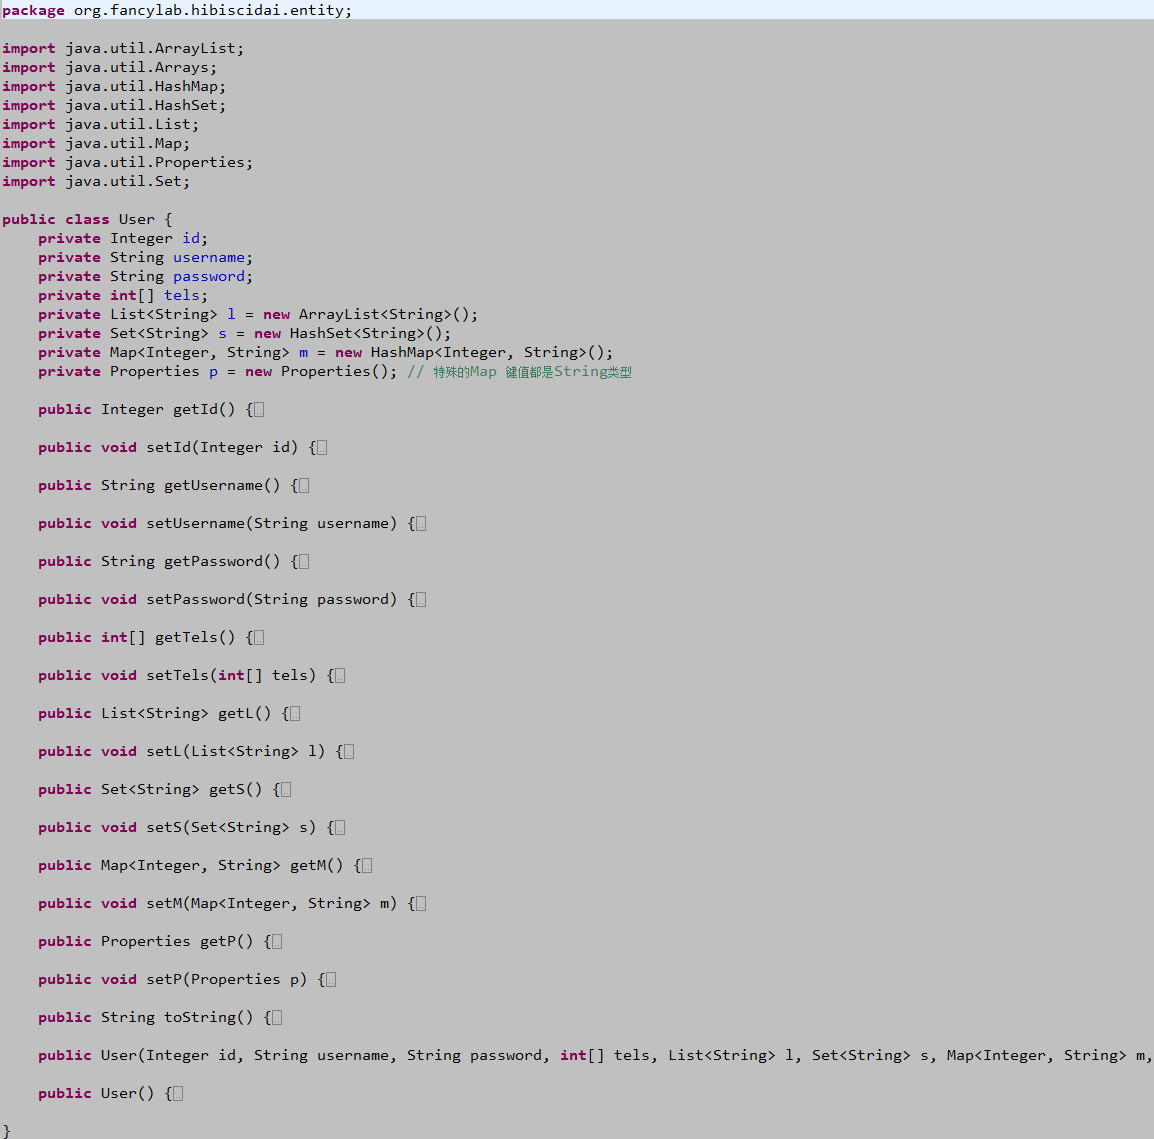
现有 User 类
类结构如下
1
2
3
4
5
6
7
8
9
10
11
12
13
| public class User {
private Integer id;
private String username;
private String password;
private int[] tels;
private List<String> l = new ArrayList<String>();
private Set<String> s = new HashSet<String>();
private Map<Integer, String> m = new HashMap<Integer, String>();
private Properties p = new Properties();
}
|

8种基本类型及String类型
在配置文件中声明如下
1
2
3
4
5
6
7
8
9
10
11
12
13
14
| <bean id="user" class="org.fancylab.hibiscidai.entity.User">
<property name="id">
<value>20</value>
</property>
<property name="username">
<value>小黑</value>
</property>
<property name="password">
<value>123456</value>
</property>
</bean>
|
数组类型的成员变量
1
2
3
4
5
6
7
8
9
|
<property name="tels">
<list>
<value>1</value>
<value>2</value>
<value>3</value>
<value>4</value>
</list>
</property>
|
List类型的成员变量
1
2
3
4
5
6
7
8
9
|
<property name="l">
<list>
<value>xiaohei</value>
<value>xiaohua</value>
<value>xiaobai</value>
<value>xiaowb</value>
</list>
</property>
|
Set类型的成员变量
1
2
3
4
5
6
7
8
|
<property name="s">
<set>
<value>xiao1</value>
<value>xiao2</value>
<value>xiao3</value>
</set>
</property>
|
Map类型的成员变量
1
2
3
4
5
6
7
8
9
10
11
12
13
14
15
16
17
18
19
20
21
22
23
|
<property name="m">
<map>
<entry>
<key>
<value>1</value>
</key>
<value>zkf1</value>
</entry>
<entry>
<key>
<value>2</value>
</key>
<value>zkf2</value>
</entry>
<entry>
<key>
<value>3</value>
</key>
<value>zkf3</value>
</entry>
</map>
</property>
|
Properties类型的成员变量
1
2
3
4
5
6
7
|
<property name="p">
<props>
<prop key="1">value1</prop>
<prop key="2">value2</prop>
</props>
</property>
|
自建(自定义)类型注入成员变量
对于三层架构
1
2
3
4
| dao
daoImpl
service
serviceImpl
|
service 层引用 dao 层作为成员变量
书写创建对象的类
1
2
3
4
5
| public class UserServiceImpl implements UserService {
private UserDao userDao;
}
|
在Spring配置中配置对应的 < bean > 标签
1
2
3
4
5
6
7
8
9
10
11
|
<bean id="userDao" class="org.fancylab.hibiscidai.dao.UserDao">
</bean>
<bean id="userService" class="org.fancylab.hibiscidai.service.impl.UserServiceImpl">
<property name="userDao">
<ref local="userDao" />
</property>
</bean>
|
在目标实体类中定义成员变量,并且在配置文件中进行引入
自动注入
1
2
3
4
5
6
7
|
<bean id="userService" class="org.fancylab.hibiscidai.service.impl.UserServiceImpl" autowire="byType">
</bean>
<bean id="userService" class="org.fancylab.hibiscidai.service.impl.UserServiceImpl" autowire="byName">
</bean>
|
构造方法注入(了解)
spring通过构造方法完成对于成员变量的赋值
前提:提供有参构造
开发步骤
以类 Account 为例
1
2
3
4
5
6
7
8
9
10
| public class Account {
private Integer id;
private String name;
private String password;
private Integer age;
}
|
提供有参构造
1
2
3
4
5
| public Account(Integer id, Integer age) {
super();
this.id = id;
this.age = age;
}
|
spring的配置文件配置
1
2
3
4
5
6
7
8
9
| <bean id="account" class="org.fancylab.hibiscidai.entity.Account">
<constructor-arg type="Integer">
<value>123456</value>
</constructor-arg>
<constructor-arg type="Integer">
<value>18</value>
</constructor-arg>
</bean>
|
有参构造中的成员变量的个数与顺序和构造注入时保持一致
构造方法可以重载
IOC与DI概念
IOC (Inversion of Control) 反转控制
例如 UserServiceImpl
1
2
3
| public class UserServiceImpl {
private UserDao ud = new UserDaoImpl();
}
|
1
2
3
4
| public class UserServiceImpl {
private UserDao ud;
}
|
在配置文件中进行set注入,把成员变量的赋值控制权从代码中转移到配置文件中
DI (dependency injection) 依赖注入
当一个类型需要使用另一个类型时,就意味着他依赖另一个类型,那么就可以把另一个类型作为成员变量通过Spring的配置文件进行赋值。
解耦合
上构造方法注入例中已说明
FactoryBean(接口)
有些简单对象可以通过 new 的方式直接创建
复杂对象不能通过new对象创建,例如 SqlSessionFactory
作用:在Spring的工厂中创建复杂对象
开发步骤
该复杂类实现 FactoryBean 接口
1
2
3
4
5
6
7
8
9
10
11
12
13
14
15
16
17
18
19
20
21
22
23
24
25
26
| public class ConnectionFactory implements FactoryBean {
@Override
public Object getObject() throws Exception {
Class.forName("oracle.jdbc.OracleDriver");
Connection connection = DriverManager.getConnection("jdbc:oracle:thin:@localhost:1521:xe", "hr", "hr");
return connection;
}
@Override
public Class getObjectType() {
return Connection.class;
}
@Override
public boolean isSingleton() {
return false;
}
}
|
Spring配置文件中配置
1
2
3
|
<bean id="conn" class="org.fancylab.hibiscidai.factory.ConnectionFactory">
</bean>
|
获取对象
1
2
3
4
|
ApplicationContext ac = new ClassPathXmlApplicationContext("applicationContext.xml");
Connection conn = (Connection) ac.getBean("conn");
|
通过bean标签的id值,直接创建对象时,拿到的是复杂对象
如果想要拿到原始对象,则需要在Spring创建对象时加上 & 号
1
2
| ConnectionFactory cf = (ConnectionFactory) ac.getBean("&conn");
System.out.println(cf);
|
控制简单对象的创建次数
1
| <bean id="" class="" scope="singleton|prototype" />
|
singleton 默认,简单对象只会被创建一次。
prototype 简单对象每次使用时都会创建新的对象。
Spring工厂的高级特性
工厂创建对象的生命周期
工厂被创建,对象被创建
工厂被关闭,对象被销毁
生命周期方法
init-method
对象中任意定义一个初始化方法·。Spring会在这个对象创建之后,自动调用初始化方法的功能。
destroy-method
对象中任意定义一个销毁方法。Spring会在这个对销毁之前调用销毁方法。
在Account类中声明方法
1
2
3
4
5
6
7
8
9
10
| <bean id="account" class="org.fancylab.hibiscidai.entity.Account"
init-method="init" destroy-method="destory">
<constructor-arg type="Integer">
<value>123456</value>
</constructor-arg>
<constructor-arg type="Integer">
<value>18</value>
</constructor-arg>
</bean>
|
配置信息参数化
作用:把Spring配置文件中,需要修改的jdbc相关参数,提取到一个小的专一化的配置文件中
好处:利于后续的维护
开发步骤
准备小配置文件
创建文件 jdbc.properties 文件要以 .properties 结尾
1
2
3
4
| driverclassname=oracle.jdbc.OracleDriver
url=jdbc:oracle:thin:@localhost:1521:xe
name=hr
password=hr
|
与spring配置文件整合
1
2
3
4
5
6
7
8
9
10
11
12
| <beans xmlns="http://www.springframework.org/schema/beans"
xmlns:xsi="http://www.w3.org/2001/XMLSchema-instance"
xmlns:context="http://www.springframework.org/schema/context"
xsi:schemaLocation="http://www.springframework.org/schema/beans
http://www.springframework.org/schema/beans/spring-beans-3.2.xsd
http://www.springframework.org/schema/context
http://www.springframework.org/schema/context/spring-context-3.2.xsd
">
<context:property-placeholder location="/jdbc.properties" />
|
其中,引入context标签
1
| xmlns:context="http://www.springframework.org/schema/context"
|
1
2
| http://www.springframework.org/schema/context
http://www.springframework.org/schema/context/spring-context-3.2.xsd
|
通过占位符替换Spring配置文件中的内容
1
2
3
4
5
6
7
8
9
10
11
12
13
14
15
16
|
<bean id="conn" class="org.fancylab.hibiscidai.factory.ConnectionFactory">
<property name="driverclassname">
<value>${driverclassname}</value>
</property>
<property name="url">
<value>${url}</value>
</property>
<property name="name">
<value>${name}</value>
</property>
<property name="password">
<value>${password}</value>
</property>
</bean>
|
AOP(Aspect Oriented Program) | 面向切面编程
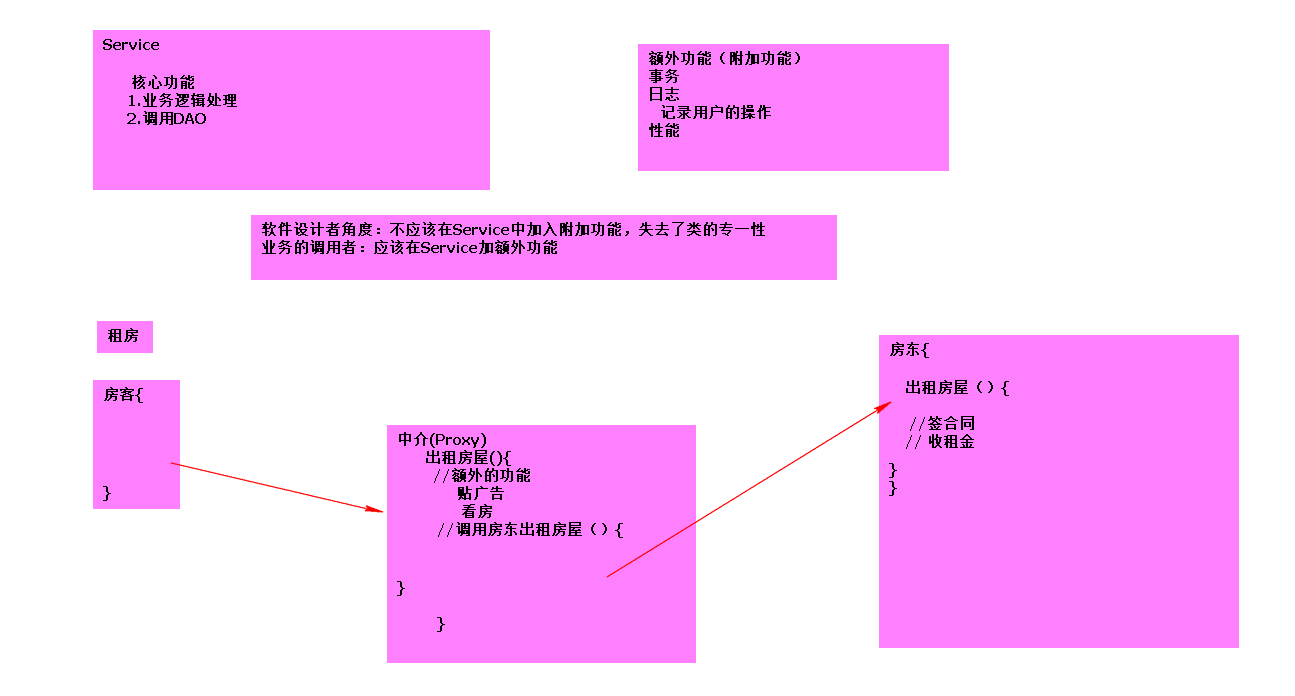
静态代理设计模式(Proxy)

概念
只做核心功能
原始对象中的方法,只做核心功能
事务 日志 性能
原始对象+额外功能+与原始对象实现相同的接口
利于维护
其他
学习源码HibisciDai/TestSpring


