
Hadoop运行环境搭建
[TOC]
Hadoop运行环境搭建
虚拟机环境的准备
克隆虚拟机
准备一个安装好的虚拟机,具体参考Linux基础篇。
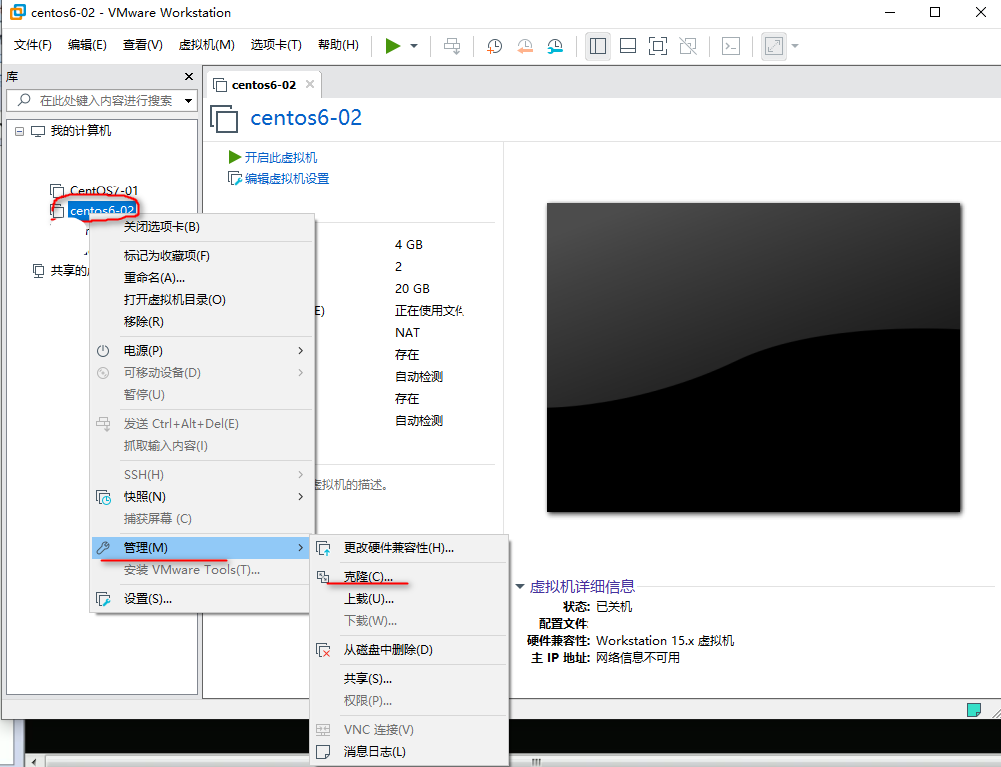


修改克隆虚拟机的静态IP
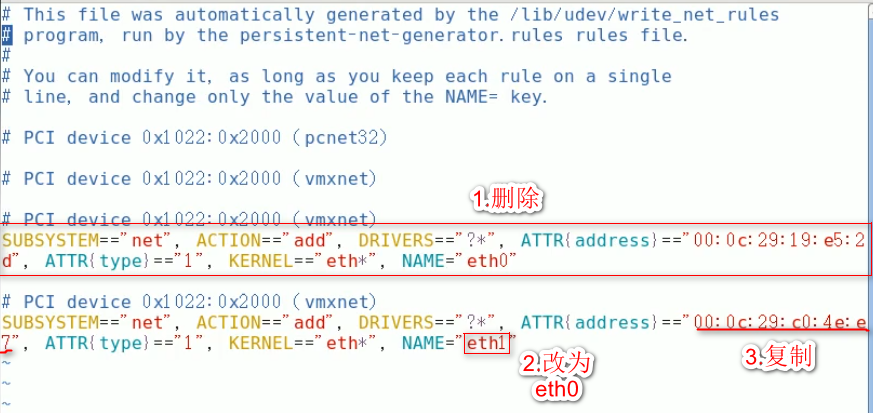
进入系统打开终端
1
| $ vim /etc/udev/rules.d/70-persistent-net.rules
|
1
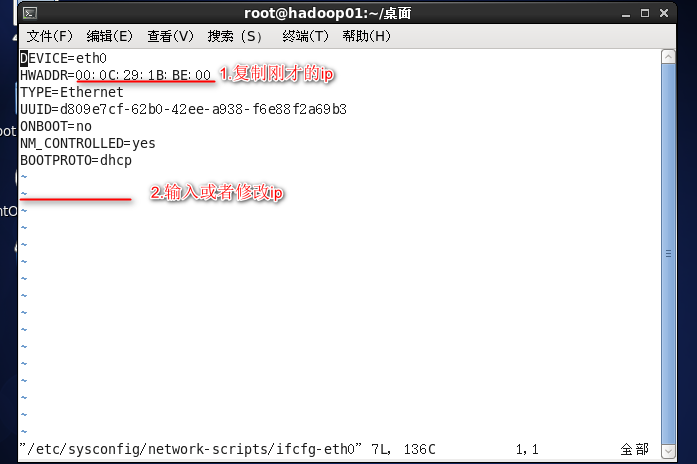
| $ vim /etc/sysconfig/network-scripts/ifcfg-eth0
|
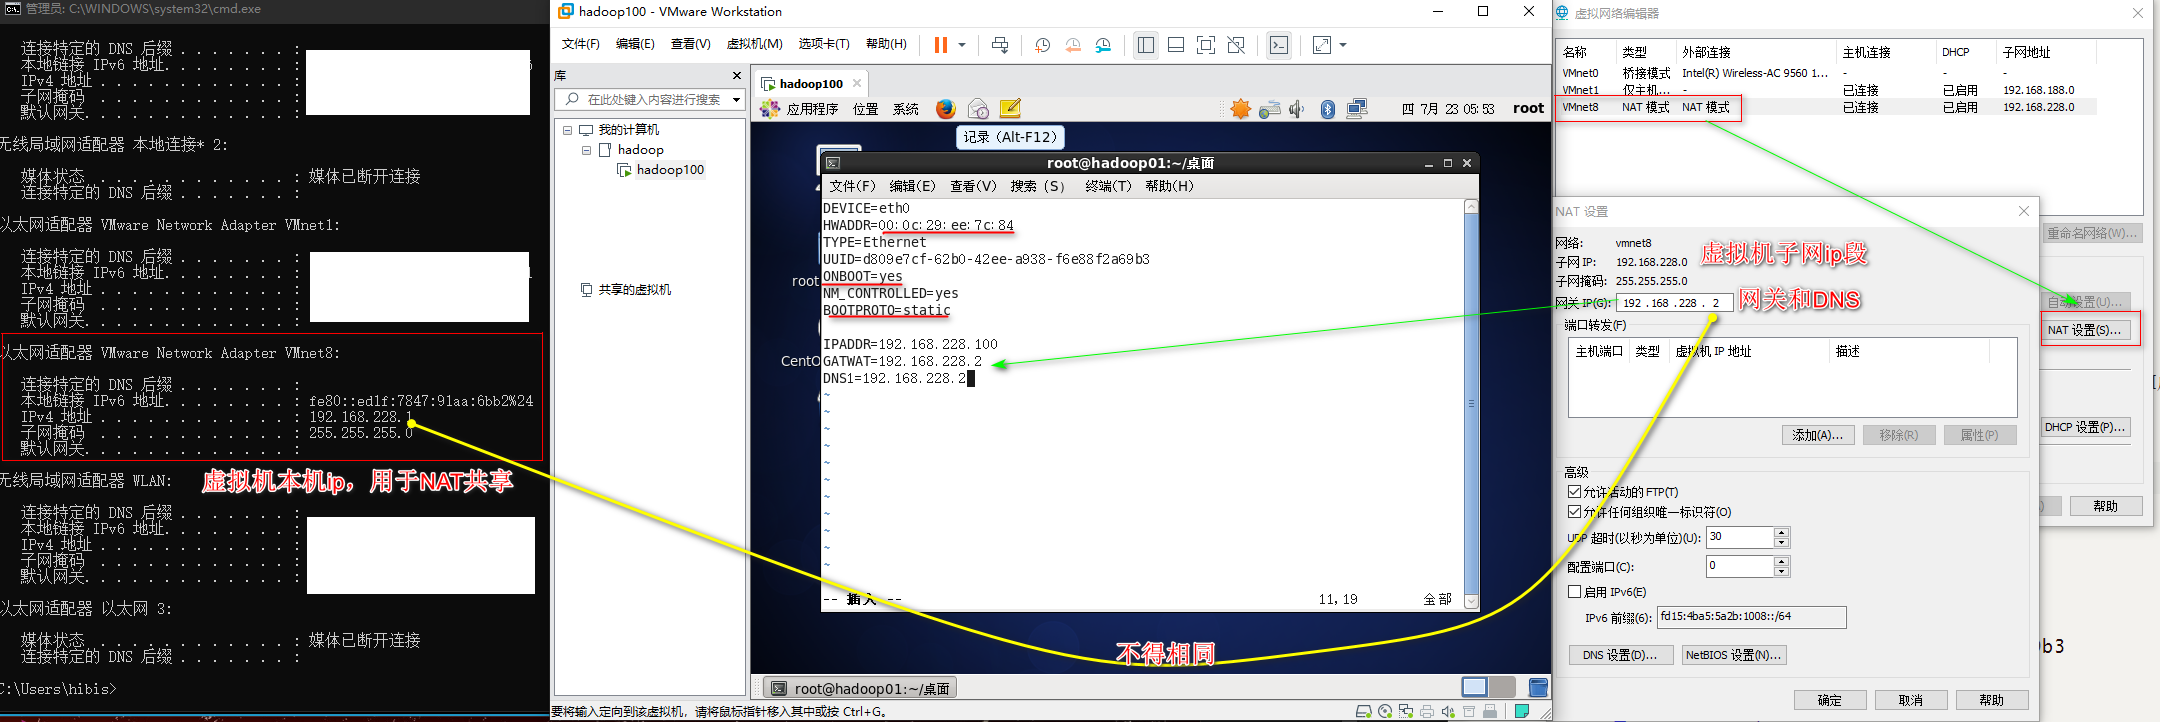
打开虚拟机网络编辑器查看NAT模式的子网IP段,然后本机查看VM虚拟网卡的ip(为网关和DNS)。
1
2
3
4
5
6
7
8
9
10
11
| DEVICE=eth0
HWADDR=00:0c:29:ee:7c:84
TYPE=Ethernet
UUID=d809e7cf-62b0-42ee-a938-f6e88f2a69b3
ONBOOT=yes
NM_CONTROLLED=yes
BOOTPROTO=static
IPADDR=192.168.228.100
GATWAT=192.168.228.2
DNS1=192.168.228.2
|
复制新的虚拟机之后需要自动生成一个网络连接然后再删除原有的eth1,目的是为了生成新的mac物理地址。
修改主机名
1
| $ vim /etc/sysconfig/network
|
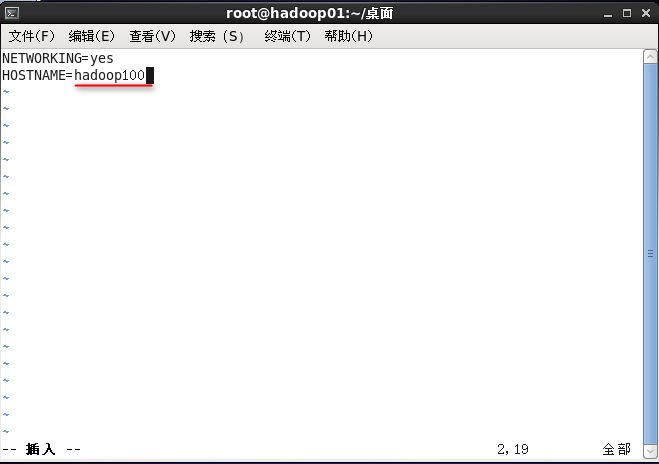
配置映射关系
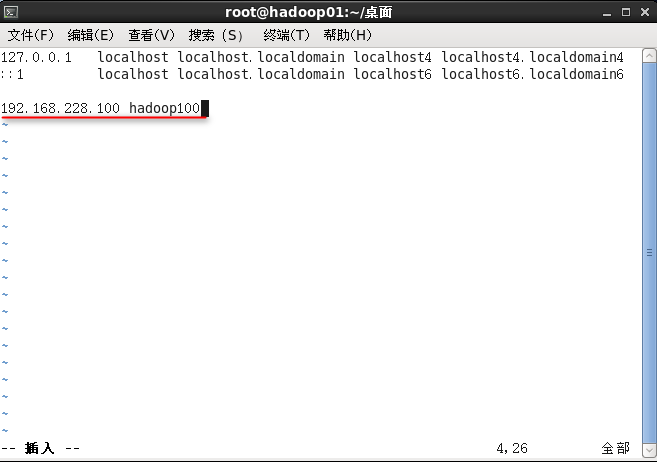
重启机器更新服务设置,输入ifconfig检查ip,ping本机ip检查联通性。
windows下修改映射关系:打开系统目录:c:/windows/system32/drivers/etc找到hosts文件,打开hosts文件并在最后面添加一条记录,例如:192.168.228.100 hadoop100
关闭防火墙
1
| $ chkconfig iptables off
|
创建atguigu用户
1
2
3
| $ useradd atguigu
$ passwd atguigu
123456
|
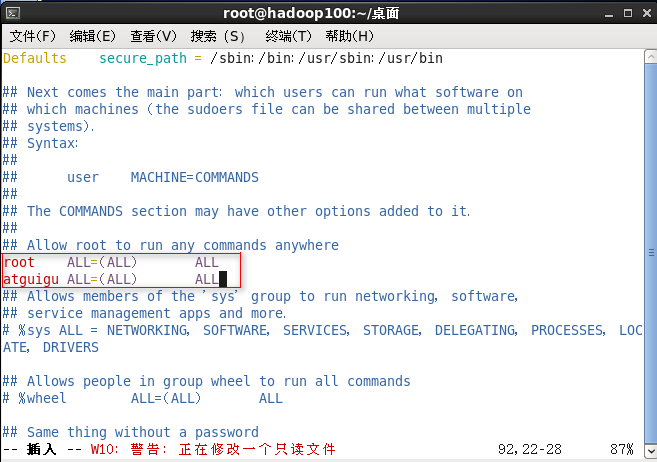
配置atguigu用户具有root权限
1
2
3
4
5
6
7
| //root权限
$ chmod 644 /etc/sudoers
$ vim /etc/sudoers
root ALL=(ALL) ALL
atguigu ALL=(ALL) ALL
|
在/opt目录下创建文件夹
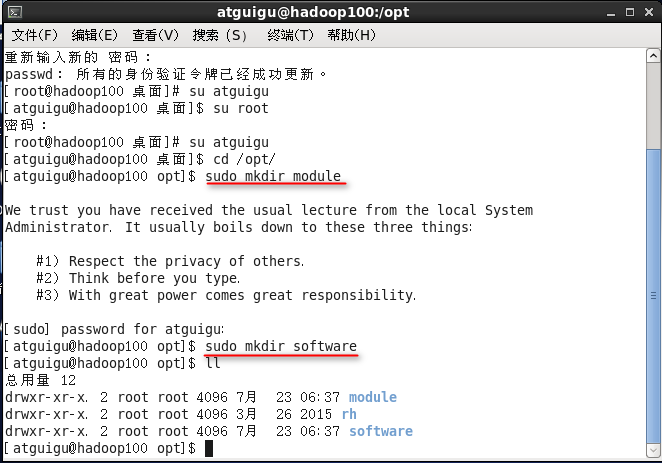
(1)在/opt目录下创建module、software文件夹
1
2
3
4
5
6
7
8
9
10
| atguigu登录
$ cd /opt/
$ mkdir software
/opt属于root用户,不能创建
$ sudo mkdir module
$ sudo mkdir software
$ sudo rm -rf rh/
|
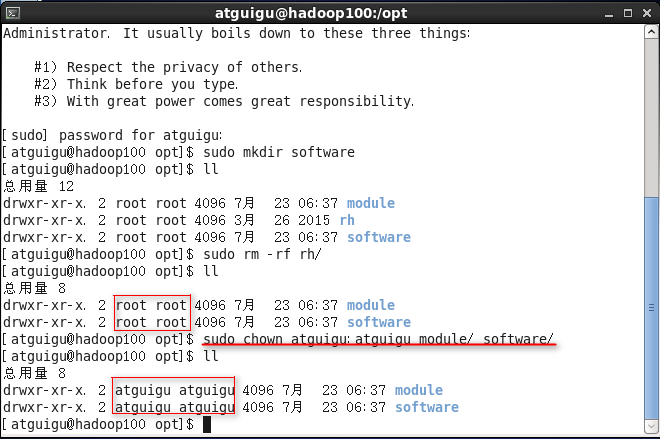
(2)修改module、software文件夹的所有者cd
1
| $ sudo chown atguigu:atguigu module/ software/
|
安装JDK
/opt/software/
jdk-8u144-linux-x64.tar.gz
1
2
3
| /opt/software/文件夹下
$ tar -zxvf jdk-8u144-linux-x64.tar.gz -C /opt/module/
|
1
2
3
4
5
6
7
8
9
10
11
12
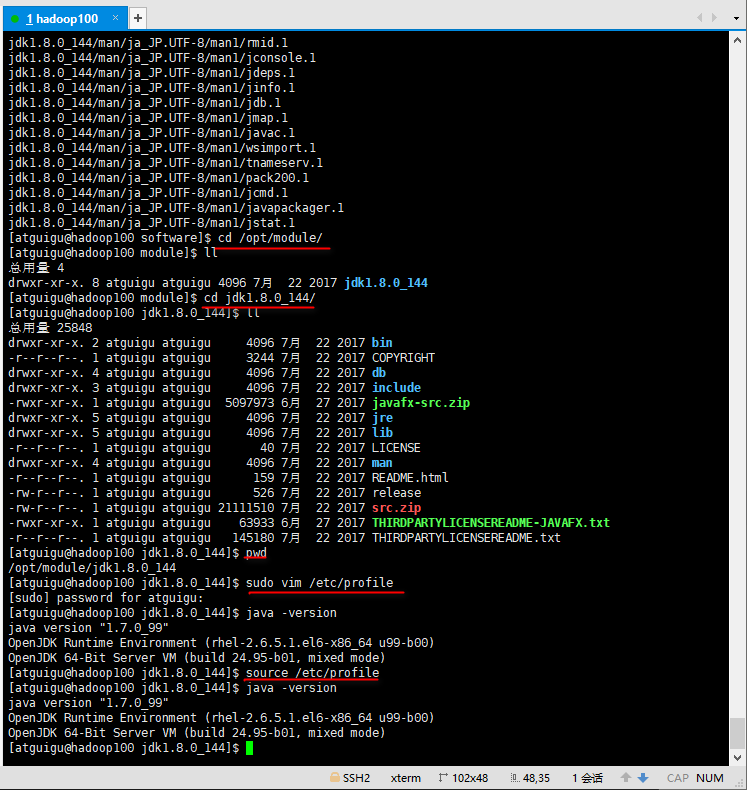
| $ cd /opt/module/
$ cd jdk1.8.0_144/
$ pwd
/opt/module/jdk1.8.0_144
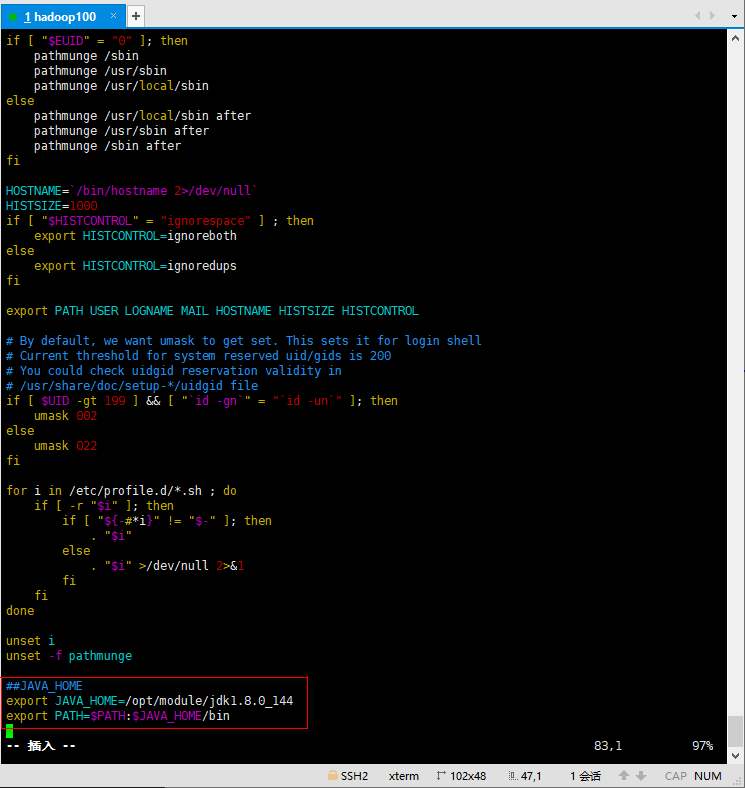
$ sudo vim /etc/profile
$ shift + G 文档末尾
export JAVA_HOME=/opt/module/jdk1.8.0_144
export PATH=$PATH:$JAVA_HOME/bin
|
1
2
3
| $ java -version
$ source /etc/profile
$ java -version
|
安装Hadoop
/opt/software/:
hadoop-2.7.2.tar.gz
1
2
| $ cd /opt/software/
$ tar -zxvf hadoop-2.7.2.tar.gz -C /opt/module/
|
1
2
3
4
5
6
7
8
9
10
| $ cd /opt/module/hadoop-2.7.2/
$ pwd
/opt/module/hadoop-2.7.2
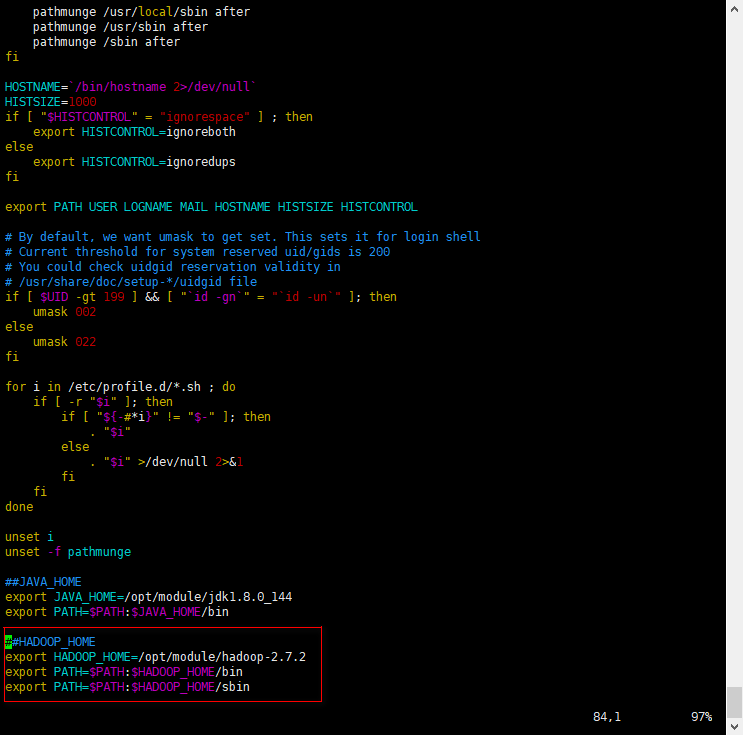
$ sudo vim /etc/profile
export HADOOP_HOME=/opt/module/hadoop-2.7.2
export PATH=$PATH$HADOOP_HOME/bin
export PATH=$PATH$HADOOP_HOME/sbin
|
1
2
3
| $ hadoop
$ source /etc/profile
hadoop
|
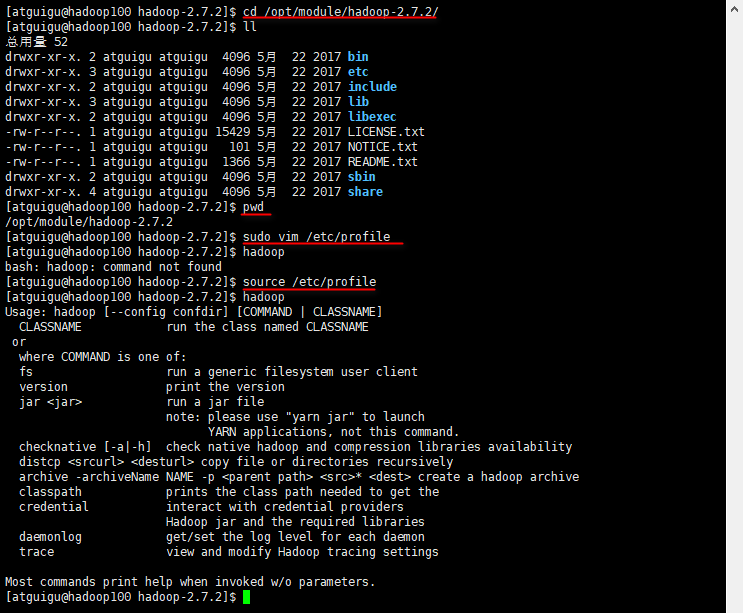
Hadoop目录结构
1
2
3
4
5
6
7
8
9
10
11
12
13
14
| $ cd /opt/module/hadoop-2.7.2/
ll
总用量 52
drwxr-xr-x. 2 atguigu atguigu 4096 5月 22 2017 bin
drwxr-xr-x. 3 atguigu atguigu 4096 5月 22 2017 etc
drwxr-xr-x. 2 atguigu atguigu 4096 5月 22 2017 include
drwxr-xr-x. 3 atguigu atguigu 4096 5月 22 2017 lib
drwxr-xr-x. 2 atguigu atguigu 4096 5月 22 2017 libexec
-rw-r--r--. 1 atguigu atguigu 15429 5月 22 2017 LICENSE.txt
-rw-r--r--. 1 atguigu atguigu 101 5月 22 2017 NOTICE.txt
-rw-r--r--. 1 atguigu atguigu 1366 5月 22 2017 README.txt
drwxr-xr-x. 2 atguigu atguigu 4096 5月 22 2017 sbin
drwxr-xr-x. 4 atguigu atguigu 4096 5月 22 2017 share
|
(1)bin目录:存放对Hadoop相关服务(HDFS,YARN)进行操作的脚本
(2)etc目录:Hadoop的配置文件目录,存放Hadoop的配置文件
(3)lib目录:存放Hadoop的本地库(对数据进行压缩解压缩功能)
(4)sbin目录:存放启动或停止Hadoop相关服务的脚本
(5)share目录:存放Hadoop的依赖jar包、文档、和官方案例
(6)include目录:其他代码文件
安装完成之后可以克隆虚拟机然后只需要修改ip和主机名就可以。


