PyTorch-26H-6
PyTorch-26H-6
主页:https://www.freecodecamp.org/news/learn-pytorch-for-deep-learning-in-day/
youtub:https://youtu.be/V_xro1bcAuA
github:https://github.com/mrdbourke/pytorch-deep-learning
Learn PyTorch for Deep Learning: Zero to Mastery book:https://www.learnpytorch.io/
PyTorch documentation:https://pytorch.org/docs/stable/index.html
本节回答以下问题:“如何将我的笔记本代码转换为 Python 脚本?”
为此,我们将把 上一节 自定义数据集 的笔记本中最有用的代码单元转换为一系列 Python 脚本,并保存到名为的目录中going_modular。
What is going modular? 什么是模块化?
模块化涉及将笔记本代码(来自 Jupyter Notebook 或 Google Colab 笔记本)转换为一系列提供类似功能的不同 Python 脚本。
例如,我们可以将笔记本代码从一系列单元格转换为以下 Python 文件:
data_setup.py: 如果需要,可以准备并下载数据的文件。engine.py:包含各种训练功能的文件。model_builder.py或者model.py:一个用于创建 PyTorch 模型的文件。train.py:一个利用所有其他文件并训练目标 PyTorch 模型的文件。utils.py:专用于实用功能的文件。
注意:上述文件的命名和布局取决于您的用例和代码要求。Python 脚本与单个笔记本单元一样通用,这意味着您可以为几乎任何类型的功能创建一个脚本。
Why would you want to go modular? 为何要采用模块化?
笔记本非常适合快速迭代探索和运行实验。
然而,对于更大规模的项目,您可能会发现 Python 脚本更具可重复性且更易于运行。
尽管这是一个有争议的话题,但像Netflix 这样的公司已经展示了他们如何使用笔记本编写生产代码。
生产代码是运行以向某人或某物提供服务的代码。
例如,如果有一个在线运行的应用程序,其他人可以访问和使用,则运行该应用程序的代码被视为生产代码。
像 fast.ai nb-dev(笔记本开发的缩写)这样的库,能够使用 Jupyter Notebooks 编写整个 Python 库(包括文档)。
Pros and cons of notebooks vs Python scripts 笔记本与 Python 脚本的优缺点
| 优点 | 缺点 | |
|---|---|---|
| Notebooks | 易于实验/入门 | 版本控制可能很困难 |
| 易于分享(例如 Google Colab 笔记本的链接) | 难以仅使用特定部件 | |
| 非常直观 | 文本和图形可能会妨碍代码 | |
| Python 脚本 | 可以将代码打包在一起(节省在不同的笔记本中重写类似代码的麻烦) | 实验并不直观(通常必须运行整个脚本而不是一个单元格) |
| 可以使用 git 进行版本控制 | ||
| 许多开源项目使用脚本 | ||
| 较大的项目可以在云供应商上运行(对笔记本的支持不太多) |
My workflow 工作流程
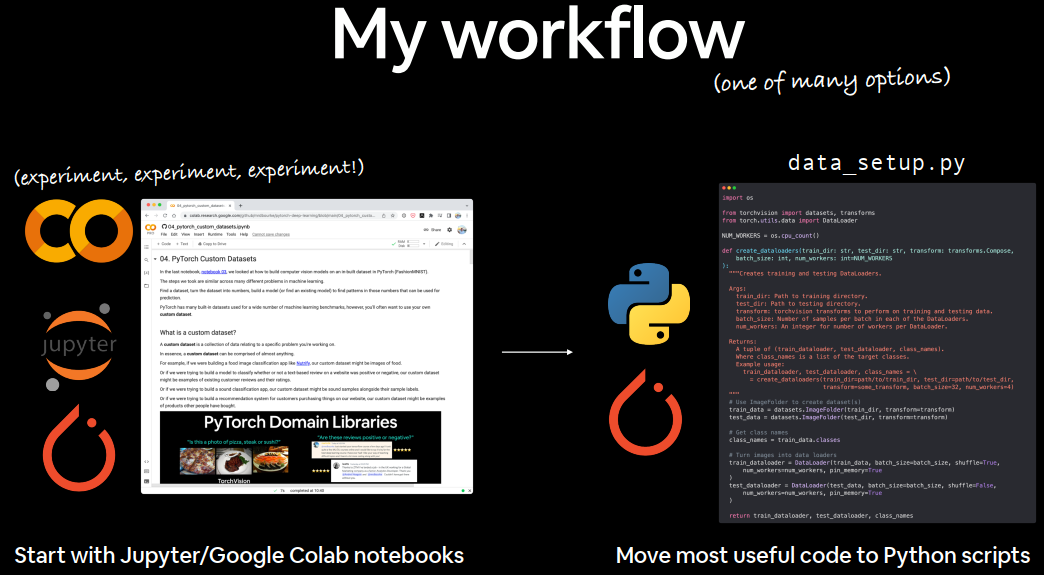
通常在 Jupyter/Google Colab 笔记本中启动机器学习项目,以便快速进行实验和可视化。
然后,当我完成一些工作时,我会将最有用的代码片段移到 Python 脚本中。

编写机器学习代码有许多可能的工作流程。有些人喜欢从脚本开始,而其他人(比如我)则喜欢从笔记本开始,然后再转到脚本。
PyTorch in the wild PyTorch 的应用
有许多基于 PyTorch 的 ML 项目的代码存储库都有关于如何以 Python 脚本的形式运行 PyTorch 代码的说明。
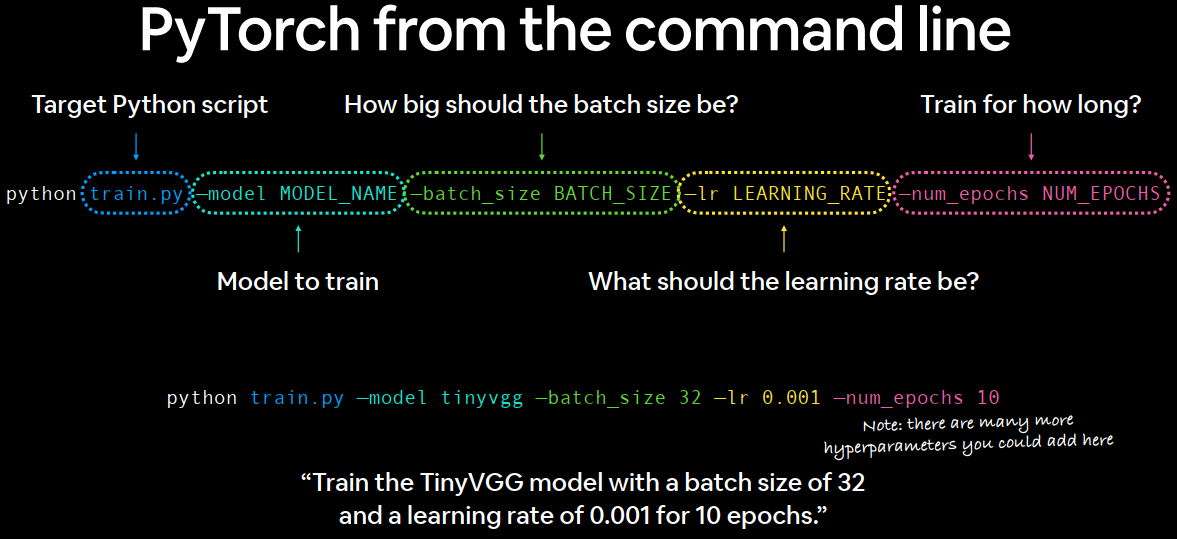
例如,可能会被指示在终端/命令行中运行如下代码来训练模型:
1 | python train.py --model MODEL_NAME --batch_size BATCH_SIZE --lr LEARNING_RATE --num_epochs NUM_EPOCHS |

train.py在命令行上运行具有各种超参数设置的 PyTorch脚本。
在这种情况下,train.py目标 Python 脚本可能包含训练 PyTorch 模型的函数。
并且--model、--batch_size、--lr和--num_epochs被称为参数标志。
您可以将它们设置为您喜欢的任何值,如果它们兼容train.py,它们就会起作用,如果不兼容,它们就会出错。
例如,假设我们想要使用笔记本 04 训练我们的 TinyVGG 模型 10 个时期,批量大小为 32,学习率为 0.001:
1 | python train.py --model tinyvgg --batch_size 32 --lr 0.001 --num_epochs 10 |
train.py您可以根据需要在脚本中设置任意数量的这些参数标志。
用于训练最先进的计算机视觉模型的 PyTorch 博客文章采用了这种风格。
What we’re going to cover
本节的主要概念是:将有用的笔记本代码单元转换为可重复使用的 Python 文件。
这样做可以节省我们一遍又一遍编写相同代码的时间。
此部分有两个笔记本:
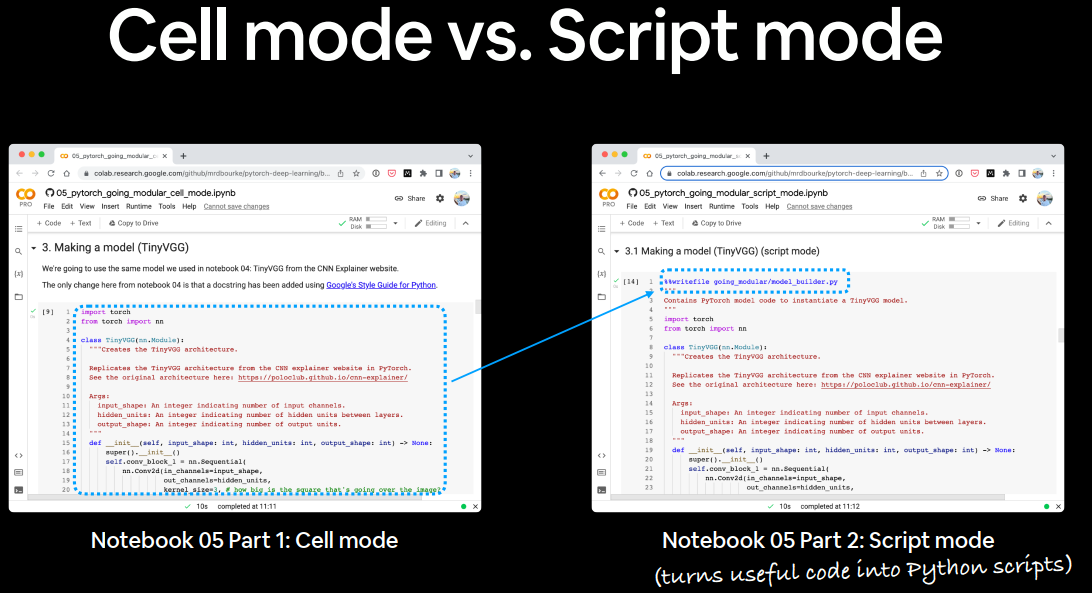
- 走向模块化:第 1 部分(单元模式) ——此笔记本作为传统的 Jupyter Notebook/Google Colab 笔记本运行,是笔记本 04的浓缩版。
- 走向模块化:第 2 部分(脚本模式) ——这个笔记本与第 1 部分相同,但增加了将每个主要部分转换为 Python 脚本的功能,例如
data_setup.py和train.py。
本文档中的文本重点介绍代码单元 05. 走向模块化:第 2 部分(脚本模式),即%%writefile ...位于顶部的代码单元。
Why two parts?
因为有时学习某事物的最好方法是观察它与其他事物的不同之处。
如果你并排运行每个笔记本,你会看到它们的不同之处,这就是关键的学习内容所在。

What we’re working towards
- 使用命令行中的一行代码即可训练我们在笔记本 04(Food Vision Mini)中构建的模型:python train.py。
- 可重用 Python 脚本的目录结构,例如:
1 | going_modular/ |
Things to note
- 文档字符串- 编写可重复且易于理解的代码非常重要。考虑到这一点,我们将放入脚本中的每个函数/类都是根据 Google 的Python 文档字符串样式创建的。
- 在脚本顶部导入——由于我们要创建的所有 Python 脚本都可以被视为一个小程序,因此所有脚本都需要在脚本开始时导入它们的输入模块,例如:
1 | # Import modules required for train.py |
0. Cell mode vs. script mode 单元格模式与脚本模式
单元格模式笔记本,例如05. 走向模块化第 1 部分(单元格模式)是一个正常运行的笔记本,笔记本中的每个单元格都是代码或 markdown。
脚本模式笔记本(例如05. Going Modular Part 2(脚本模式))与单元格模式笔记本非常相似,但是,许多代码单元格可以转换为 Python 脚本。
注意:您不需要通过笔记本创建 Python 脚本,您可以直接通过 IDE(集成开发环境)创建它们,例如VS Code。将脚本模式笔记本作为本节的一部分只是为了演示从笔记本到 Python 脚本的一种方法。
1. Get data 获取数据
获取 05 个笔记本中每个笔记本的数据的方式与获取04 个笔记本中的数据的方式相同。
通过 Python 的模块调用 GitHubrequests下载.zip文件并解压。
1 | import os |
这样就会产生一个名为 data 的文件,其中包含另一个名为的目录,pizza_steak_sushi其中包含标准图像分类格式的披萨、牛排和寿司图像。
1 | data/ |
2. Create Datasets and DataLoaders (data_setup.py) 创建数据集和数据加载器(data_setup.py)
一旦我们获得了数据,我们就可以将其转换为 PyTorchDataset 的和 DataLoader(一个用于训练数据,一个用于测试数据)。
我们将有用 Dataset 和 DataLoader 创建的代码转换为一个名为的函数create_dataloaders()。
我们使用以下行将其写入文件%%writefile going_modular/data_setup.py。
data_setup.py
1 | %%writefile going_modular/data_setup.py |
如果我们想要制作 DataLoader,我们现在可以使用其中的函数,data_setup.py如下所示:
1 | # Import data_setup.py |
3. Making a model (model_builder.py)制作模型(model_builder.py)
在过去的几本笔记本(笔记本 03 和笔记本 04)中,我们已经构建了 TinyVGG 模型几次。
因此将模型放入其文件中以便我们可以反复重复使用它是很有意义的。
我们将TinyVGG()模型类放入脚本中,如下所示%%writefile going_modular/model_builder.py:
model_builder.py
1 | %%writefile going_modular/model_builder.py |
现在,我们不用每次都从头开始编写 TinyVGG 模型,而是可以使用以下方法导入它:
1 | import torch |
4. Creating train_step() and test_step() functions and train() to combine them 创建train_step()和test_step()函数并将train()它们组合起来
我们在笔记本 04中写了几个训练函数:
train_step()- 接受一个模型、一个DataLoader、一个损失函数和一个优化器,并在DataLoader上训练模型。test_step()- 接受一个模型、一个DataLoader和一个损失函数,并在DataLoader上评估模型。train()- 在给定的周期数内同时执行 1. 和 2.,并返回结果字典。
由于这些将成为我们模型训练的引擎,我们可以将它们全部放入一个 Python 脚本中,engine.py并使用以下行进行调用%%writefile going_modular/engine.py:
engine.py1
2
3
4
5
6
7
8
9
10
11
12
13
14
15
16
17
18
19
20
21
22
23
24
25
26
27
28
29
30
31
32
33
34
35
36
37
38
39
40
41
42
43
44
45
46
47
48
49
50
51
52
53
54
55
56
57
58
59
60
61
62
63
64
65
66
67
68
69
70
71
72
73
74
75
76
77
78
79
80
81
82
83
84
85
86
87
88
89
90
91
92
93
94
95
96
97
98
99
100
101
102
103
104
105
106
107
108
109
110
111
112
113
114
115
116
117
118
119
120
121
122
123
124
125
126
127
128
129
130
131
132
133
134
135
136
137
138
139
140
141
142
143
144
145
146
147
148
149
150
151
152
153
154
155
156
157
158
159
160
161
162
163
164
165
166
167
168
169
170
171
172
173
174
175
176
177
178
179
180
181
182
183
184
185
186
187
188
189
190
191
192
193%%writefile going_modular/engine.py
"""
Contains functions for training and testing a PyTorch model.
"""
import torch
from tqdm.auto import tqdm
from typing import Dict, List, Tuple
def train_step(model: torch.nn.Module,
dataloader: torch.utils.data.DataLoader,
loss_fn: torch.nn.Module,
optimizer: torch.optim.Optimizer,
device: torch.device) -> Tuple[float, float]:
"""Trains a PyTorch model for a single epoch.
Turns a target PyTorch model to training mode and then
runs through all of the required training steps (forward
pass, loss calculation, optimizer step).
Args:
model: A PyTorch model to be trained.
dataloader: A DataLoader instance for the model to be trained on.
loss_fn: A PyTorch loss function to minimize.
optimizer: A PyTorch optimizer to help minimize the loss function.
device: A target device to compute on (e.g. "cuda" or "cpu").
Returns:
A tuple of training loss and training accuracy metrics.
In the form (train_loss, train_accuracy). For example:
(0.1112, 0.8743)
"""
# Put model in train mode
model.train()
# Setup train loss and train accuracy values
train_loss, train_acc = 0, 0
# Loop through data loader data batches
for batch, (X, y) in enumerate(dataloader):
# Send data to target device
X, y = X.to(device), y.to(device)
# 1. Forward pass
y_pred = model(X)
# 2. Calculate and accumulate loss
loss = loss_fn(y_pred, y)
train_loss += loss.item()
# 3. Optimizer zero grad
optimizer.zero_grad()
# 4. Loss backward
loss.backward()
# 5. Optimizer step
optimizer.step()
# Calculate and accumulate accuracy metric across all batches
y_pred_class = torch.argmax(torch.softmax(y_pred, dim=1), dim=1)
train_acc += (y_pred_class == y).sum().item()/len(y_pred)
# Adjust metrics to get average loss and accuracy per batch
train_loss = train_loss / len(dataloader)
train_acc = train_acc / len(dataloader)
return train_loss, train_acc
def test_step(model: torch.nn.Module,
dataloader: torch.utils.data.DataLoader,
loss_fn: torch.nn.Module,
device: torch.device) -> Tuple[float, float]:
"""Tests a PyTorch model for a single epoch.
Turns a target PyTorch model to "eval" mode and then performs
a forward pass on a testing dataset.
Args:
model: A PyTorch model to be tested.
dataloader: A DataLoader instance for the model to be tested on.
loss_fn: A PyTorch loss function to calculate loss on the test data.
device: A target device to compute on (e.g. "cuda" or "cpu").
Returns:
A tuple of testing loss and testing accuracy metrics.
In the form (test_loss, test_accuracy). For example:
(0.0223, 0.8985)
"""
# Put model in eval mode
model.eval()
# Setup test loss and test accuracy values
test_loss, test_acc = 0, 0
# Turn on inference context manager
with torch.inference_mode():
# Loop through DataLoader batches
for batch, (X, y) in enumerate(dataloader):
# Send data to target device
X, y = X.to(device), y.to(device)
# 1. Forward pass
test_pred_logits = model(X)
# 2. Calculate and accumulate loss
loss = loss_fn(test_pred_logits, y)
test_loss += loss.item()
# Calculate and accumulate accuracy
test_pred_labels = test_pred_logits.argmax(dim=1)
test_acc += ((test_pred_labels == y).sum().item()/len(test_pred_labels))
# Adjust metrics to get average loss and accuracy per batch
test_loss = test_loss / len(dataloader)
test_acc = test_acc / len(dataloader)
return test_loss, test_acc
def train(model: torch.nn.Module,
train_dataloader: torch.utils.data.DataLoader,
test_dataloader: torch.utils.data.DataLoader,
optimizer: torch.optim.Optimizer,
loss_fn: torch.nn.Module,
epochs: int,
device: torch.device) -> Dict[str, List]:
"""Trains and tests a PyTorch model.
Passes a target PyTorch models through train_step() and test_step()
functions for a number of epochs, training and testing the model
in the same epoch loop.
Calculates, prints and stores evaluation metrics throughout.
Args:
model: A PyTorch model to be trained and tested.
train_dataloader: A DataLoader instance for the model to be trained on.
test_dataloader: A DataLoader instance for the model to be tested on.
optimizer: A PyTorch optimizer to help minimize the loss function.
loss_fn: A PyTorch loss function to calculate loss on both datasets.
epochs: An integer indicating how many epochs to train for.
device: A target device to compute on (e.g. "cuda" or "cpu").
Returns:
A dictionary of training and testing loss as well as training and
testing accuracy metrics. Each metric has a value in a list for
each epoch.
In the form: {train_loss: [...],
train_acc: [...],
test_loss: [...],
test_acc: [...]}
For example if training for epochs=2:
{train_loss: [2.0616, 1.0537],
train_acc: [0.3945, 0.3945],
test_loss: [1.2641, 1.5706],
test_acc: [0.3400, 0.2973]}
"""
# Create empty results dictionary
results = {"train_loss": [],
"train_acc": [],
"test_loss": [],
"test_acc": []
}
# Loop through training and testing steps for a number of epochs
for epoch in tqdm(range(epochs)):
train_loss, train_acc = train_step(model=model,
dataloader=train_dataloader,
loss_fn=loss_fn,
optimizer=optimizer,
device=device)
test_loss, test_acc = test_step(model=model,
dataloader=test_dataloader,
loss_fn=loss_fn,
device=device)
# Print out what's happening
print(
f"Epoch: {epoch+1} | "
f"train_loss: {train_loss:.4f} | "
f"train_acc: {train_acc:.4f} | "
f"test_loss: {test_loss:.4f} | "
f"test_acc: {test_acc:.4f}"
)
# Update results dictionary
results["train_loss"].append(train_loss)
results["train_acc"].append(train_acc)
results["test_loss"].append(test_loss)
results["test_acc"].append(test_acc)
# Return the filled results at the end of the epochs
return results
可以通过以下方式从中导入函数:
1 | # Import engine.py |
5. Creating a function to save the model (utils.py) 创建一个函数来保存模型(utils.py)
通常您会希望在训练期间或训练后保存模型。
由于我们已经在之前的笔记本中编写了几次保存模型的代码,因此将其转换为函数并将其保存到文件中是有意义的。
将辅助函数存储在名为 (utilities 的缩写) 的文件中是一种常见的做法utils.py。
我们将函数保存到名为以下行的save_model()文件中:utils.py%%writefile going_modular/utils.py
utils.py1
2
3
4
5
6
7
8
9
10
11
12
13
14
15
16
17
18
19
20
21
22
23
24
25
26
27
28
29
30
31
32
33
34
35
36%%writefile going_modular/utils.py
"""
Contains various utility functions for PyTorch model training and saving.
"""
import torch
from pathlib import Path
def save_model(model: torch.nn.Module,
target_dir: str,
model_name: str):
"""Saves a PyTorch model to a target directory.
Args:
model: A target PyTorch model to save.
target_dir: A directory for saving the model to.
model_name: A filename for the saved model. Should include
either ".pth" or ".pt" as the file extension.
Example usage:
save_model(model=model_0,
target_dir="models",
model_name="05_going_modular_tingvgg_model.pth")
"""
# Create target directory
target_dir_path = Path(target_dir)
target_dir_path.mkdir(parents=True,
exist_ok=True)
# Create model save path
assert model_name.endswith(".pth") or model_name.endswith(".pt"), "model_name should end with '.pt' or '.pth'"
model_save_path = target_dir_path / model_name
# Save the model state_dict()
print(f"[INFO] Saving model to: {model_save_path}")
torch.save(obj=model.state_dict(),
f=model_save_path)
现在,如果我们想使用我们的save_model()函数,而不必重新编写它,我们可以导入它并通过以下方式使用它:
1 | # Import utils.py |
6. Train, evaluate and save the model (train.py)训练、评估并保存模型(train.py)
如前所述,您经常会遇到将所有功能组合在一个train.py文件中的 PyTorch 存储库。
该文件本质上是在说“使用任何可用的数据来训练模型”。
在我们的 train.py 文件中,我们将结合我们创建的其他 Python 脚本的所有功能并使用它来训练模型。
这样,我们就可以使用命令行中的一行代码来训练 PyTorch 模型:
1 | python train.py |
要创建 train.py,我们将执行以下步骤:
- 导入各种依赖项,即
torch、os、torchvision.transforms和来自going_modular目录、data_setup、engine、model_builder、utils的所有脚本。 - 注意:由于
train.py将位于going_modular目录中,我们可以通过import ...而不是from going_modular import ....来导入其他模块。 - 设置各种超参数,例如批处理大小、时期数、学习率和隐藏单元数(这些可以在将来通过 Python 的
argparse设置)。 - 设置训练和测试目录。
- 设置与设备无关的代码。
- 创建必要的数据转换。
- 使用
data_setup.py创建DataLoaders。 - 使用
model_builder.py创建模型。 - 设置损失函数和优化器。
- 使用
engine.py训练模型。 - 使用
utils.py保存模型。
我们可以使用以下行从笔记本单元创建文件%%writefile going_modular/train.py:
train.py1
2
3
4
5
6
7
8
9
10
11
12
13
14
15
16
17
18
19
20
21
22
23
24
25
26
27
28
29
30
31
32
33
34
35
36
37
38
39
40
41
42
43
44
45
46
47
48
49
50
51
52
53
54
55
56
57
58
59
60
61
62
63%%writefile going_modular/train.py
"""
Trains a PyTorch image classification model using device-agnostic code.
"""
import os
import torch
import data_setup, engine, model_builder, utils
from torchvision import transforms
# Setup hyperparameters
NUM_EPOCHS = 5
BATCH_SIZE = 32
HIDDEN_UNITS = 10
LEARNING_RATE = 0.001
# Setup directories
train_dir = "data/pizza_steak_sushi/train"
test_dir = "data/pizza_steak_sushi/test"
# Setup target device
device = "cuda" if torch.cuda.is_available() else "cpu"
# Create transforms
data_transform = transforms.Compose([
transforms.Resize((64, 64)),
transforms.ToTensor()
])
# Create DataLoaders with help from data_setup.py
train_dataloader, test_dataloader, class_names = data_setup.create_dataloaders(
train_dir=train_dir,
test_dir=test_dir,
transform=data_transform,
batch_size=BATCH_SIZE
)
# Create model with help from model_builder.py
model = model_builder.TinyVGG(
input_shape=3,
hidden_units=HIDDEN_UNITS,
output_shape=len(class_names)
).to(device)
# Set loss and optimizer
loss_fn = torch.nn.CrossEntropyLoss()
optimizer = torch.optim.Adam(model.parameters(),
lr=LEARNING_RATE)
# Start training with help from engine.py
engine.train(model=model,
train_dataloader=train_dataloader,
test_dataloader=test_dataloader,
loss_fn=loss_fn,
optimizer=optimizer,
epochs=NUM_EPOCHS,
device=device)
# Save the model with help from utils.py
utils.save_model(model=model,
target_dir="models",
model_name="05_going_modular_script_mode_tinyvgg_model.pth")
现在我们可以通过在命令行上运行以下行来训练 PyTorch 模型:
1 | python train.py |
这样做将利用我们创建的所有其他代码脚本。
如果我们愿意,我们可以调整我们的train.py文件以使用 Pythonargparse模块的参数标志输入,这将允许我们提供不同的超参数设置,如前所述:
1 | python train.py --model MODEL_NAME --batch_size BATCH_SIZE --lr LEARNING_RATE --num_epochs NUM_EPOCHS |
Exercises
资源:
- 05 年练习模板笔记本
- 05 示例解决方案笔记本
- YouTube 上 05 解决方案笔记本的实时编码演示
练习:
将获取数据的代码(来自上面的 1.获取数据部分)转换为 Python 脚本,例如
get_data.py- 当您运行脚本时,
python get_data.py它应该检查数据是否已经存在,如果存在则跳过下载。 - 如果数据下载成功,您应该能够
pizza_steak_sushi从data目录访问图像。
- 当您运行脚本时,
使用
Python 的argparse模块能够发送train.py训练程序的自定义超参数值。- 添加使用不同方法的参数:
- 训练/测试目录
- 学习率
- 批次大小
- 训练的周期数
- TinyVGG 模型中的隐藏单元数量
- 保持上述每个参数的默认值不变(如笔记本 05 中所示)。
- 例如,您应该能够运行类似于以下代码行的程序来训练一个学习率为 0.003、批量大小为 64 的 TinyVGG 模型,为期 20 个时期:
python train.py --learning_rate 0.003 --batch_size 64 --num_epochs 20。 - 注意:由于
train.py利用了我们在 05 节中创建的其他脚本,例如、model_builder.py和utils.py,engine.py因此您必须确保它们也可供使用。您可以在going_modular课程 GitHub 上的文件夹中找到这些脚本。
- 添加使用不同方法的参数:
predict.py创建一个脚本来对给定已保存模型的文件路径的目标图像进行预测(例如)。- 例如,您应该能够运行命令
python predict.py some_image.jpeg并让训练有素的 PyTorch 模型对图像进行预测并返回其预测。 - 要查看示例预测代码,请查看笔记本 04 中的自定义图像预测部分。
- 您可能还需要编写代码来加载经过训练的模型。
- 例如,您应该能够运行命令
Extra-curriculum
- 要了解有关构建 Python 项目的更多信息,请查看 Real Python 的Python 应用程序布局指南。
- 有关 PyTorch 代码样式的想法,请查看Igor Susmelj 的 PyTorch 样式指南(本章中的大部分样式均基于本指南 + 各种类似的 PyTorch 存储库)。
train.py有关PyTorch 团队编写的用于训练最先进的图像分类模型的示例脚本和各种其他 PyTorch 脚本,请查看classificationGitHub 上的存储库。
