实用Python程序设计MOOC-第十章玩转Python生态
[TOC]
实用Python程序设计MOOC-第十章玩转Python生态 使用Python的库
math,re,datetime,turtle,random
Pillow,jieba,request,matplotlib
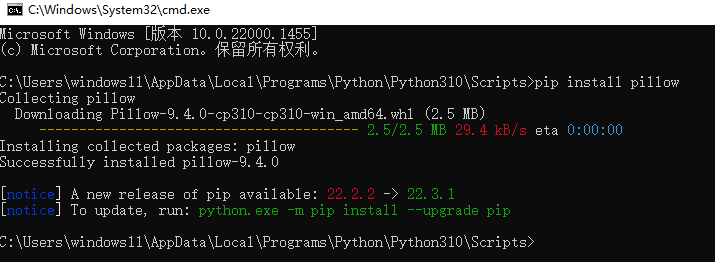
安装Python第三方库 cmd窗口安装 1) 进入cmd命令行窗口
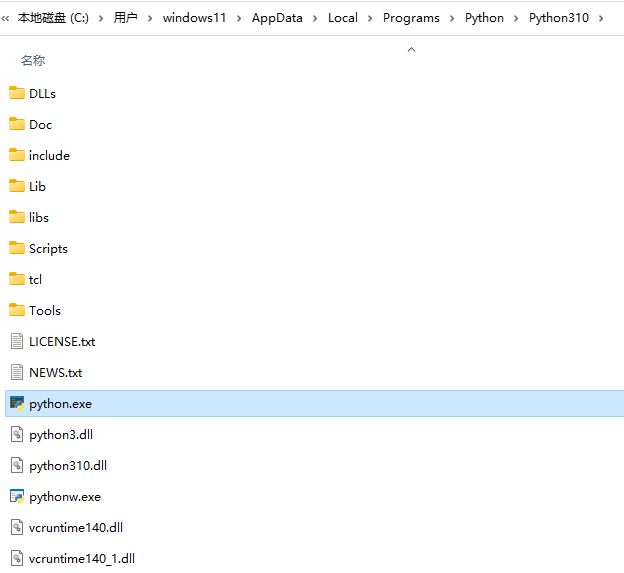
1 C:\Users\你的用户名\AppData\Loca1\Programs\Python\Python37
不知道的话查找python.exe可以找到
pychram安装 file - seting - project:xxx - Projet interpreter/Python解释器 - 点加号 -搜索第三方库 - 安装
Import的用法 1 2 3 import turtle turtle.setup(800 , 600 ) turtle.fd()
或1 2 3 import turtle as tt tt.setup(800 , 600 ) tt.fd(100 )
1
2
3
import PIL.Image img = PIL.Image.open ("C:/tmp/pic/grass.jpg" ) img.show()
或1 2 from PIL import Image img = Image.open ("c:/tmp/pic/grass.jpg" )
1 2 3 4 import PIL.Image, PIL.ImageDraw, PIL.ImageFontimg = PIL.Image.open ("c:/tmp/pic/grass.jpg" ) draw = PIL.ImageDraw.Draw(img) myFont = PIL.ImageFont.truetype("C:\\Windows\\Fonts\\simhei.ttf" ,164 )
或1 2 3 4 from PIL import Image, ImageDraw, ImageFontimg = Image.open ("c:/tmp/pic/grass.jpg" ) draw = ImageDraw.Draw(img) myFont = ImageFont.truetype("C:\\Windows\\Fonts\\simhei.ttf" , 164 )
1 2 3 from openpyxl.styles import Font, colors, AlignmentboldRedFont = Font(size = 18 , name = 'Times New Roman' , bold = True , color = colors.RED) alignment = Alignment(horizontal = 'left' , vertical = 'center' )
datetime库处理时间相关
random库处理随机数相关
jieba库进行分词
openpyxl处理excel文档
Pillow处理图像
用datetime库处理日期、时间 1 2 3 4 5 6 7 8 9 10 11 12 13 14 15 16 17 18 import datetime dtBirth = datetime.date (2000 , 9 , 27 ) print (dtBirth.weekday()) dtNow = datetime.date.today() print (dtBirth < dtNow) life = dtNow - dtBirth print (life.days, life.total_seconds()) delta = datetime.timedelta(days = -10 ) newDate = dtNow + delta print (newDate.year, newDate.month, newDate.day, newDate.weekday()) print (newDate.strftime(r'%m/%d/%Y' )) newDate = datetime.datetime.strptime("2020.08.05" , "%Y.%m.%d" ) print (newDate.strftime("%Y%m%d" ))
处理时刻 1 2 3 4 5 6 7 8 9 10 11 12 13 14 15 16 17 18 19 import datetimetm = datetime.datetime.now() print (tm.year, tm.month, tm.day, tm.hour, tm.minute, tm.second, tm.microsecond) tm = datetime.datetime(2017 , 8 , 10 , 15 , 56 , 10 , 0 ) print (tm.strftime("%Y%m%d %H:%M:%S" )) print (tm.strftime("%Y%m%d %I:%M:%S %p" )) tm2 = datetime.datetime.strptime("2013.08.10 22:31:24" , "%Y.%m.%d %H:%M:%S" ) delta = tm - tm2 print (delta.days, delta.seconds, delta.total_seconds())delta = tm2 - tm print (delta.days, delta.seconds, delta.total_seconds()) delta = datetime.timedelta(days = 10 , hours = 10 , minutes = 30 , seconds = 20 ) tm2 = tm + delta print (tm2.strftime("%Y%m%d %H:%M:%S" ))
datetime局限
用random库处理随机事务
函数
解释
random.random()
随机生成一个[0, 1]之间的数
random.uniform(x, y)
随机生成一个[x,y]之间的数(含两端,下同)。x,y可以是小数
random.randint(x, y)
随机生成个[x,y]之间的整数。x,y都是整数
random.randrange(x, y, z)
在range(x, y, z)中随机取一个数
random.choice(x)
从序列x中随机取一个元素。x可以是为列表、元组、字符串
random.shuffle(x)
将列表x的元素顺序随机打乱
random.sample(x, n)
从序列x中随机取一个长度为n的子序列。x可以是元组、列表、集合
random.seed(x)
设置随机种子为x。x可以是个数、元组、字符串
用法示例 1 2 3 4 5 6 7 8 9 10 11 12 13 14 15 16 17 import randomprint (random.random()) print (random.uniform(1.2 , 7.8 )) print (random.randint(-20 , 70 )) print (random.randrange(2 , 20 , 3 )) print (random.choice("hello,world" )) print (random.choice([1 , 2 , 'ok' , 34.6 , 'jack' ])) lst = [1 , 2 , 3 , 4 , 5 , 6 ] random.shuffle(lst) print (lst) print (random.sample(lst, 3 ))
设置随机种子 生活中真实的随机数是不可预测的,当计算机中初始条件设置后是可以预测的。
1 2 3 4 5 6 7 8 9 10 11 12 13 14 import randomrandom.seed(2 ) print (random.random())print (random.uniform(1.2 , 7.8 ))print (random.randint(-20 , 70 ))print (random.randrange(2 , 30 , 3 ))print (random.choice("hello,world" ))print (random.choice([1 , 2 , 'ok' , 34.6 , 'jack' ]))lst = [1 , 2 , 3 , 4 , 5 , 6 ] random.shuffle(lst) print (lst)print (random.sample(lst, 3 ))
实现4人玩牌的发牌模拟 1 2 3 4 5 6 7 8 9 10 11 12 13 14 15 import randomcards = [str (i) for i in range (2 , 11 )] cards.extend(list ("JQKA" )) allCards = [] for s in "♣♦♥♠" : for c in cards: allCards.append(s + c) random.shuffle(allCards) for i in range (4 ): onePlayer = allCards[i::4 ] onePlayer.sort() print (onePlayer)
输出:
1 2 3 4 ['♠4', '♠8', '♠K', '♠Q', '♣2', '♣J', '♥3', '♥8', '♥K', '♦10', '♦6', '♦J', '♦Q'] ['♠2', '♠3', '♠6', '♠J', '♣10', '♣7', '♣Q', '♥10', '♥4', '♥5', '♥A', '♦2', '♦8'] ['♠7', '♠9', '♣3', '♣4', '♣8', '♣K', '♥2', '♥6', '♥Q', '♦3', '♦7', '♦9', '♦A'] ['♠10', '♠5', '♠A', '♣5', '♣6', '♣9', '♣A', '♥7', '♥9', '♥J', '♦4', '♦5', '♦K']
使用Jieba进行分词 “买马上战场”应该分成”买 马 上 战场”还是”买 马上 战场”?
1 2 3 4 5 6 7 8 9 10 11 12 13 14 15 16 import jieba s = "我们热爱中华人民共和国" lst = jieba.lcut(s) print (lst) print (jieba.lcut(s, cut_all = True )) print (jieba.lcut_for_search(s)) s = "拼多多是个网站" print (jieba.lcut(s)) jieba.add_word("拼多多" ) print (jieba.lcut(s))
1 2 3 4 5 6 7 s = "高克丝马微中" print (jieba.lcut(s)) jieba.load_userdict("C:/tmp/tmpdict.txt" ) print (jieba.lcut(s)) print (jieba.lcut("显微中,容不得一丝马虎。" ))
c:/tmp/tmpdict.txt 文件内容如下:
用jieba库找出三国演义中出场次数最多的几个人 分词后对所有词进行频率统计并输出出现最多的15个词(单个字的词去掉) :
1 曹操 929, 孔明 825, 将军 756, 却说 646, 玄德 556, 关公 508, 丞相 484, 二人 459, 不可 432, 荆州 417, 孔明曰 383, 不能 380, 玄德日 380, 如此 375, 张飞 349,
1 2 3 4 5 6 7 8 9 10 11 12 13 14 15 16 17 18 19 20 21 22 23 24 25 26 import jiebaf = open ("'c:/tmp/三国演义utf8.txt" , "r" , encoding="utf-8" ) text = f.read() f.close() words = jieba.lcut(text) result = {} for word in words: if len (word) == 1 : continue elif word in ("诸葛亮" , "孔明曰" ): word = "孔明" elif word in ("关公" , "云长" , "关云长" ): word = "关羽" elif word in ("玄德" , "玄德日" ): word = "刘备" elif word in ("孟德" , "操贼" , "曹阿瞒" ): word = "曹操" result[word] = result.get(word, 0 ) + 1 noneNames = {'将军' , '却说' , '荆州' , '二人' , '不可' , '不能' , '如此' , '丞相' ,"商议" , "如何" , "主公" , "军士" , "左右" , "军马" , "引兵" , "次日" } for word in noneNames: result.pop(word) items = list (result.items()) items.sort(key = lambda x : -x[1 ]) for i in range (15 ): print (items[i][0 ], items[i][1 ], end=", " )
输出:1 孔明 1366, 刘备 1204, 曹操 973, 关羽 814, 张飞 349, 吕布 299, 孙权 264, 大喜 262, 东吴 252, 天下 252, 赵云 251, 于是 250, 今日 242, 魏兵 234, 不敢 234,
用openpyxl处理excel文档 excel文档相关库
用xlrd库读取
用openpyxl库读写(官网: openpyxl.readthedocs.io)
1 2 pip install openpyxl (不支持Python 3.5及以前版本) Python 3.5及以前: pip install openpyxl == 2.6.4
openpyxl读取excel文件内容
1 2 sheet = book.active sheet = book["price" ]
1 2 for sheet in book.worksheets: print (sheet.title)
1 2 3 4 type (ce11.value) : int , float , str , datetime.datetimece1l.coordinate : 'A2' , 'E3' cell.col_idx : 单元格列号 cell.number_format : 数的显示格式,"General" , "0.00%" , "0.00E+00" 等
1 2 3 4 5 6 7 8 9 10 11 12 13 14 15 16 17 18 19 20 21 22 23 24 25 26 import openpyxl as pxlbook = pxl.load_workbook("c:/tmp/test.xlsx" ) sheet = book.worksheets[0 ] print (sheet.title) print (sheet.min_row, sheet.max_row) print (sheet.min_column, sheet.max_column) for row in sheet.rows: for cell in row: print (cell.value) for cell in sheetp['G' ]: print (cell.value) for cell in sheet[3 ]: print (cell.value, type (cell.value), cell.coordinate, cell.col_idx, cell.number_format) print (pxl.utils.get_colum_letter(5 )) print (pxl.utils.column_index_from_string('D' )) print (pxl.utils.column_index_from_string('AC' )) colRange = sheet['C:F' ] for col in colRange: for cell in col: print (cell.value) rowRange = sheet[5 :10 ] for row in sheet['A1' :'D2' ]: for cell in row: print (cell.value) print (sheet['C9' ].value) print (sheet.cell(row=8 , column=4 ).value)
读取公式的计算结果 1 2 3 4 import openpyxlwb = openpyxl.load_workbook("C:/tmp/style.xlsx" , data_only = True ) ws = wb.worksheets[1 ] print (ws['A3' ].value)
openpyxl创建excel文件 1 2 3 4 5 6 7 8 9 10 11 12 13 14 15 16 17 18 19 20 21 22 23 24 import openpyxlimport datetimebook = openpyxl.Workbook() sheet = book.active sheet.title = "sample1" dataRows = ((10 , 20 , 30 , 40.5 ), (100 , 200 , '=sum(A1:B2)' ), [], ['1000' , datetime.datetime.now(), 'ok' ]) for row in dataRows: sheet.append(row) sheet.column_dimensions['B' ].width = len (str (sheet['B4' ].value)) sheet['E1' ].value = "=sum(A1:D1)" sheet['E2' ].value = 12.5 sheet["E2" ].number_format = "0.00%" sheet['F1' ].value = 3500 sheet['F2' ].value = "35.00" sheet['F3' ].value = datetime.datetime.today().date() sheet.column_dimensions['F' ].width = len (str (sheet['F3' ].value)) sheet.row_dimensions[2 ].height = 48 sheet2 = book.create_sheet("Sample2" ) sheet2["A1" ] = 50 sheet2 = book.create_sheet("Sample0" , 0 ) sheet3 = book.copy_worksheet(sheet) book.remove_sheet(book["Sample2" ]) book.save('C:/tmp/sample.xlsx' )
将所有文本形式的数转换为真正的数 1 2 3 4 5 6 7 8 9 10 11 12 13 14 import openpyxl as pxlbook = pxl.load_workbook("C:/tmp/test2.xlsx" ) for sheet in book.worksheets: for row in sheet.rows: for cell in row: v = cell.value if type (v) == str : if v.isdigit(): cell.value = int (v) else : try : cell.value = float (v) except :pass book.save("C:/tmp/test3.xlsx" )
将真正的数转换为文本形式 1 2 3 4 5 6 7 8 import openpyxl as pxlbook = pxl.load_workbook("c:/tmp/test2.xlsx" ) for sheet in book.worksheets: for row in sheet.rows: for cell in row : if type (cell.value) == int or type (cell.value) == float : cell.value = str (cell.value) book.save("c:/tmp/test3.xlsx" )
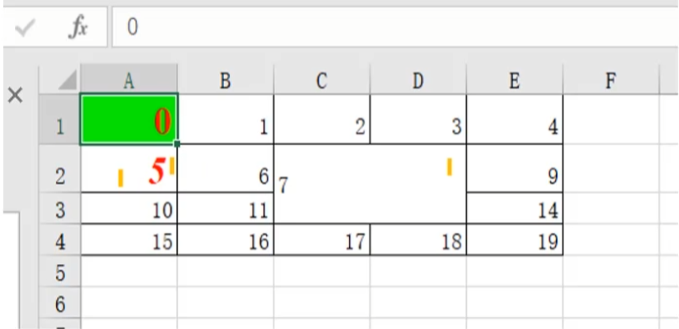
openpyxl指定单元格的样式 1 2 3 4 5 6 7 8 9 10 11 12 13 14 15 16 17 18 19 20 21 22 23 24 25 26 import openpyxlfrom openpyxl.styles import Font, colors, PatternFill, Alignment, Side, Borderbook = openpyxl.Workbook() sheet = book.active for i in range (4 ): sheet.append([i*5 + j for j in range (5 )]) side = Side(style="thin" ) border = Border(left=side, right=side, top=side, bottom=side) for row in sheet.rows: for cell in row: cell.border = border sheet['A1' ].fill = PatternFill(patternType='solid' , fgColor="00ff00" ) a1 = sheet['A1' ] italicRedFont = Font(size=18 , name='Times New Roman' , bold=True , color=colors.RED) a1.font = italicRedFont sheet['A2' ].font = sheet['A1' ].font.copy(italic = True ) sheet.merge_cells('C2:D3' ) sheet['C2' ].alignment = Alignment(horizontal='left' , vertical='center' ) book.save("c:/tmp/style.xlsx" )
xlrd读取excel文件内容 1 2 3 4 5 6 7 8 9 10 11 12 13 14 15 16 17 18 import xlrdbook = xlrd.open_workbook("c:\\tmp\\sample.xlsx" ) for s in book.sheets(): print =(s.name) sheet1 = book.sheet_by_index(0 ) sheet1_name = book.sheet_names()[0 ] print (sheet1_name) sheet1 = book.sheet_by_name(sheet1_name) nrows = sheet1.nrows ncols = sheet1.ncols for i in range (nrows): for j in range (ncols): cell_value = sheet1.cell_value(i, j) print (cell_value, end = "\t" ) print ("" )
输出:
xlwt创建excel文件 1 2 3 4 5 6 7 8 9 10 11 12 13 14 15 16 17 18 19 20 import xlwtbook = xlwt.Workbook(encoding = "utf-8" , style_compression = 0 ) sheet = book.add_sheet("成绩单" , cell_overwrite_ok = True ) sheet.write(0 , 0 , "姓名" ) sheet.write(0 , 1 , "绩点" ) sheet.write(1 , 0 , "王二" ) sheet.write(1 , 1 , "3.4" ) sheet.write(2 , 0 , "赵二" ) sheet.write(2 , 1 , "3.9" ) sheet = book.add_sheet("名单" , cell_overwrite_ok = True ) sheet.write(0 , 0 , "学号" ) sheet.write(0 , 1 , "姓名" ) sheet.write(1 , 0 , "1234" ) sheet.write(1 , 1 , "Jack" ) sheet.write(2 , 0 , "6656" ) sheet.write(2 , 1 , "Jone" ) book.save("c:\\tmp\\sample2.xls" )
xlwt向单元格添加公式 1 2 3 4 5 6 7 8 9 10 import xlwtworkbook = xlwt.Workbook() worksheet = workbook.add_sheet('My Sheet' ) worksheet.write(0 , 0 , 5 ) worksheet.write(0 , 1 , 2 ) worksheet.write(1 , 0 , xlwt.Formula('A1*B1' )) worksheet.write(1 , 1 , xlwt.Formula('SUM(A1,B1)' )) workbook.save('c:\\tmp\\Excel_Workbook.xls' )
xlwt向单元格添加日期 1 2 3 4 5 6 7 8 9 10 11 import xlwtimport datetimeworkbook = xlwt.Workbook() worksheet = workbook.add_sheet('My Sheet' ) style = xlwt.XFStyle() style.num_format_str = 'M/D/YY' worksheet.write(0 , 0 , datetime.datetime.now(), style) workbook.save('Excel_Workbook.xls' )
xlwt向单元格添加一个超链接 1 2 3 4 5 6 7 import xlwtworkbook = xlwt.Workbook() worksheet = workbook.add_sheet('My Sheet' ) worksheet.write(0 , 0 , xlwt.Formula('HYPERLINK("http://www.pku.edu.cn";"PKU")' )) workbook.save('Excel_Workbook.xls' )
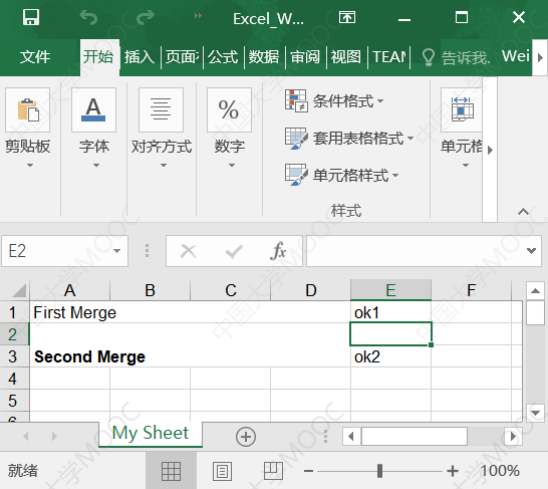
xlwt合并单元格 1 2 3 4 5 6 7 8 9 10 11 12 13 14 import xlwtworkbook = xlwt.Workbook() worksheet = workbook.add_sheet('My Sheet' ) worksheet.write_merge(0 , 0 , 0 , 3 , 'First Merge' ) worksheet.write(0 ,4 ,"ok1" ) font = xlwt.Font() font.bold = True style = xlwt.XFStyle() style.font = font worksheet.write_merge(1 , 2 , 0 , 3 , 'Second Merge' , style) worksheet.write(2 ,4 ,"ok2" ) workbook.save('c:\\tmp\\Excel_Workbook.xls' )
用Pillow处理图像
图像缩放和旋转
图像加滤镜
图像切割
图像加水印
图像素描化
图像加文字
图像的常识
图像由像素构成
图像模式
图像的缩放 1 2 3 4 5 6 7 8 9 10 11 12 13 from PIL import Image img = Image.open ("c:/tmp/pic/grass.jpg" ) w,h = img.size newSize = (w//2 ,h//2 ) newImg = img.resize(newSize) newImg.save("c:/tmp/pic/grass_half.jpg" ) newImg.thumbnail((128 ,128 )) newImg.save("c:/tmp/pic/grass_thumb.png" , "PNG" ) newImg.show()
图像的旋转、翻转图像、 和滤镜效果 1 2 3 4 5 6 7 8 9 10 from PIL import Imagefrom PIL import ImageFilter img = Image.open ("c:/tmp/pic/grass_half.jpg" ) print (img.format , img.mode) newImg = img.rotate(90 , expand = True ) newImg.show() newImg = img.transpose(Image.FLIP_LEFT_RIGHT) newImg = img.transpose(Image.FLIP_TOP_BOTTOM) newImg = img.filter (ImageFilter.BLUR)
滤镜效果:
图像的裁剪 1 2 3 4 5 6 7 8 9 10 11 12 13 from PIL import Imageimg = Image.open ("c:/tmp/pic/grass.jpg" ) w,h = img.size[0 ]//3 ,img.size[1 ]//3 gap = 10 newImg = Image.new("RGB" ,(w * 3 + gap * 2 , h * 3 + gap * 2 ),"white" ) for i in range (0 ,3 ): for j in range (0 ,3 ): clipImg = img.crop((j*w,i*h,(j+1 )*w,(i+1 )*h)) clipImg.save("c:/tmp/pic/grass%d%d.jpg" % (i,j)) newImg.paste(clipImg,(j*(w + gap), i * ( h + gap))) newImg.save("c:/tmp/pic/grass9.jpg" ) newImg.show()
图像的素描化 1 2 3 4 5 6 7 8 9 10 11 12 13 14 15 from PIL import Imagedef makeSketch (img, threshold ): w, h = img.size img = img.convert('L' ) pix = img.load() for x in range (w-1 ): for y in range (h-1 ): if abs (pix[x,y] - pix[x+1 ,y+1 ]) >= threshold: pix[x,y] = 0 else : pix[x,y] = 255 return img img = Image.open ("c:/tmp/pic/models2.jpg" ) img = makeSketch(img, 15 ) img.show()
给图像添加水印
原理: paste时可以用“掩膜”指定img的每个像素粘贴过去的透明度。如果透明度为0,则完全透明,如果透明度为255,则完全遮盖imgSrc原来的像素。
mask参数即为掩膜,是个模式为”L”的图片(Image对象)
1 imgSrc.paste(img, (x, y), mask = msk)
1 2 3 4 5 6 7 8 9 10 11 12 13 14 15 16 17 18 19 20 21 22 23 24 from PIL import Imagedef getMask (img,isTransparent,alpha ): if img.mode != "RGBA" : img = img.convert('RGBA' ) w, h = img.size pixels = img.load() for x in range (w): for y in range (h): p = pixels[x,y] if isTransparent(p[0 ],p[1 ],p[2 ]): pixels[x,y] = (p[0 ],p[1 ],p[2 ],0 ) else : pixels[x,y] = (p[0 ],p[1 ],p[2 ],alpha) r, g, b, a = img.split() return a img = Image.open ("c:/tmp/pic/pku.png" ) msk = getMask(img, lambda r,g,b: r >245 and g > 245 and b > 245 , 130 ) imgSrc = Image.open ("c:/tmp/pic/iceland1.png" ) imgSrc.paste(img,(imgSrc.size[0 ] - img.size[0 ] - 30 , imgSrc.size[1 ] - img.size[1 ] - 30 ),mask = msk) imgSrc.show()
在图像上绘图和写字 照片的exif信息,存有照片的所有信息。
1 2 3 4 5 6 7 8 9 10 11 12 13 14 15 16 17 18 19 20 21 22 23 24 25 26 27 28 29 30 from PIL import Image, ImageDraw, ImageFont, ExifTags def correctOrientation (img ): if hasattr (img, "_getexif" ): exif = img._getexif() if exif != None : orientation = exif[getExifKeyCode('Orientation' )] if orientation == 3 : img = img.rotate(180 , expand=True ) elif orientation == 6 : img = img.rotate(270 , expand=True ) elif orientation == 8 : img = img.rotate(90 , expand=True ) return img def getExifKeyCode (keyStr ): for x in ExifTags.TAGS.items(): if x[1 ] == keyStr: return x[0 ] return None def writeTextToImage (img, text, myFont ): W, h = img.size fw, fh = myFont.getsize(text) draw = ImageDraw.Draw(img) x,y = w - fw - 30 , h - fh - 30 draw.rectangle((x - 5 , y - 5 , x + fw + 5 , y + fh + 5 ), outline= 'white' ) draw.text((x ,y), text, (255 , 255 , 255 ), font=myFont)
