LaTex入门

LaTex入门

LaTex入门

什么是LaTex

是一种用于创建专业外观文档的工具。它基于所见即所得的理念,只关注文档的内容,而计算机将负责格式化。与Microsoft Word或LibreOffice Writer一样,用户可以输入纯文本并让LATEX处理其余内容,而不是在页面上隔开文本以控制格式。

它将文档的内容与样式分开。这意味着一旦您编写了文档的内容,我们就可以轻松更改其外观。同样,您可以创建一种文档样式,用于标准化许多不同文档的外观。这允许科学期刊为提交创建模板。这些模板具有预先制作的布局,这意味着只需添加内容。事实上,有数百种模板可用于从简历到幻灯片的所有内容。

LaTex平台环境

miktex-PC端

miktex官网

MiKTeX 是开源的。是适用于 Windows、Linux 和 macOS 的现代 TeX 发行版。

使用TexWorks桌面工具进行文件编辑。

overleaf-Web端

overleaf官网

在网页端完成内容编排。

Hello LaTex

LaTex会生成.tex文件

1
2
3
4
5
6
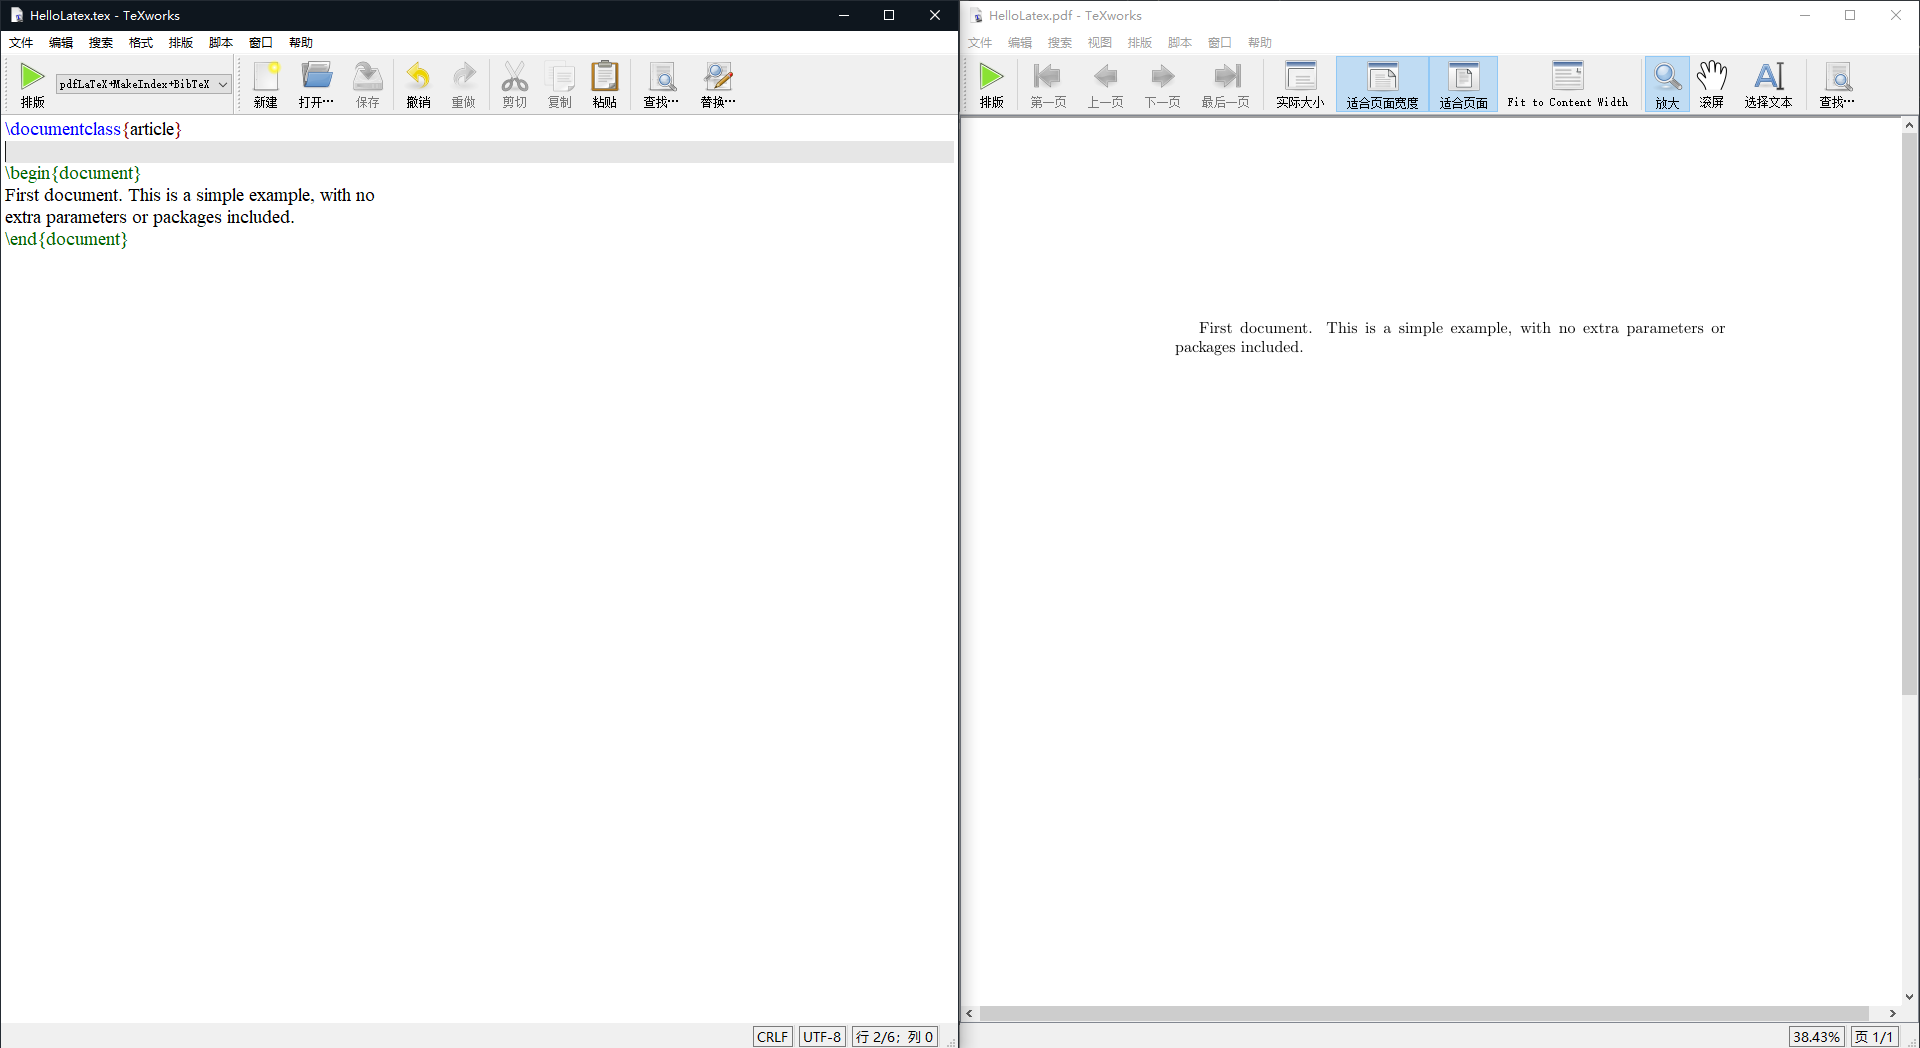
\documentclass{article}

\begin{document}
First document. This is a simple example, with no
extra parameters or packages included.
\end{document}
  • 文档正文

包含在 \begin{document} 和 \end{document}之间

  • 编译模式

pdflatex

1
2
3
4
% 额外参数设置字体大小(12pt)和纸张大小(letterpaper) %
\documentclass [12pt, letterpaper] { article }
% 文档的编码 %
\usepackage [utf8] { inputenc }

文件序言

在 \begin{document} 之前

标题、作者和日期

在文档中添加标题、作者和日期,必须在序言中添加三行。

  • 标题
1
\title{First document}
  • 作者
1
\author{Hibisci Dai}
  • 日期
1
2
3
4
\date{February 2014}

%编译时自动获取本天%
\today
  • 致谢
1
2
%这可以添加在作者姓名之后,在author命令的大括号内。它将在大括号内添加一个上标和一个脚注。如果您需要在文章中感谢某个机构,这将很有用%
\thanks{funded by the Overleaf team}

加入序言之后,文章有

1
2
3
4
5
6
7
8
9
10
11
12
13
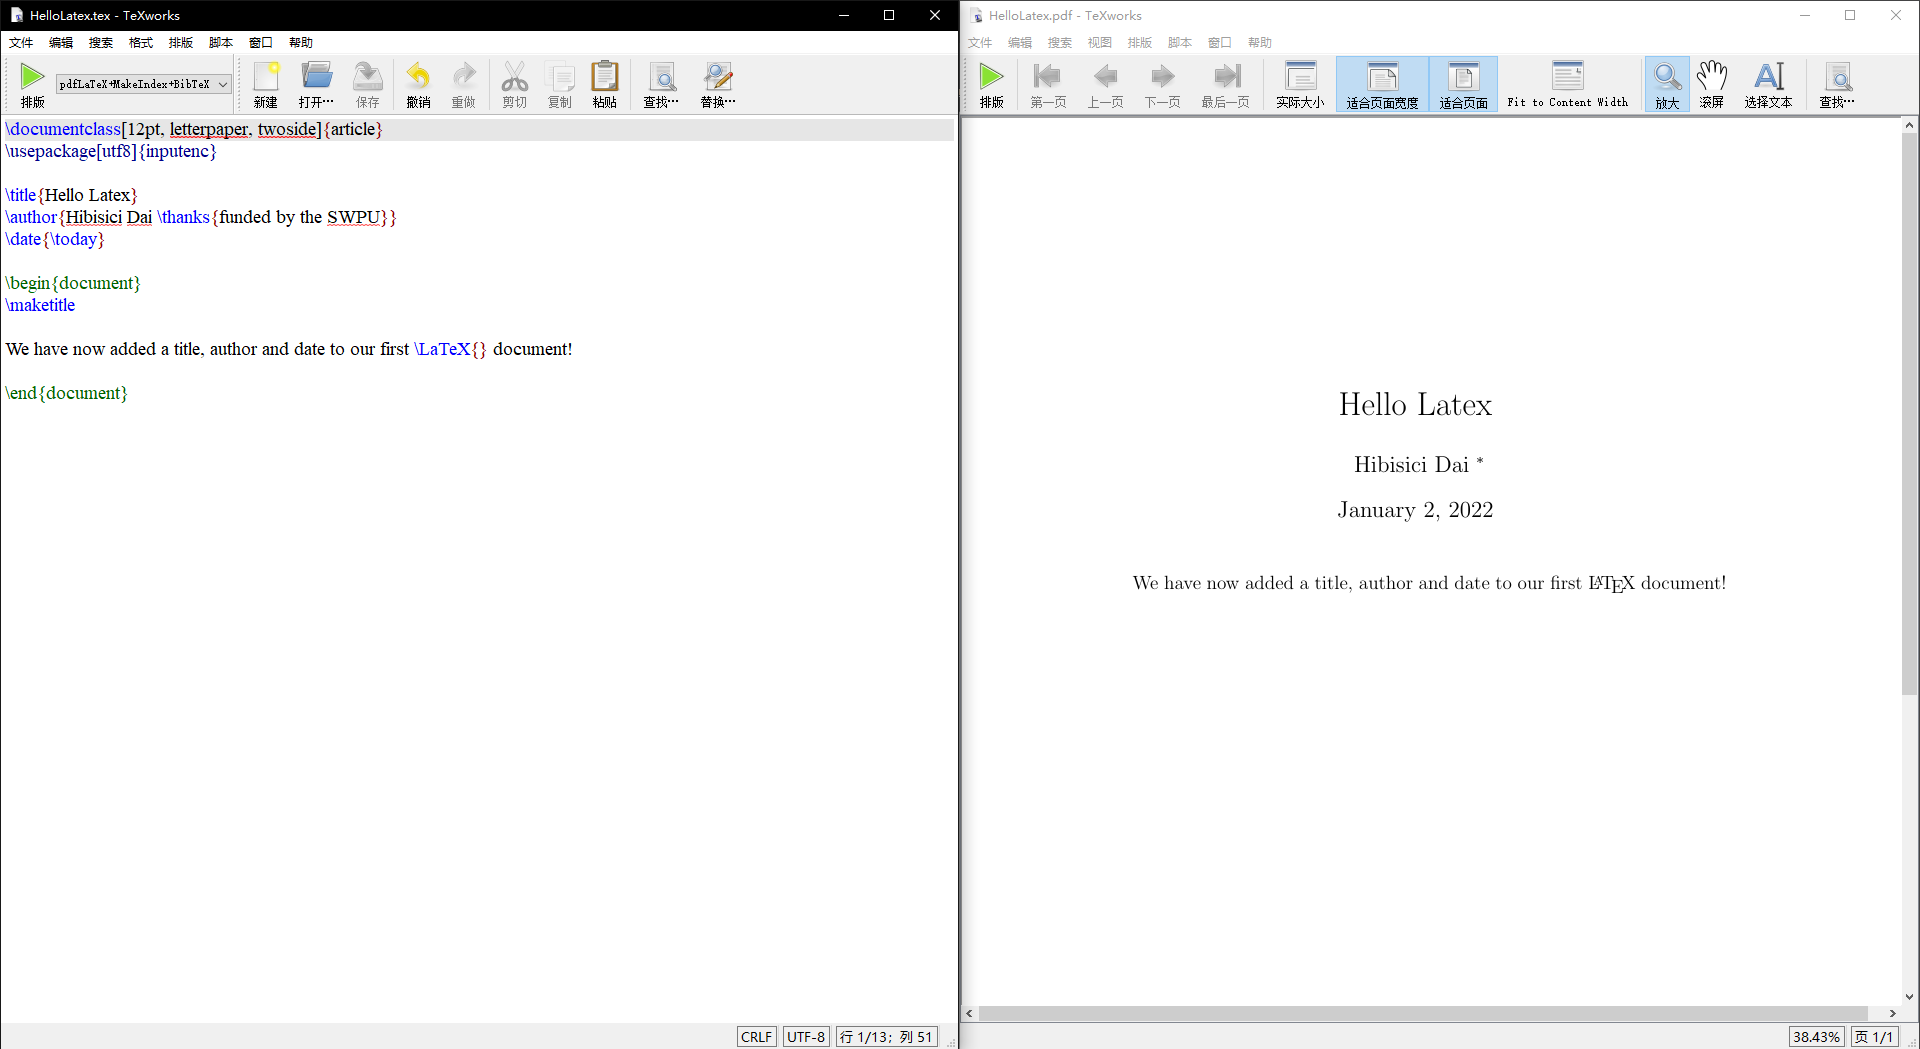
\documentclass[12pt, letterpaper, twoside]{article}
\usepackage[utf8]{inputenc}

\title{Hello Latex}
\author{Hibisici Dai \thanks{funded by the SWPU}}
\date{\today}

\begin{document}
\maketitle

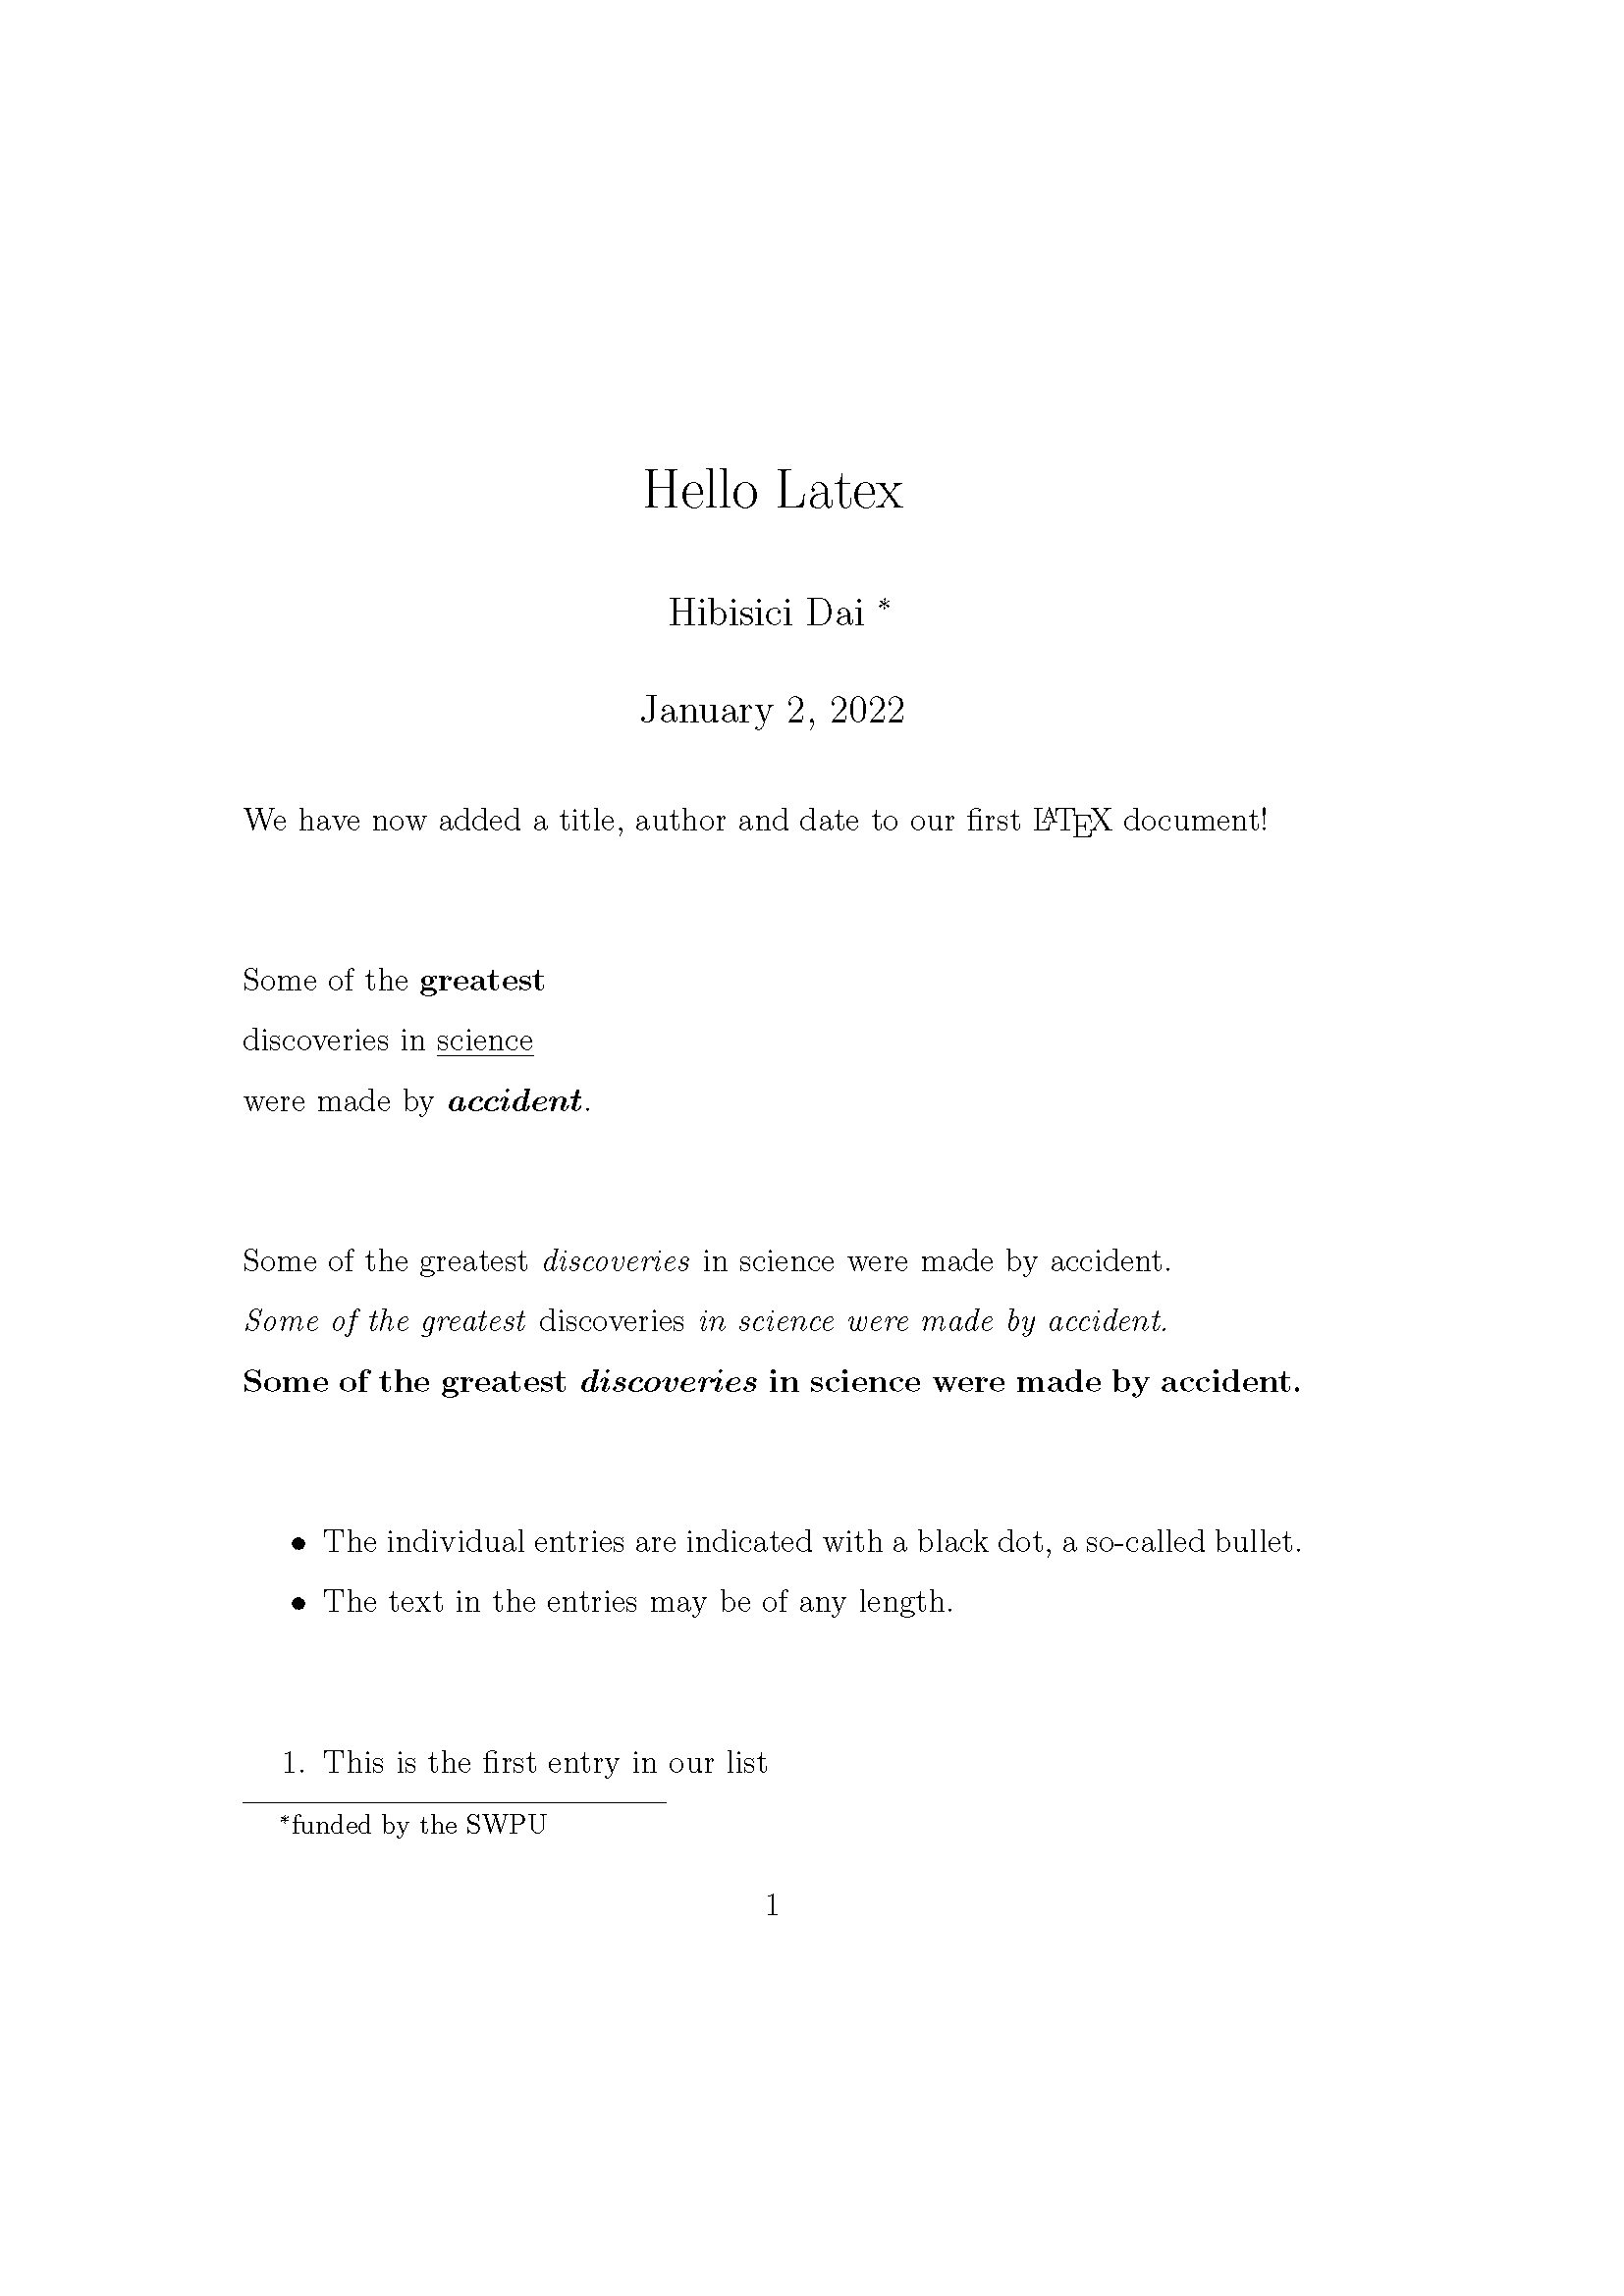
We have now added a title, author and date to our first \LaTeX{} document!

\end{document}

注释

注释是包含在文档中但不会被打印的文本片段,并且不会以任何方式影响文档。
需要在该行 % 包裹

粗体、斜体和下划线

  • 粗体

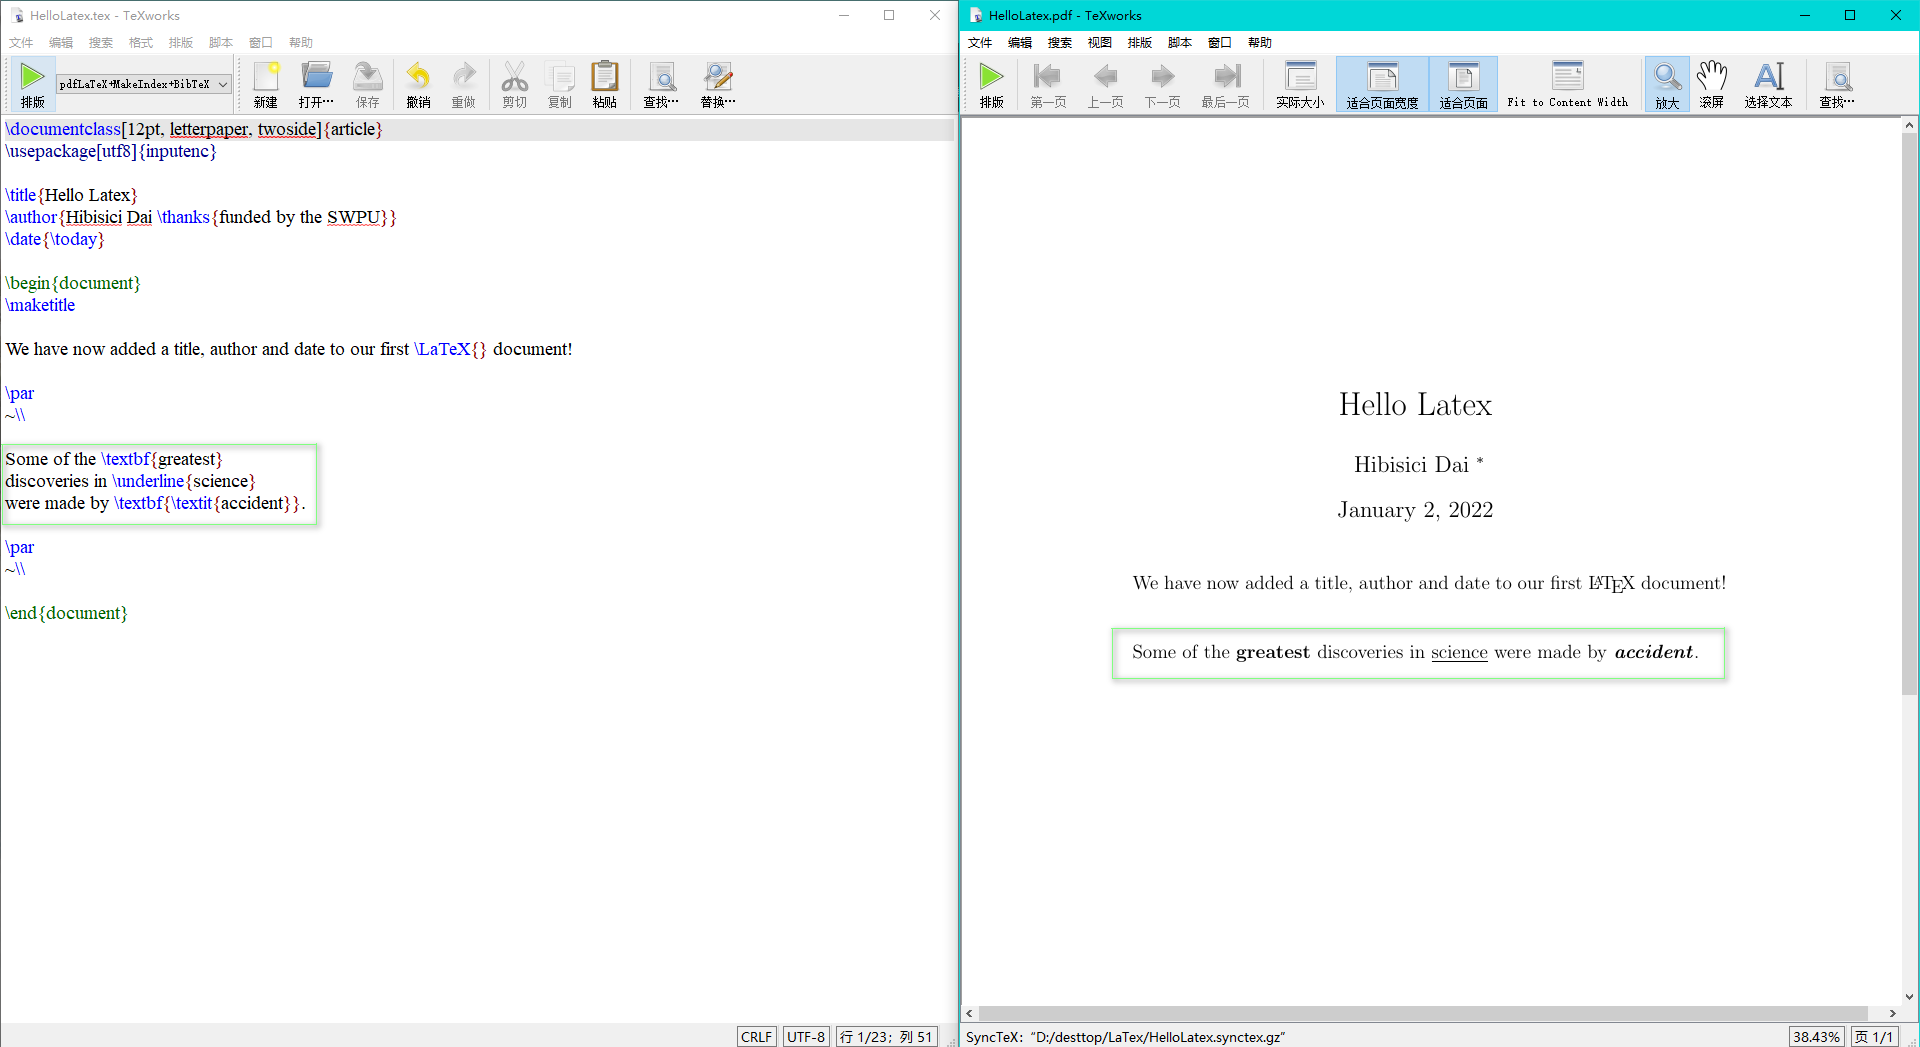
\textbf{...}

  • 斜体

\textit{...}

  • 下划线

\underline{...}

案例示例

1
2
3
4
5
6
7
8
%粗体%
Some of the \textbf{greatest}

%下划线%
discoveries in \underline{science}

%粗体、斜体%
were made by \textbf{\textit{accident}}.
  • 依赖上下文的斜体命令

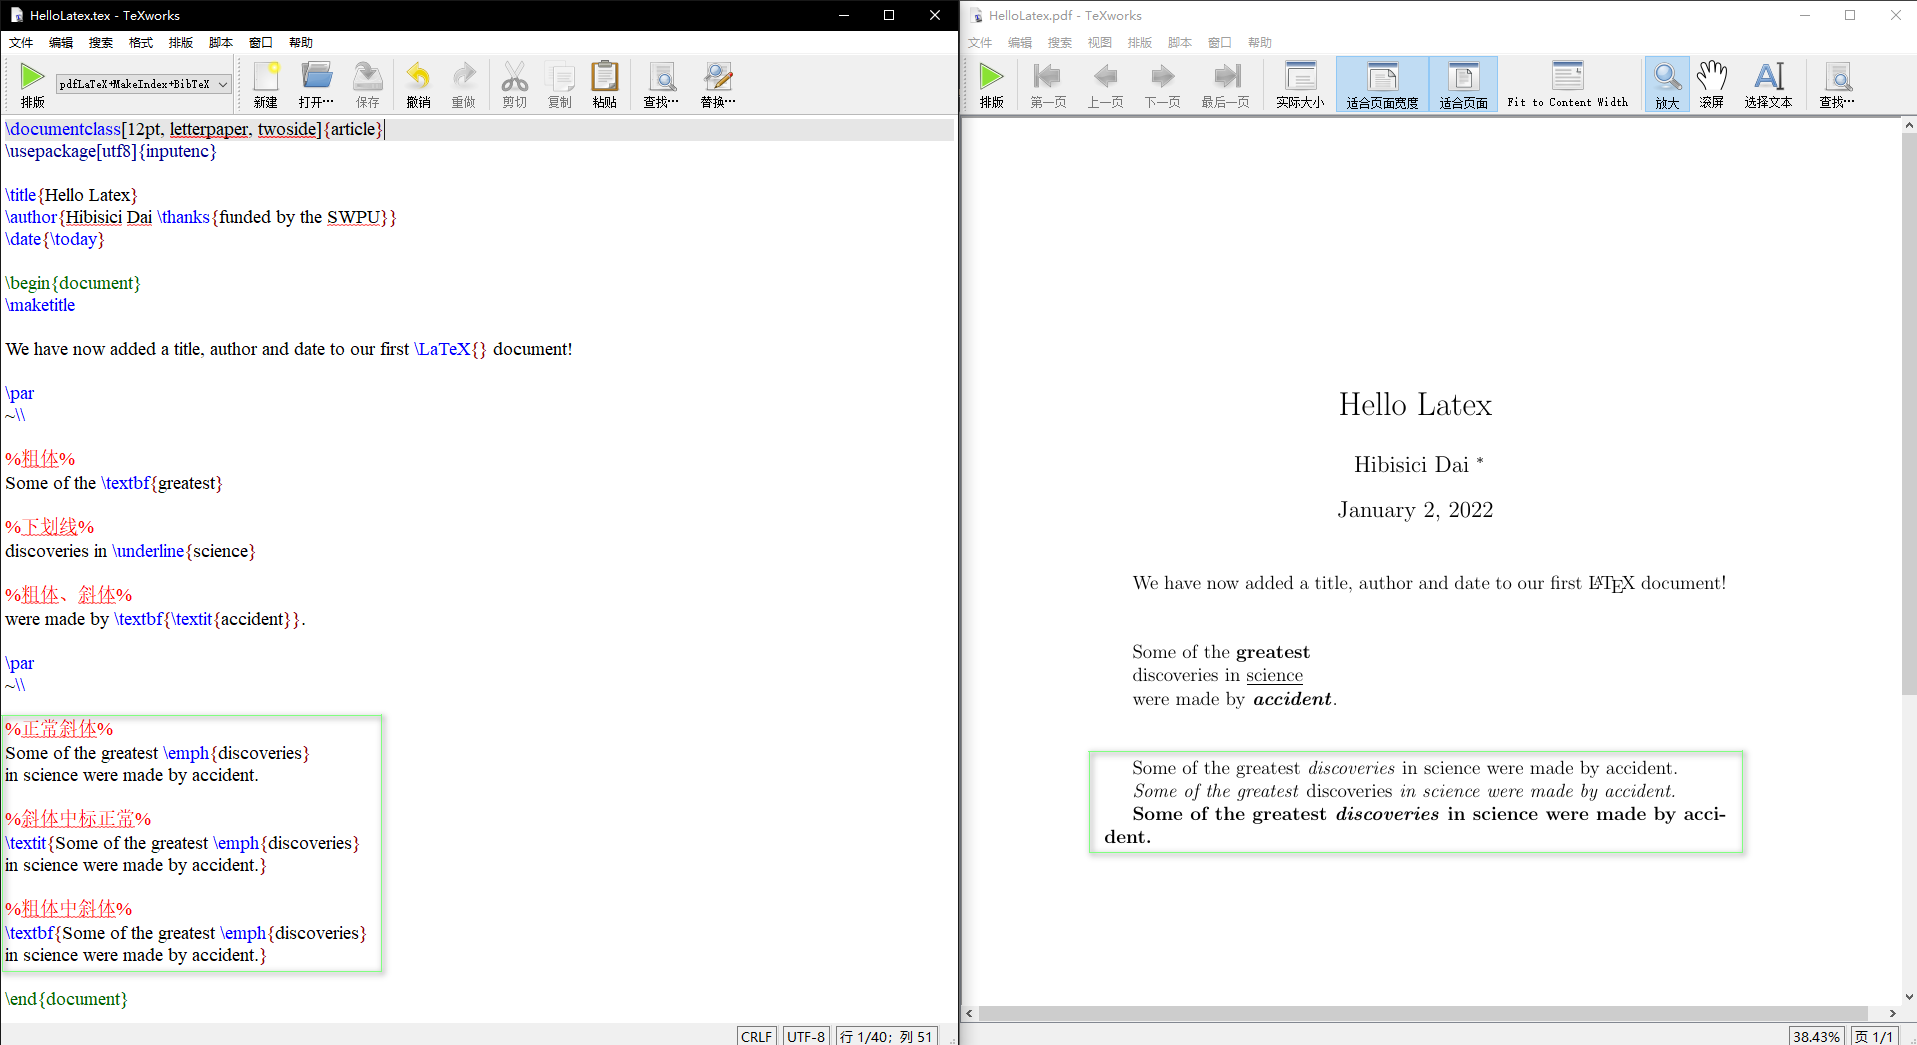
参数不依赖于上下文-普通文本内的强调文本为斜体,但如果内部使用的这种行为相反斜体文本

1
2
3
4
5
6
7
8
9
10
11
%正常斜体%
Some of the greatest \emph{discoveries}
in science were made by accident.

%斜体中标正常%
\textit{Some of the greatest \emph{discoveries}
in science were made by accident.}

%粗体中斜体%
\textbf{Some of the greatest \emph{discoveries}
in science were made by accident.}

添加图片

1
2
3
4
5
6
7
8
9
10
11
12
13
14
15
16
\documentclass{article}

%声明使用图片包%
\usepackage{graphicx}

%图片存放路径%
\graphicspath{ {images/} }

\begin{document}
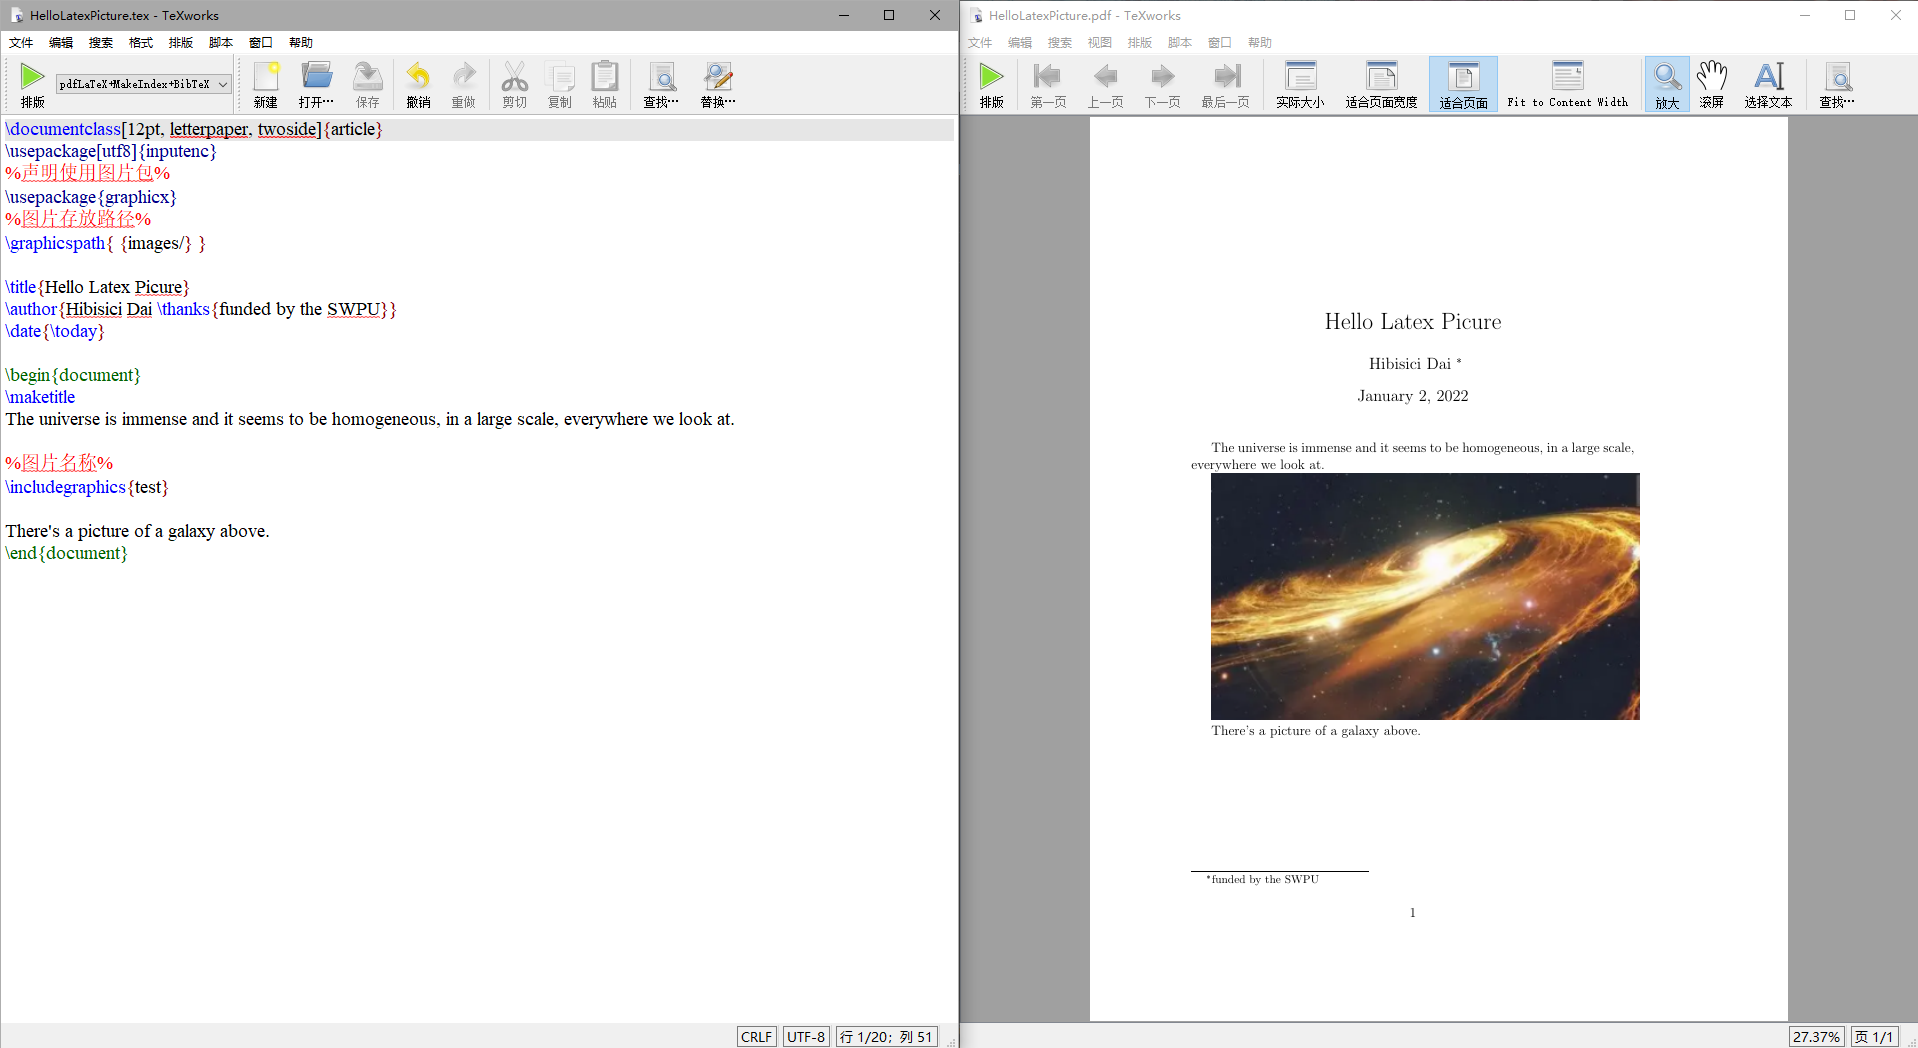
这里是测试图片。

%图片名称%
\includegraphics{test}

有一个测试图片。
\end{document}

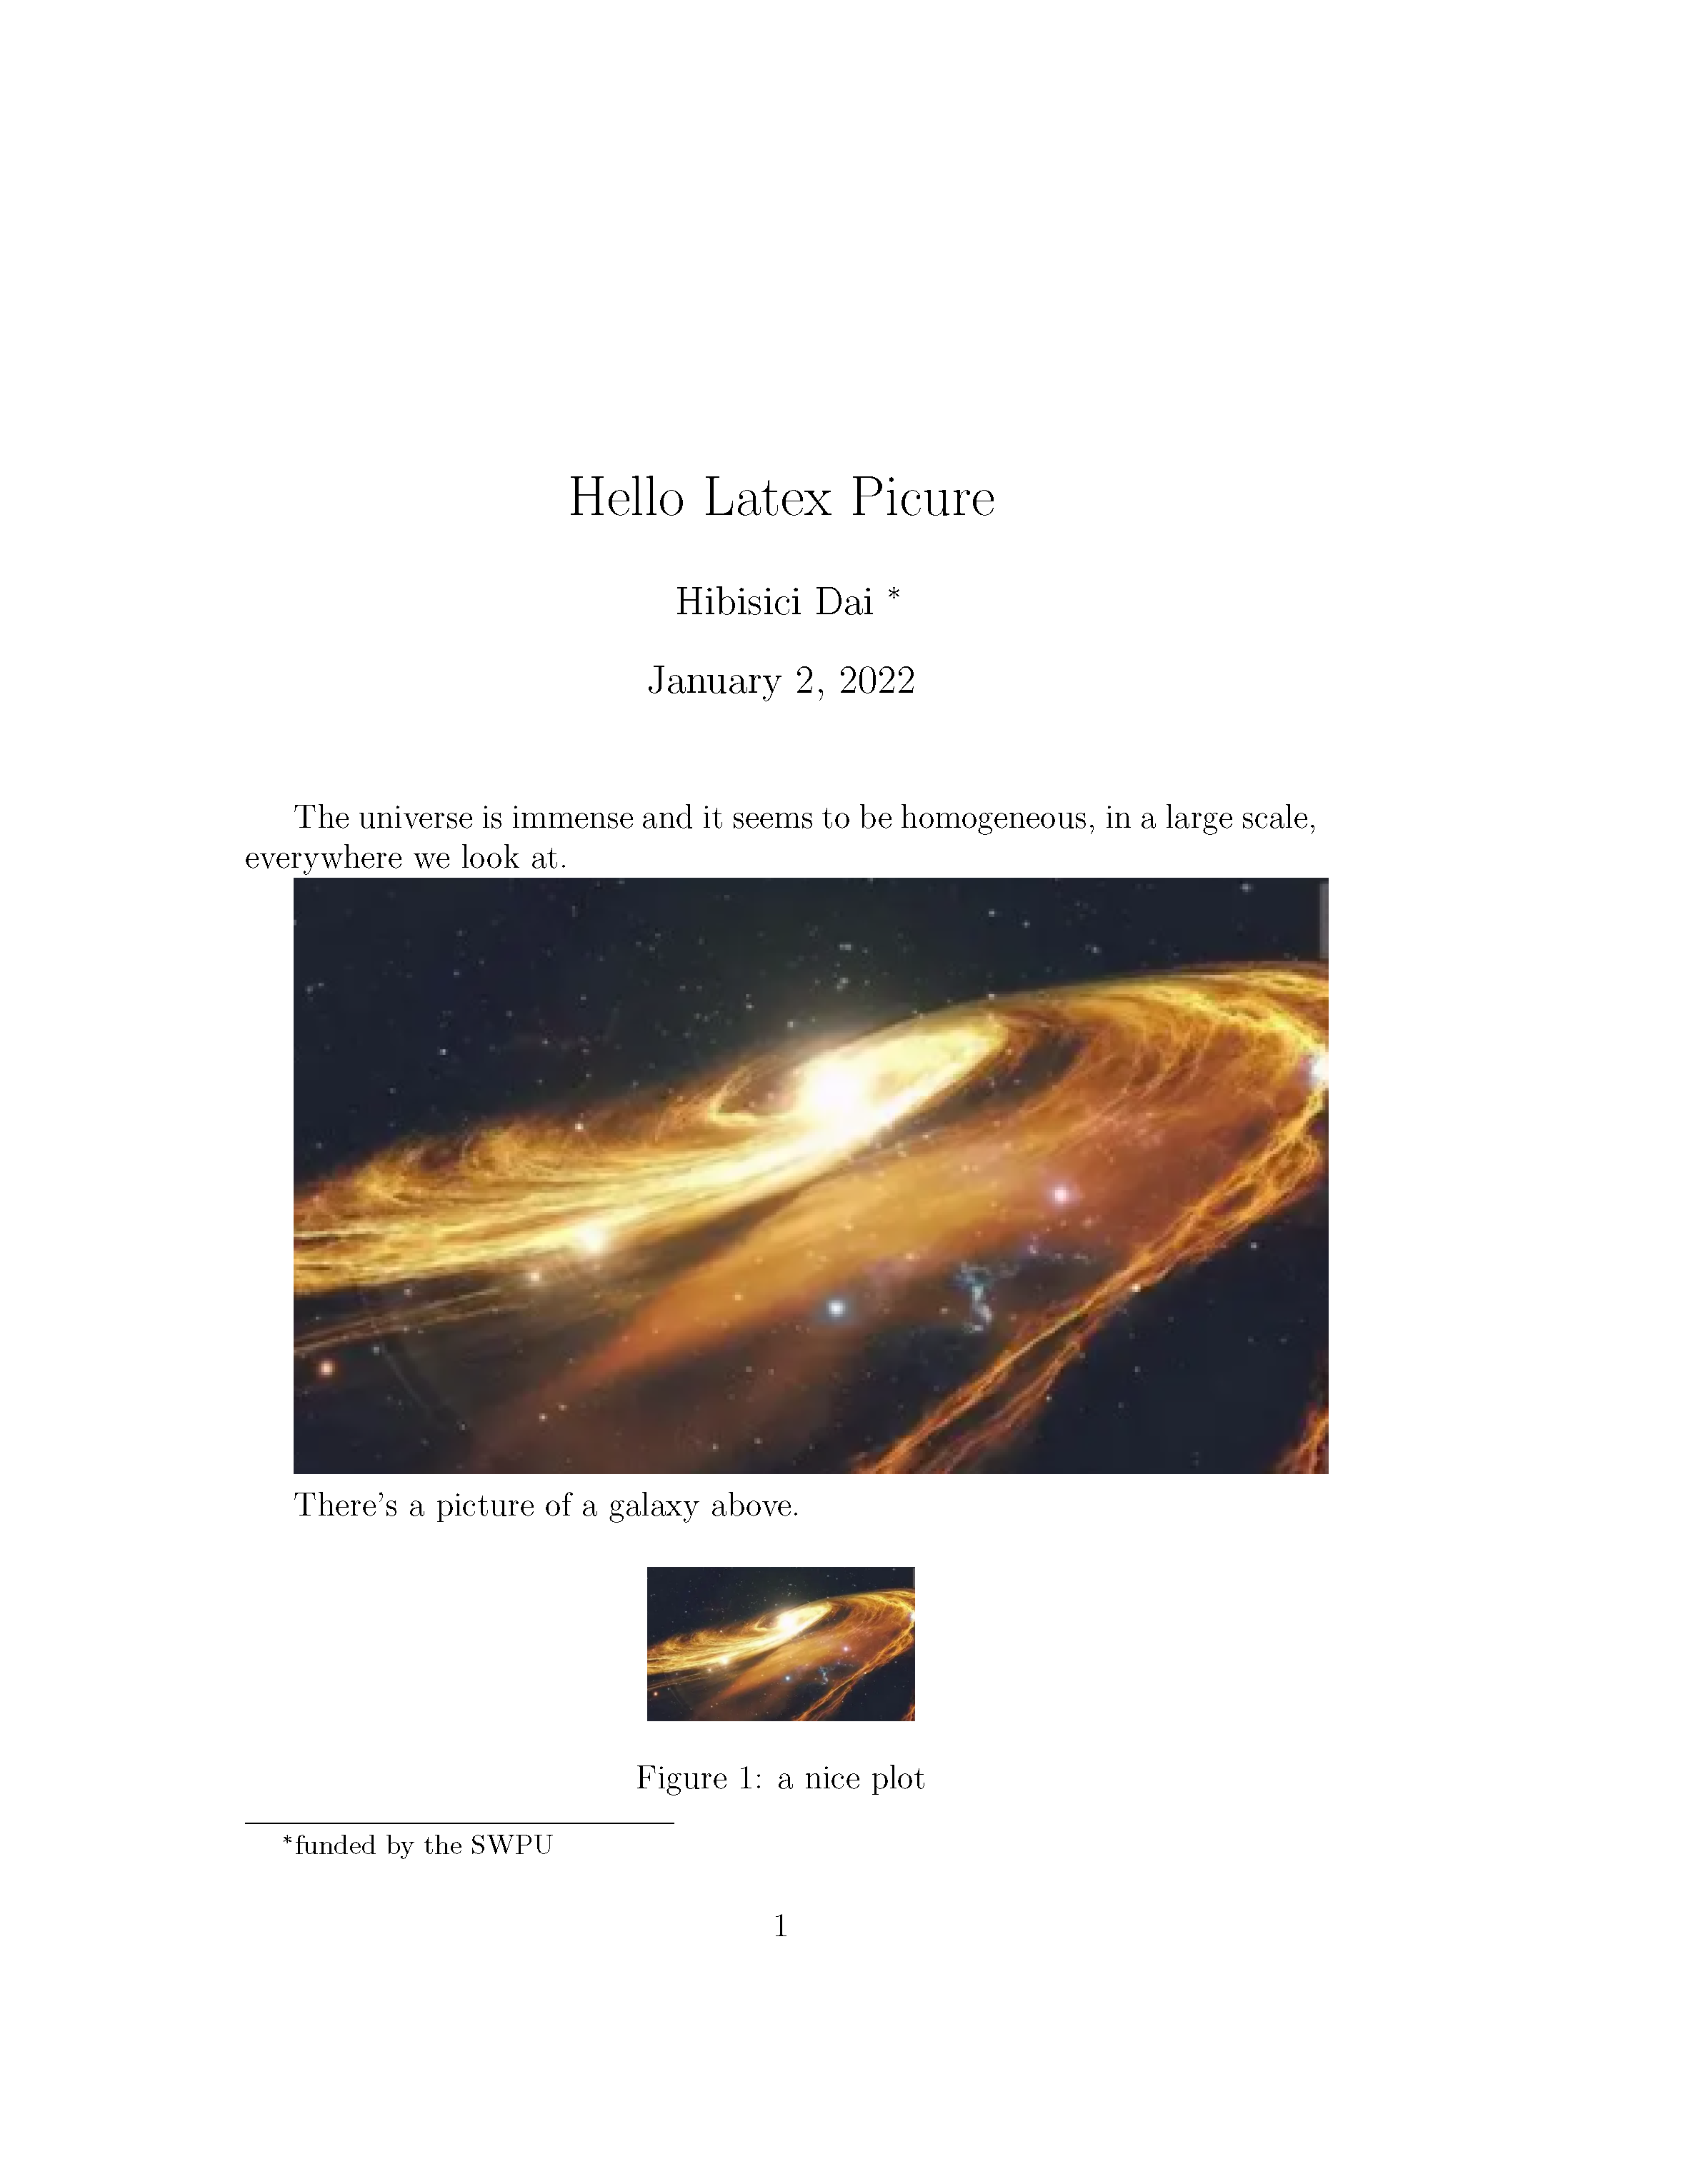
latex本身无法管理图像,因此需要使用package。在文档中包含一个图像,应该使用该 graphicx 包。这个包提供了新的命令, \includegraphics{...}并且\graphicspath{...}。要使用该 graphicx 包,在序言中包含以下行:\usepackage{graphicx}。图像的文件名不应包含空格或多个点

图的标题、标签和参考

可以通过figure环境对图像进行标题、标记和引用

1
2
3
\begin{figure}[placement specifier]
... figure contents ...
\end{figure}
Specifier Permission
h Place the float here, i.e., approximately at the same point it occurs in the source text (however, not exactly at the spot)
t Position at the top of the page.
b Position at the bottom of the page.
p Put on a special page for floats only.
! Override internal parameters LaTeX uses for determining “good” float positions.
H Places the float at precisely the location in the LaTeX code. Requires the float package, i.e., \usepackage{float}.
1
2
3
4
5
6
7
8
9
10
\begin{figure}[h]
\centering
\includegraphics[width=0.25\textwidth]{mesh}
\caption{a nice plot}
\label{fig:mesh1}
\end{figure}

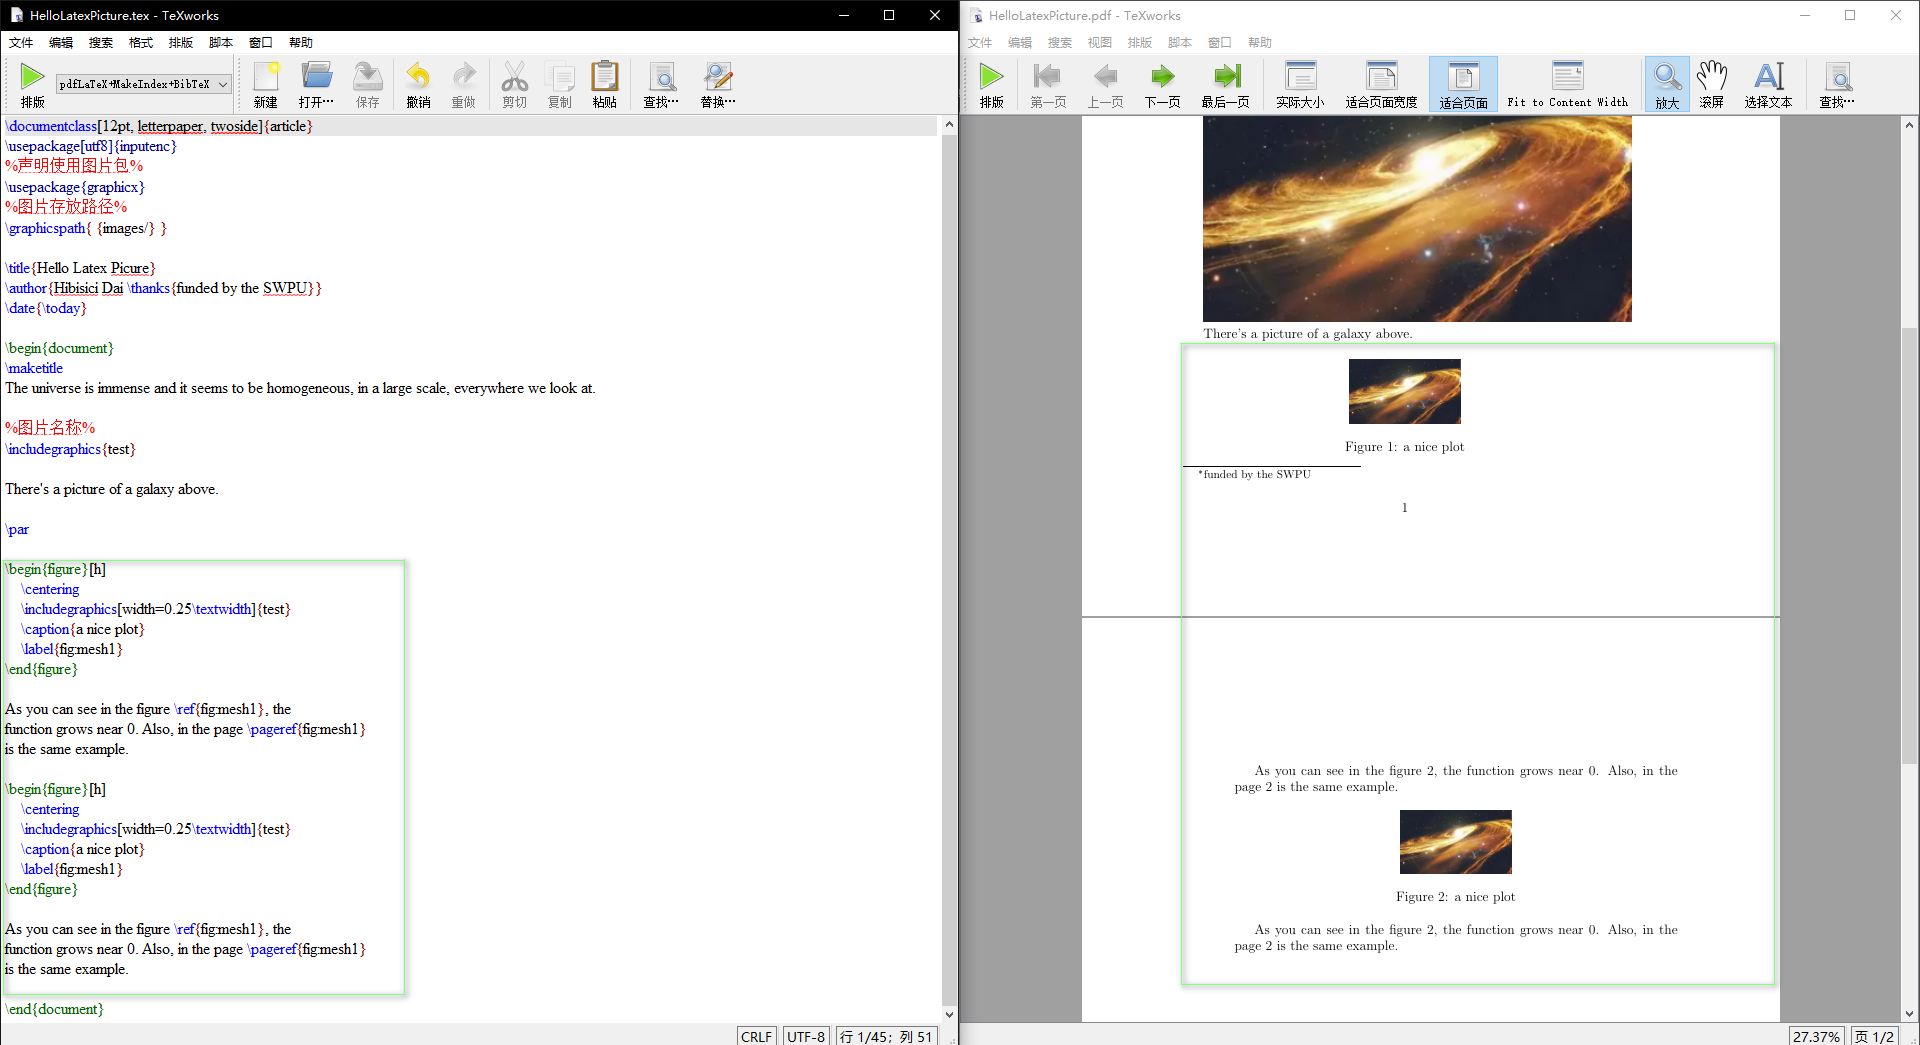
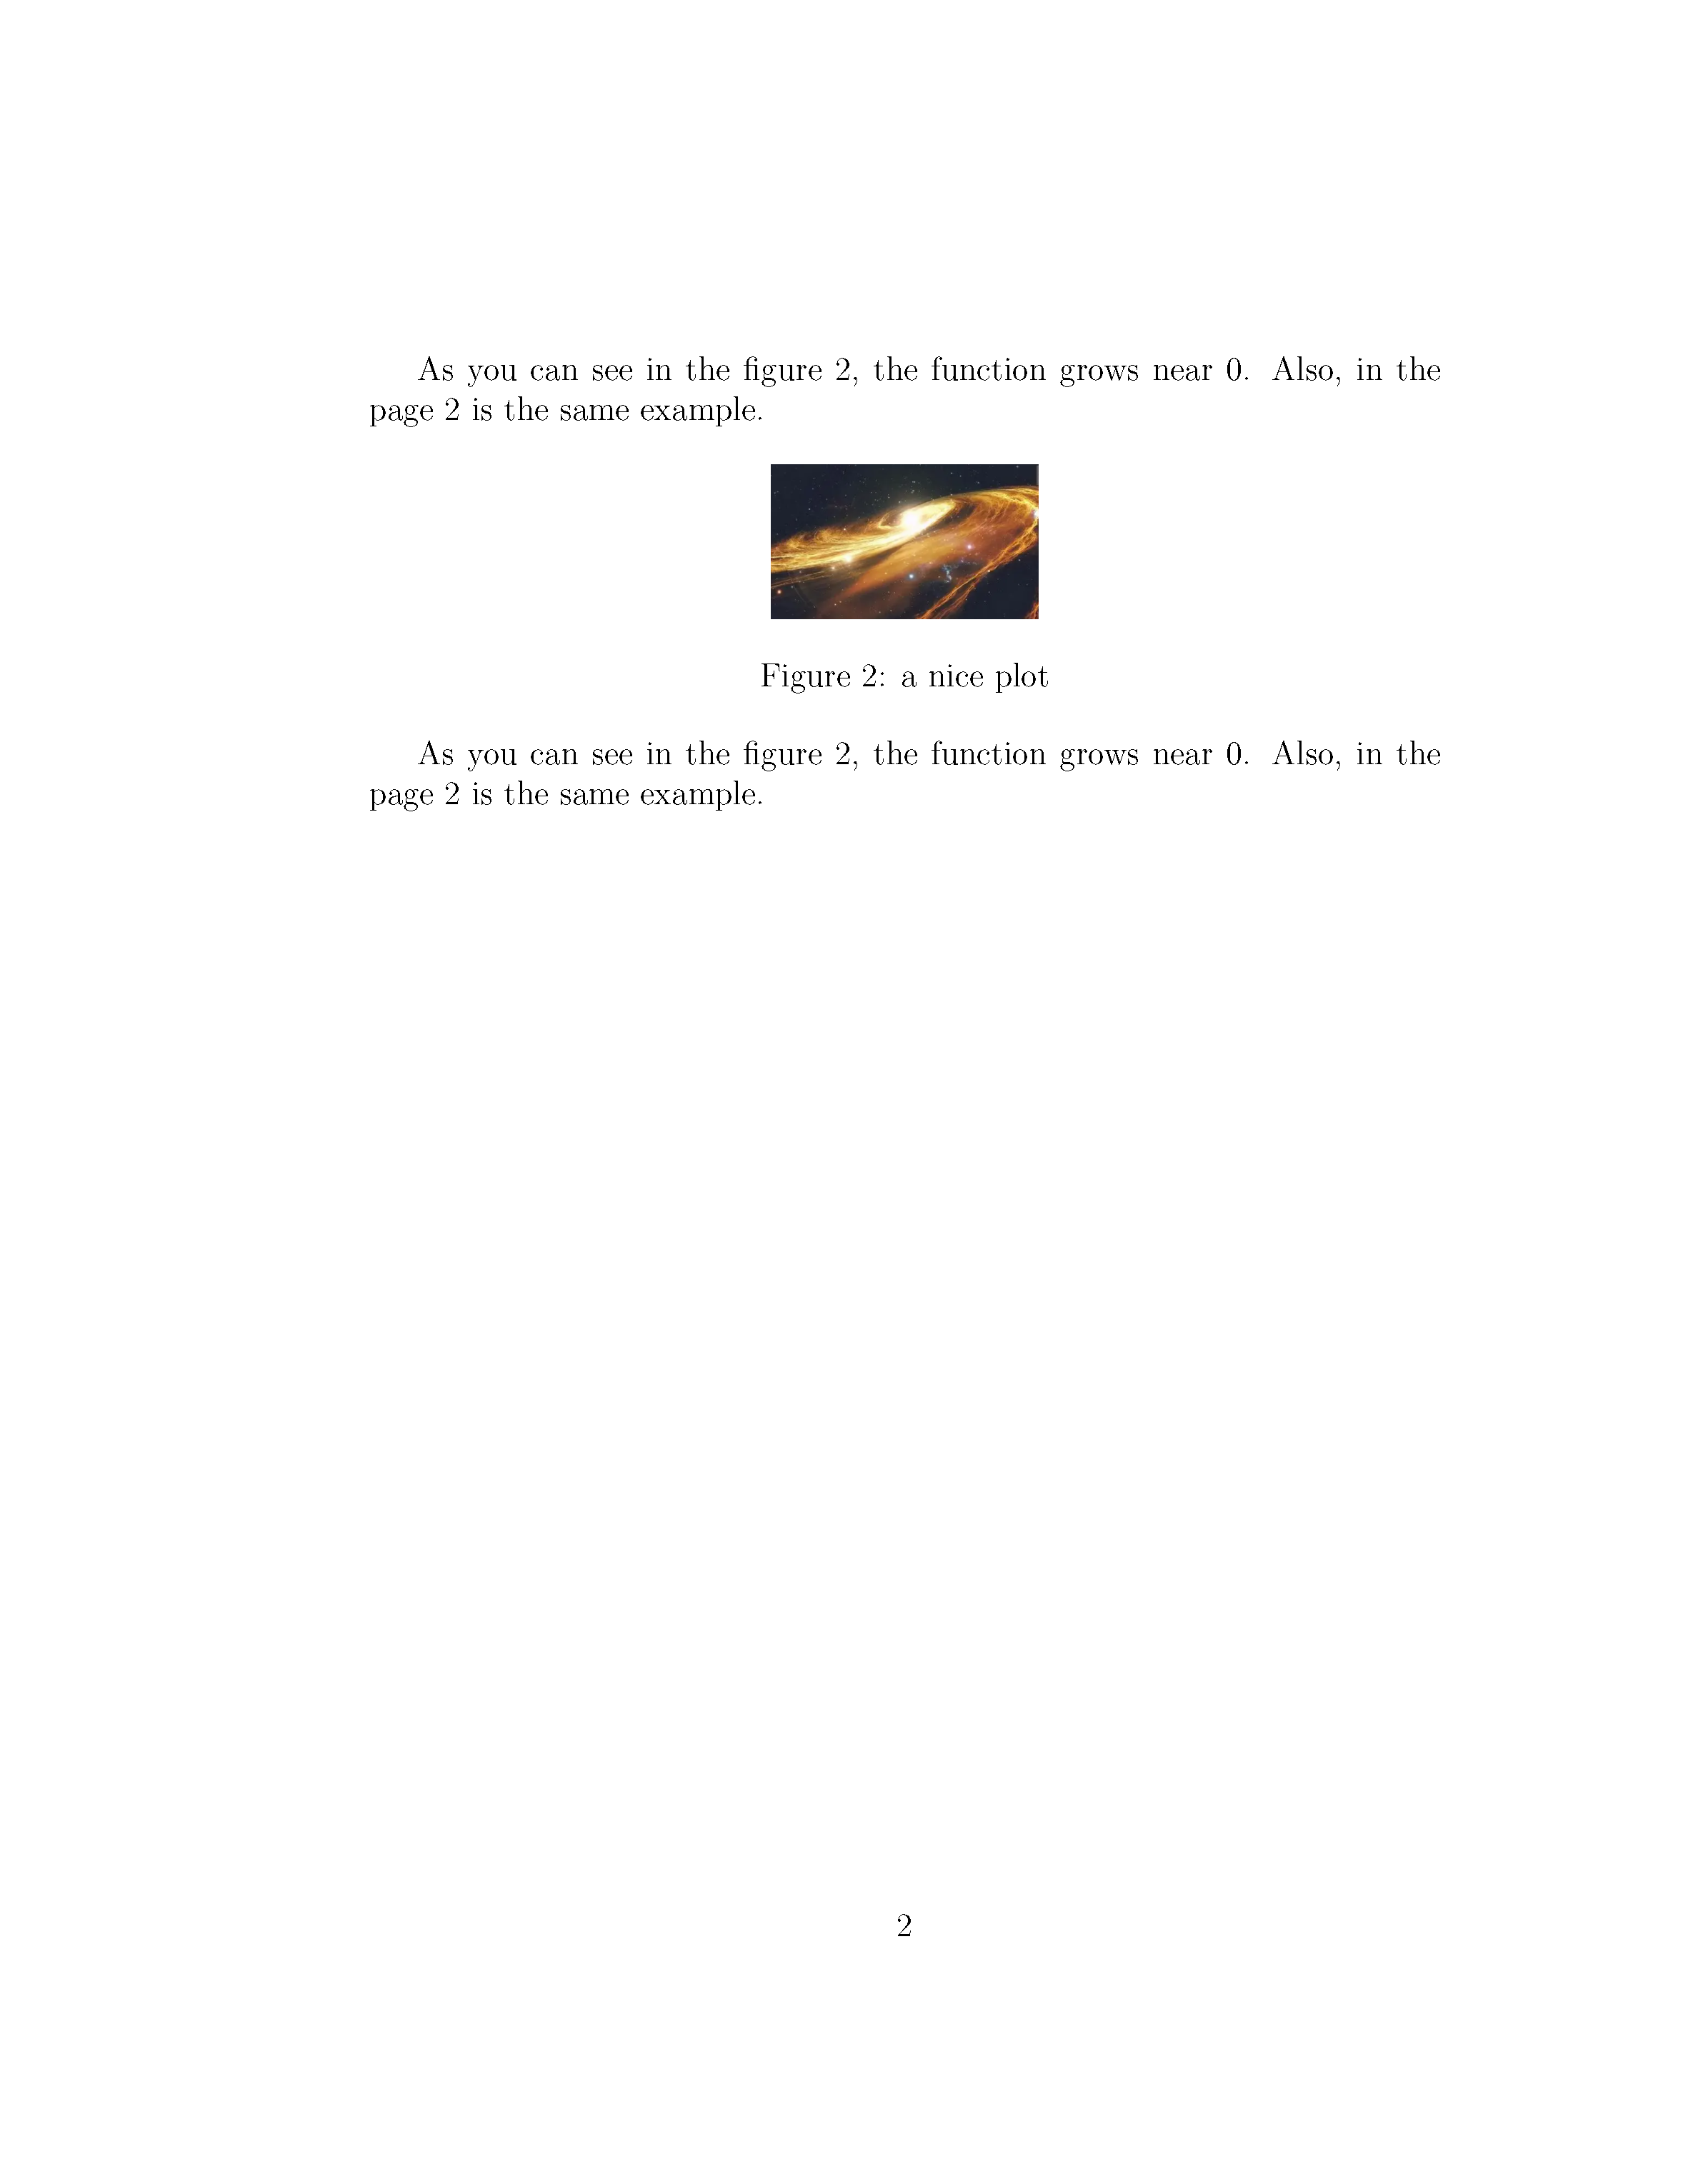
As you can see in the figure \ref{fig:mesh1}, the
function grows near 0. Also, in the page \pageref{fig:mesh1}
is the same example.

\caption{a nice plot}:此命令设置图形的标题。如果创建一个数字列表,则将在那里使用此标题。可将其放置在图形上方或下方。

\label{fig:mesh1}:如果需要引用文档中的图像,请使用此命令设置标签。标签将为图像编号,并结合下一个命令引用它。

\ref{fig:mesh1}:此代码将被与参考图对应的数字代替。

在latex文档中放置图像时,应该始终将它们放在figure环境或类似环境中,以便latex以适合文本其余部分的方式定位图像。

列表

无序列表

itemize标签产生,每个列表前有\item

默认情况下,单个条目用黑点表示,即所谓的项目符号。条目中的文本可以是任意长度。

1
2
3
4
\begin{itemize}
\item The individual entries are indicated with a black dot, a so-called bullet.
\item The text in the entries may be of any length.
\end{itemize}

有序列表

enumerate标签产生,每个列表前有\item

它会自动生成标记该项目的编号。枚举标签由从 1 开始的序列号组成。

1
2
3
4
\begin{enumerate}
\item This is the first entry in our list
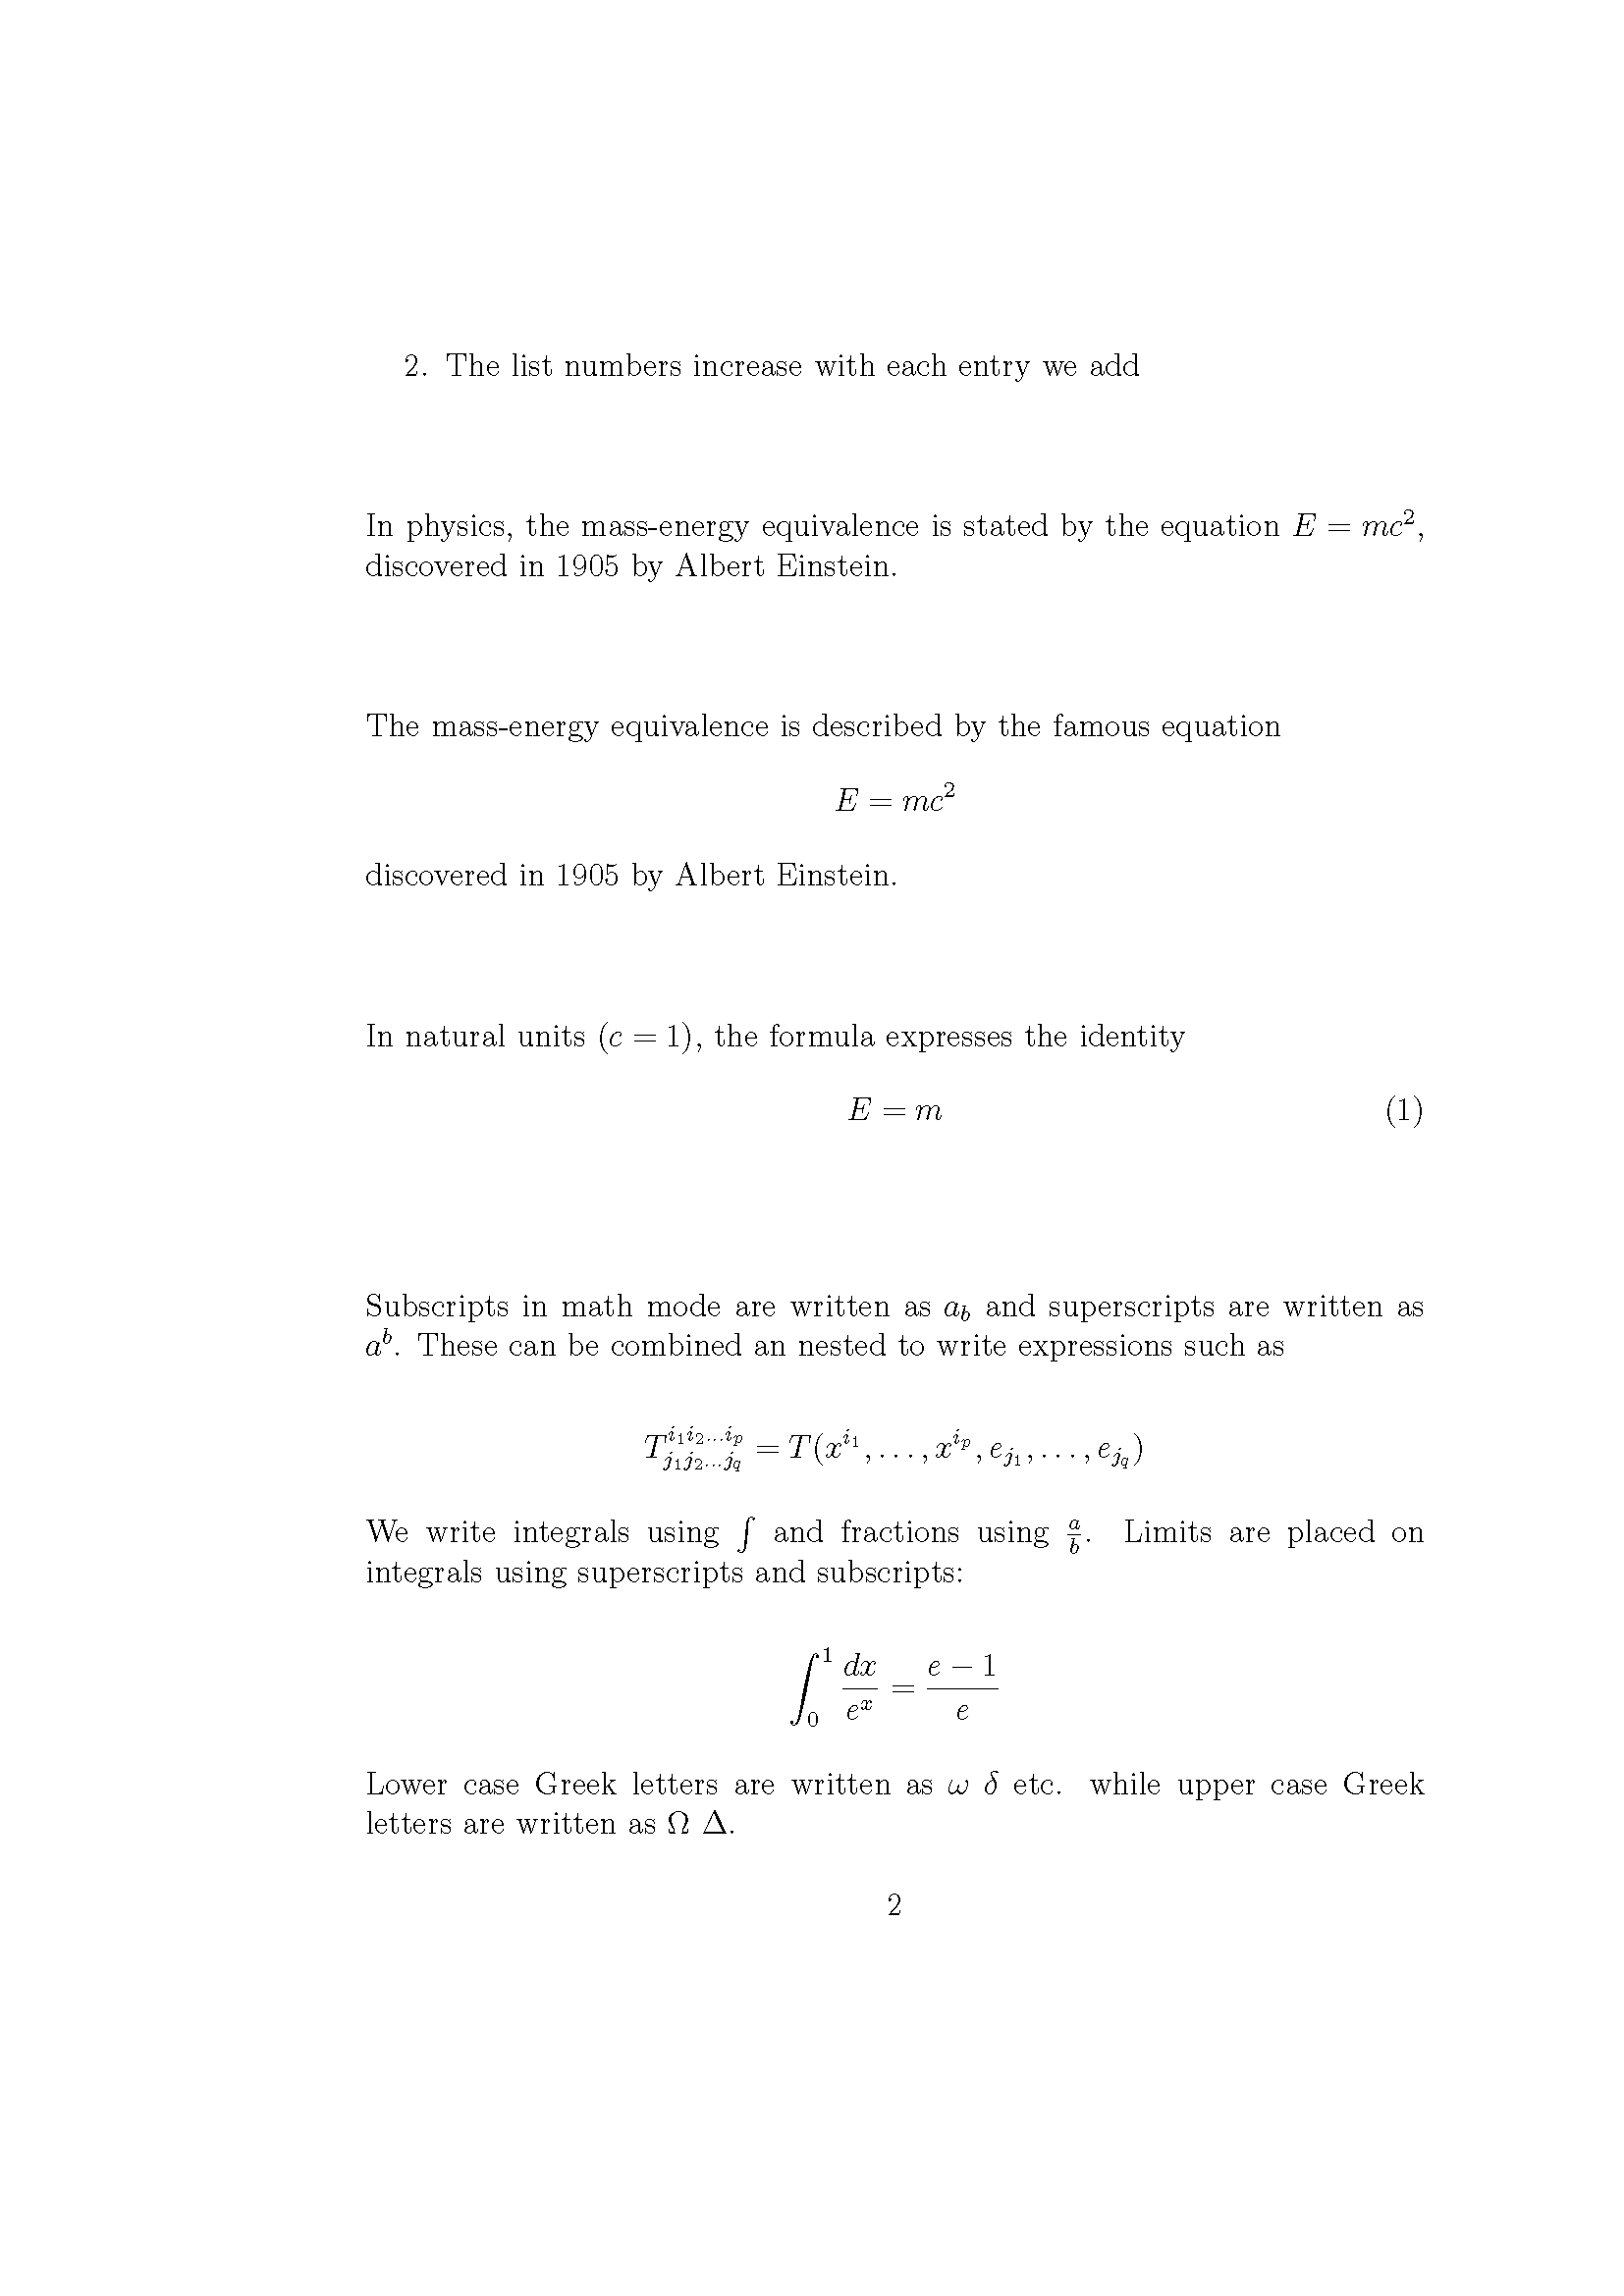
\item The list numbers increase with each entry we add
\end{enumerate}

数学公式

LATEX允许两种数学表达式的书写模式:内联(inline)模式和显示(display)模式。

内联(inline)模式:编写作为文本一部分的公式。

显示(display)模式:编写不属于文本或段落的表达式,因此放在单独的行上。

许多数学模式命令需要amsmath包。

内联(inline)模式

1
2
In physics, the mass-energy equivalence is stated 
by the equation $E=mc^2$, discovered in 1905 by Albert Einstein.

要将方程置于内联模式,请使用以下分隔符之一:

  • \( ... \)
  • $ ... $
  • \begin{math} ... \end{math}

显示(display)模式

要在显示模式下打印方程,请使用以下分隔符之一:

  • \[ ... \]
  • \begin{displaymath} ... \end{displaymath}
  • \begin{equation} ... \end{equation}
  • $$ ... $$不建议使用,不一致的间距,并不得与一些数学工具很好地工作。
1
2
3
4
5
6
7
8
9
10
%无编号-display%
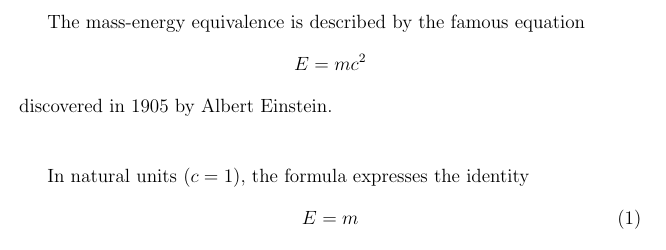
The mass-energy equivalence is described by the famous equation
\[ E=mc^2 \]
discovered in 1905 by Albert Einstein.

%有编号-display%
In natural units ($c = 1$), the formula expresses the identity
\begin{equation}
E=m
\end{equation}

基本数学符号案例

1
2
3
4
5
6
7
8
9
10
11
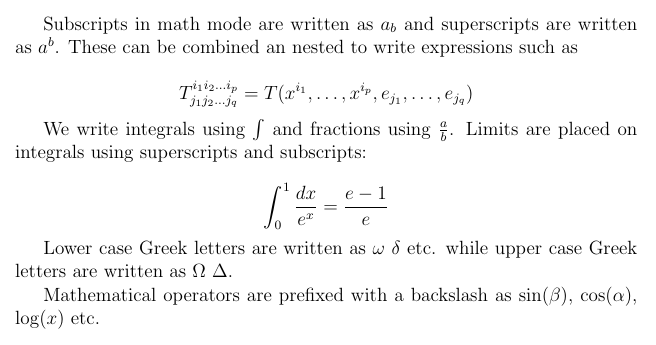
Subscripts in math mode are written as $a_b$ and superscripts are written as $a^b$. These can be combined an nested to write expressions such as

\[ T^{i_1 i_2 \dots i_p}_{j_1 j_2 \dots j_q} = T(x^{i_1},\dots,x^{i_p},e_{j_1},\dots,e_{j_q}) \]

We write integrals using $\int$ and fractions using $\frac{a}{b}$. Limits are placed on integrals using superscripts and subscripts:

\[ \int_0^1 \frac{dx}{e^x} = \frac{e-1}{e} \]

Lower case Greek letters are written as $\omega$ $\delta$ etc. while upper case Greek letters are written as $\Omega$ $\Delta$.

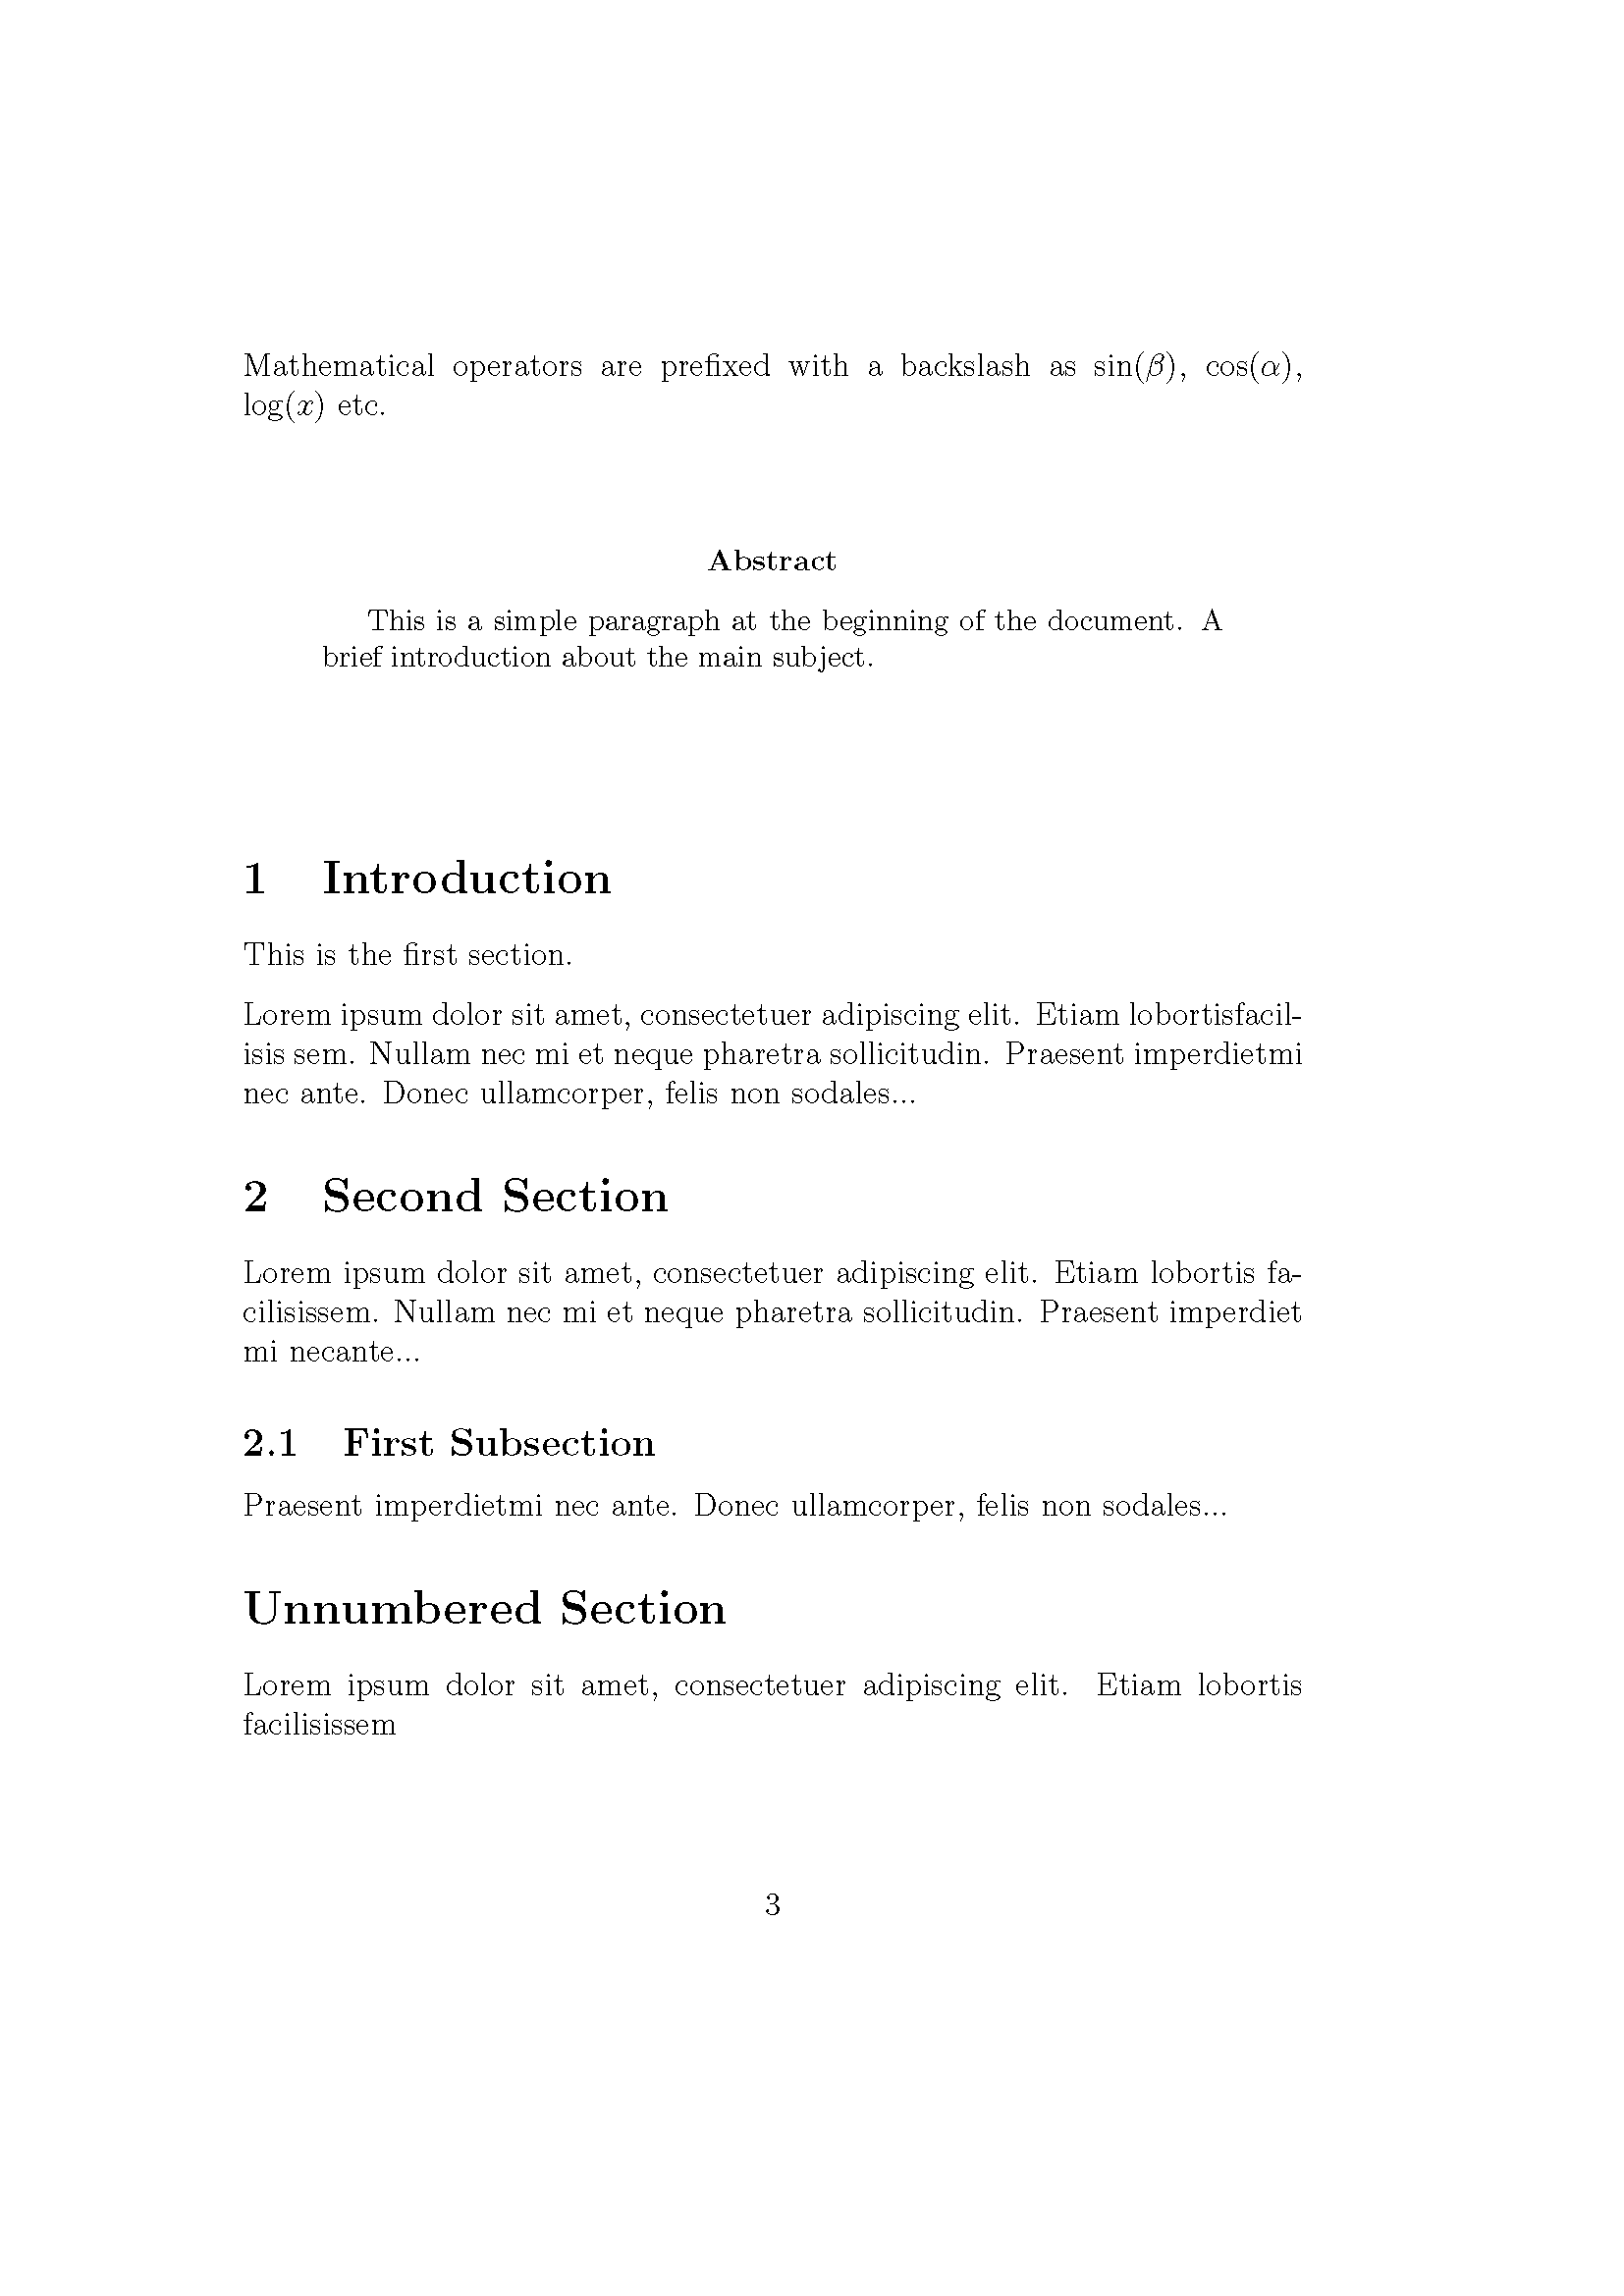
Mathematical operators are prefixed with a backslash as $\sin(\beta)$, $\cos(\alpha)$, $\log(x)$ etc.

基本格式化

摘要

声明摘要会将文字以特殊格式放置文档顶部。

1
2
3
4
5
6
7
\begin{document}

\begin{abstract}
This is a simple paragraph at the beginning of the
document. A brief introduction about the main subject.
\end{abstract}
\end{document}

缩进

  • 增加标准缩进

\indent 这个段落将使用标准缩进值(由 \parindent 定义)。即使在通常不缩进的位置
(如章节后的第一段),这个命令也会强制缩进。

  • 取消缩进

\noindent 这个段落不会有缩进,无论全局设置如何。

  • 使用自定义缩进
1
2
3
4
5
{\setlength{\parindent}{4em} \indent
这个段落将使用4em的缩进,而不是文档的默认缩进值。花括号确保这个更改仅对当前段落有效。
}

下一个段落将恢复使用默认缩进值。
1
\noindent\hspace{3cm}这个段落将从左边距开始有3厘米的缩进。这种方法可以精确控制缩进的大小。
  • 使用环境或命令组
1
2
3
4
5
6
7
8
9
10
11
12
13
% 在导言区定义
\newenvironment{specialindent}[1]
{\par\setlength{\parindent}{#1}\indent}
{\par}

% 在文档中使用
\begin{specialindent}{5em}
这个段落将使用5em的缩进。环境可以接受参数,使其更加灵活。

这个段落也在环境内,所以也会使用5em的缩进。
\end{specialindent}

这个段落在环境外,将恢复使用默认缩进。
  • leftskip
1
2
3
4
5
6
{
\setlength{\leftskip}{2cm}
这个段落的所有行都将从左边距缩进2厘米。这不仅仅是第一行缩进,而是整个段落都向右移动。

这种效果适合创建引用或突出显示的文本块。
}
  • 悬挂缩进
1
2
3
\hangindent=2cm \hangafter=1
这个段落将从第二行开始缩进2厘米。第一行不缩进,这种格式称为悬挂缩进,常用于参考文献列表或术语定义。
\hangafter 参数指定从哪一行开始应用缩进(正值表示从指定行开始,负值表示前几行)。
  • quote或quotation
1
2
3
4
5
6
7
8
9
10
11
\begin{quote}
这个段落使用 quote 环境,会在左右两侧都有适当的缩进。quote 环境通常用于短引用,
段落之间没有缩进。
\end{quote}

\begin{quotation}
这个段落使用 quotation 环境,也会在左右两侧有缩进。quotation 环境通常用于较长的引用,
段落之间保留缩进。这个环境适合包含多个段落的长引用。

这是 quotation 环境中的第二个段落,注意段落首行仍然有缩进。
\end{quotation}

段落与换行

  • \\ 换行
  • ~\\ 不打断换行
  • \par 新自然段

可能需要声明包 \usepackage{parskip}

章节

基本的深度级别

  • -1 : \part{part}
  • 0 : \chapter{chapter}
  • 1 : \section{section}
  • 2 : \subsection{subsection}
  • 3 : \subsubsection{subsubsection}
  • 4 : \paragraph{paragraph}
  • 5 : \subparagraph{subparagraph}

\section{} 标志着一个新部分的开始,在大括号内设置标题。节编号是自动的,可以通过*在节命令中来禁用自动变化,\section*{}。

类似的\subsection{},实际上是\subsubsection{}。

\part 和 \chapter 仅在报告和书籍文档类中可用。

1
2
3
4
5
6
7
8
9
10
11
12
13
14
15
16
17
18
19
20
21
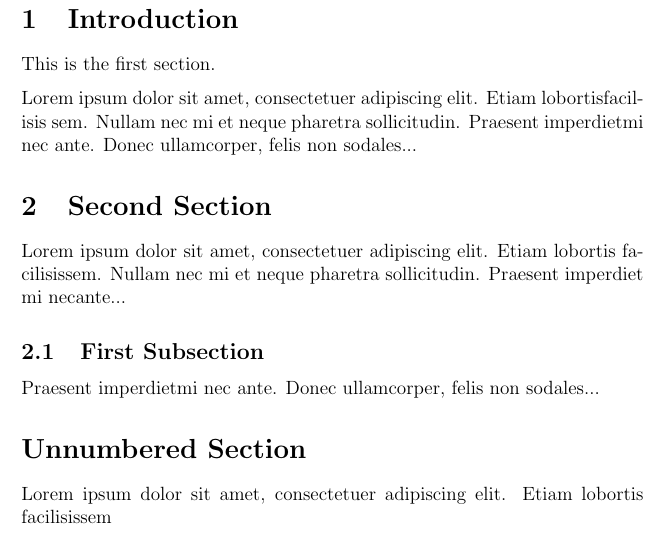
\section{Introduction}

This is the first section.

Lorem ipsum dolor sit amet, consectetuer adipiscing
elit. Etiam lobortisfacilisis sem. Nullam nec mi et
neque pharetra sollicitudin. Praesent imperdietmi nec ante.
Donec ullamcorper, felis non sodales...

\section{Second Section}

Lorem ipsum dolor sit amet, consectetuer adipiscing elit.
Etiam lobortis facilisissem. Nullam nec mi et neque pharetra
sollicitudin. Praesent imperdiet mi necante...

\subsection{First Subsection}
Praesent imperdietmi nec ante. Donec ullamcorper, felis non sodales...

\section*{Unnumbered Section}
Lorem ipsum dolor sit amet, consectetuer adipiscing elit.
Etiam lobortis facilisissem

表

1
2
3
4
5
6
7
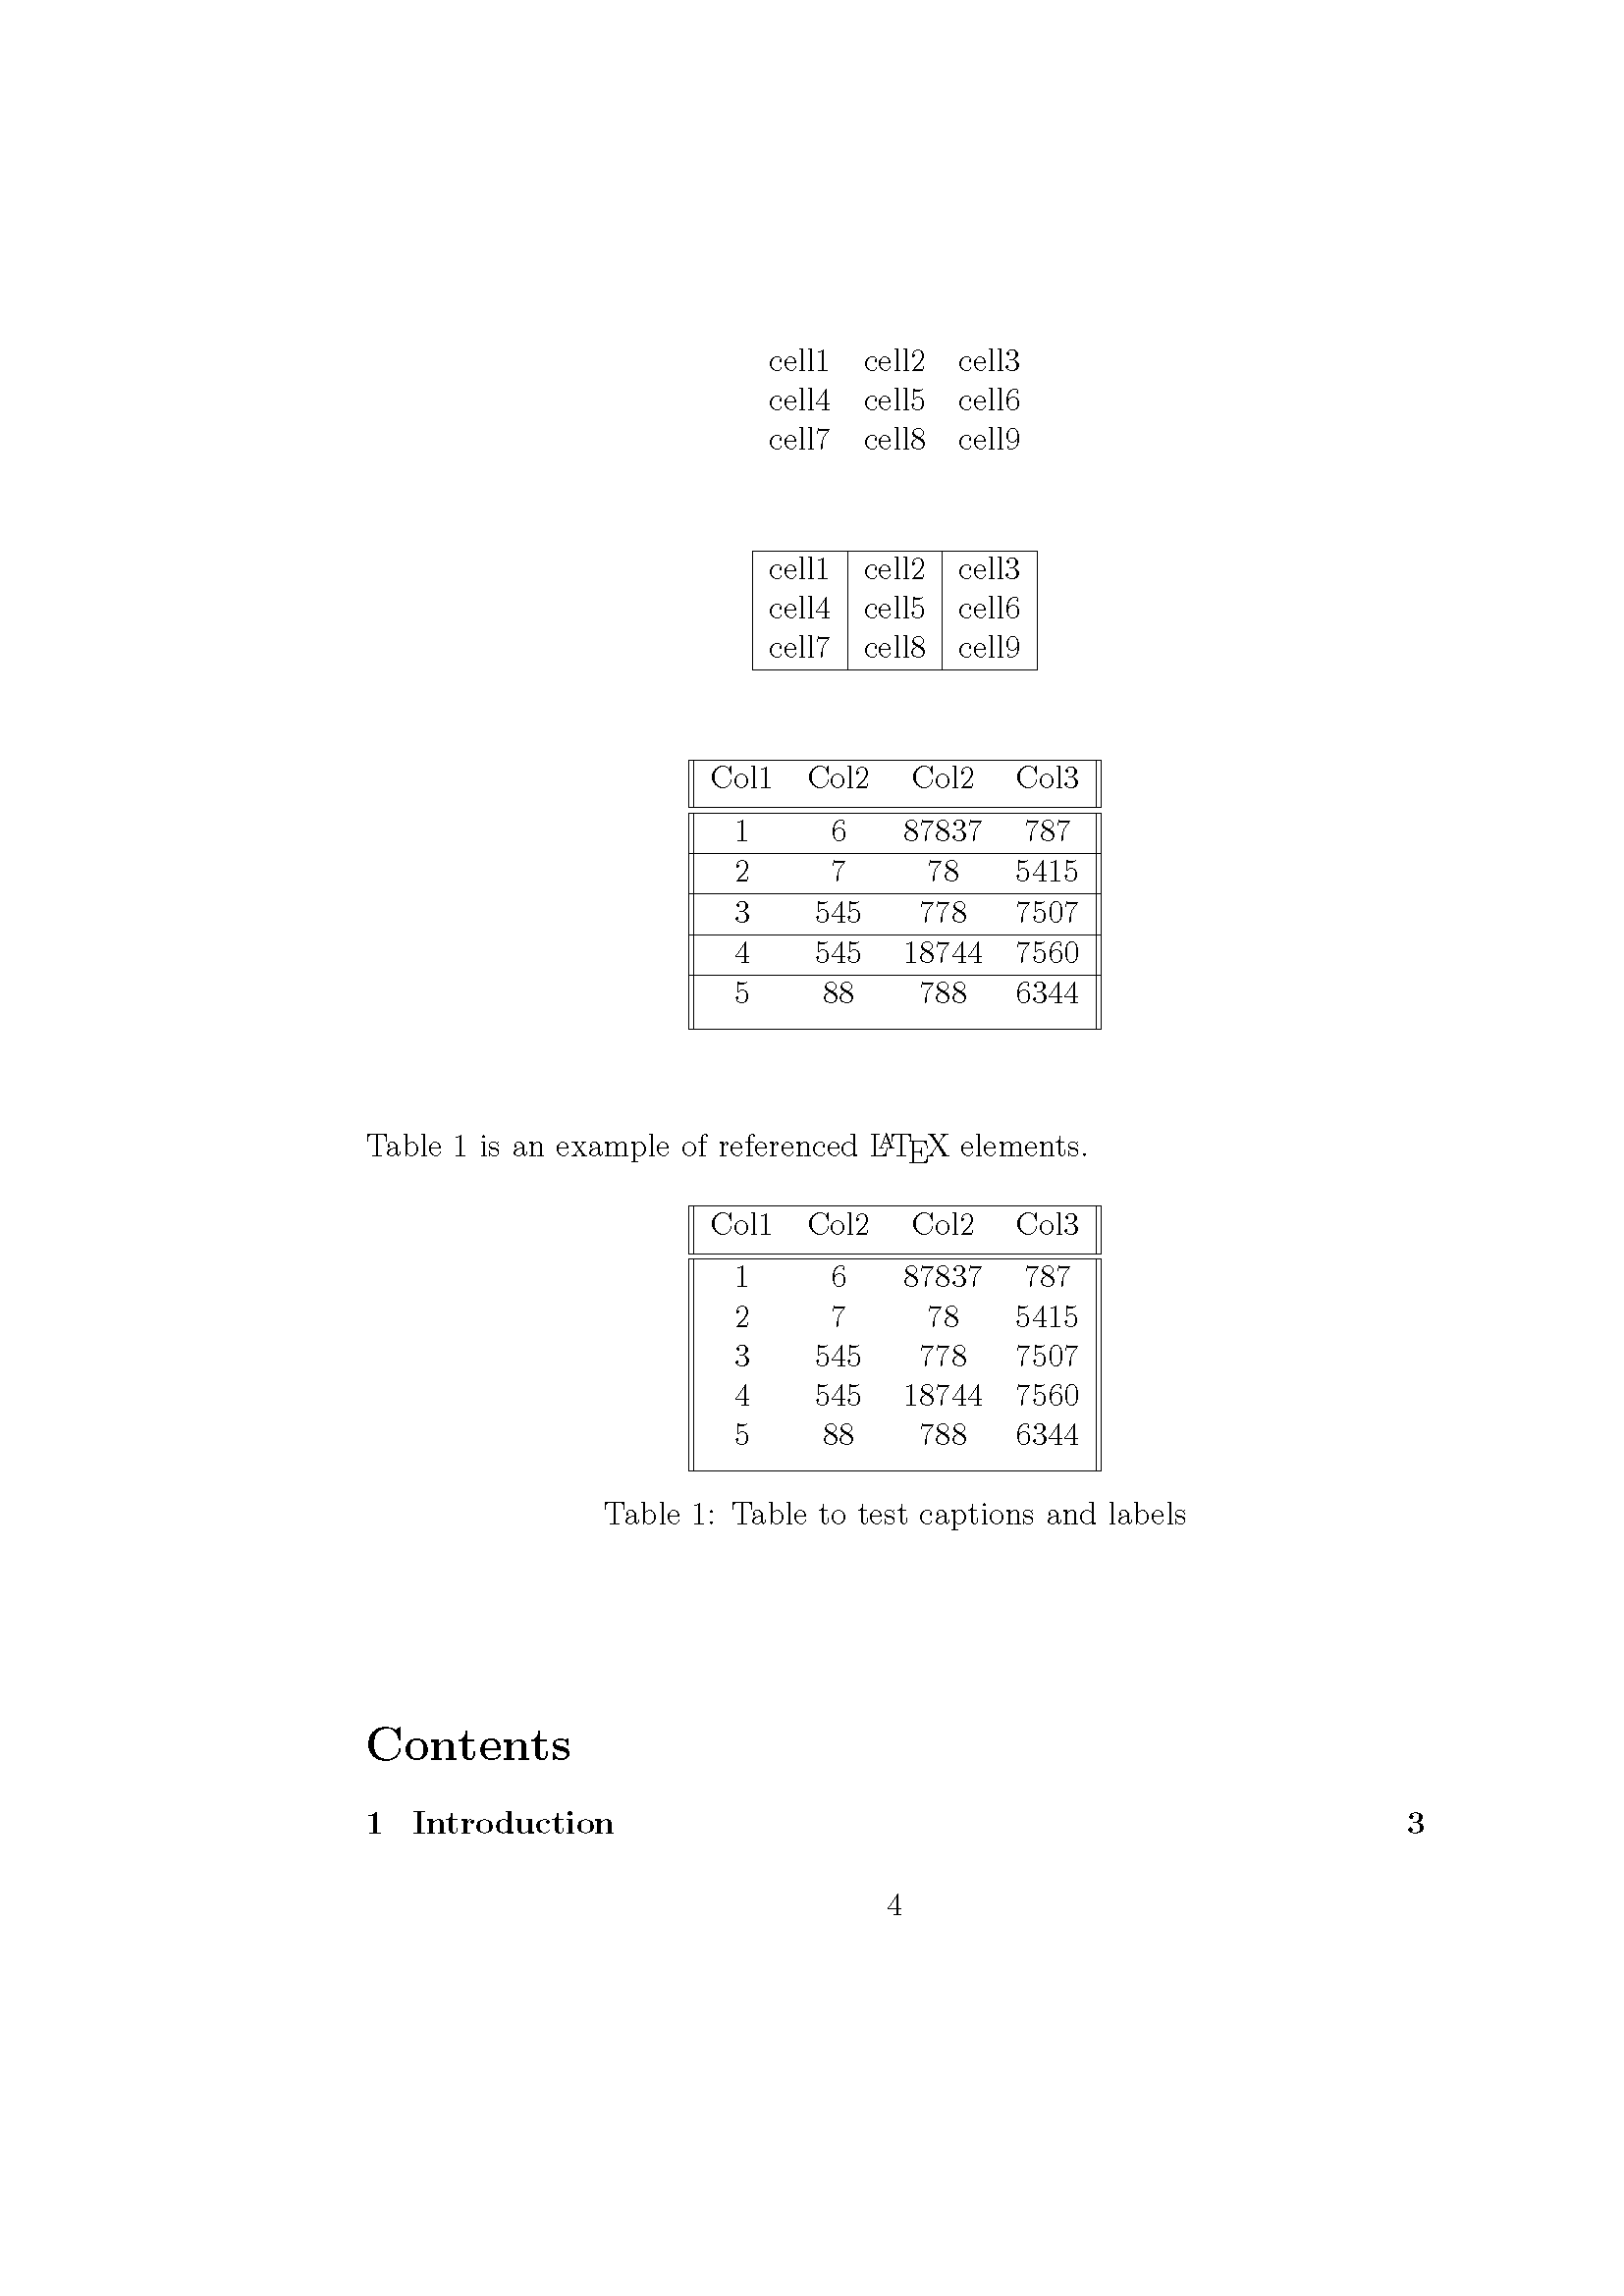
\begin{center}
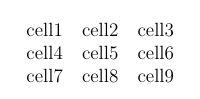
\begin{tabular}{ c c c }
cell1 & cell2 & cell3 \\
cell4 & cell5 & cell6 \\
cell7 & cell8 & cell9
\end{tabular}
\end{center}

表边框

1
2
3
4
5
6
7
8
9
\begin{center}
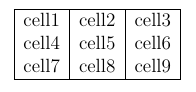
\begin{tabular}{ |c|c|c| }
\hline
cell1 & cell2 & cell3 \\
cell4 & cell5 & cell6 \\
cell7 & cell8 & cell9 \\
\hline
\end{tabular}
\end{center}
1
2
3
4
5
6
7
8
9
10
11
12
13
14
15
16
17
\begin{center}
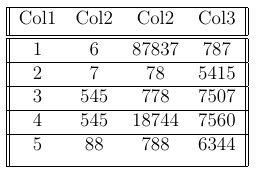
\begin{tabular}{||c c c c||}
\hline
Col1 & Col2 & Col2 & Col3 \\ [0.5ex]
\hline\hline
1 & 6 & 87837 & 787 \\
\hline
2 & 7 & 78 & 5415 \\
\hline
3 & 545 & 778 & 7507 \\
\hline
4 & 545 & 18744 & 7560 \\
\hline
5 & 88 & 788 & 6344 \\ [1ex]
\hline
\end{tabular}
\end{center}

表的标题、标签和参考

1
2
3
4
5
6
7
8
9
10
11
12
13
14
15
16
17
18
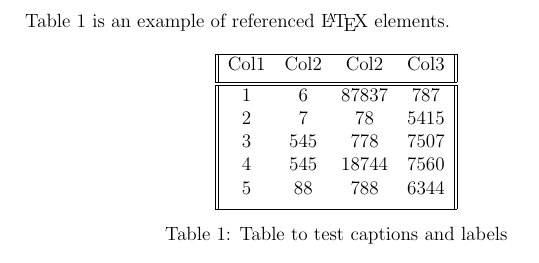
Table \ref{table:data} is an example of referenced \LaTeX{} elements.

\begin{table}[h!]
\centering
\begin{tabular}{||c c c c||}
\hline
Col1 & Col2 & Col2 & Col3 \\ [0.5ex]
\hline\hline
1 & 6 & 87837 & 787 \\
2 & 7 & 78 & 5415 \\
3 & 545 & 778 & 7507 \\
4 & 545 & 18744 & 7560 \\
5 & 88 & 788 & 6344 \\ [1ex]
\hline
\end{tabular}
\caption{Table to test captions and labels}
\label{table:data}
\end{table}

目录

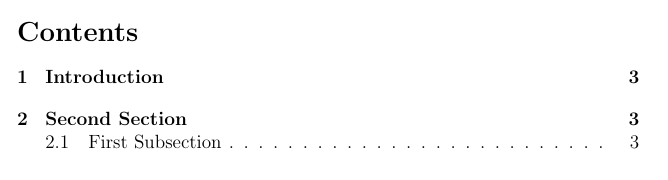
\tableofcontents 创建目录

章节、小节和章节会自动包含在目录中。要手动添加条目,例如当您想要一个未编号的部分时,请使用\addcontentsline示例中所示的命令。

1
2
3
4
5
6
7
8
9
10
11
12
13
14
15
16
17
18
19
20
21
22
23
24
25
26
27
28
29
30
31
32
33
34
35
36
\documentclass{article}
\usepackage[utf8]{inputenc}

\title{Sections and Chapters}
\author{Gubert Farnsworth}
\date{ }

\begin{document}

\maketitle

\tableofcontents

\section{Introduction}

This is the first section.

Lorem ipsum dolor sit amet, consectetuer adipiscing
elit. Etiam lobortisfacilisis sem. Nullam nec mi et
neque pharetra sollicitudin. Praesent imperdietmi nec ante.
Donec ullamcorper, felis non sodales...

\section*{Unnumbered Section}
\addcontentsline{toc}{section}{Unnumbered Section}

Lorem ipsum dolor sit amet, consectetuer adipiscing elit.
Etiam lobortis facilisissem. Nullam nec mi et neque pharetra
sollicitudin. Praesent imperdiet mi necante...

\section{Second Section}

Lorem ipsum dolor sit amet, consectetuer adipiscing elit.
Etiam lobortis facilisissem. Nullam nec mi et neque pharetra
sollicitudin. Praesent imperdiet mi necante...

\end{document}

参考文献-elsarticle

参考文件样式

elsarticle.cls 提供了三种参考文献样式文件(.bst):

elsarticle-num.bst:用于编号引用方案
elsarticle-num-names.bst:用于带有natbib新选项的编号方案
elsarticle-harv.bst:用于作者-年份引用方案

每个文章都有BibTex格式的引用

1
2
3
4
5
6
7
8
9
@article{wu2022resistivity,
title={Resistivity anisotropy analysis of Longmaxi shale by resistivity measurements, scanning electron microscope, and resistivity simulation},
author={Wu, Feng and Dai, Jin and Wen, Zhu and Yao, Cong and Shi, Xiangchao and Liang, Lixi and Yun, Liang and Shi, Biao},
journal={Journal of Applied Geophysics},
volume={203},
pages={104700},
year={2022},
publisher={Elsevier}
}

bib文件存储文章信息,bst文件控制参考文献格式。

引用方式

在LaTeX中使用natbib包进行文献引用的不同方式:

括号引用:\citep{WB96} 生成 (Wettig & Brown, 1996)
文本引用:\citet{ESG96} 生成 Elson et al. (1996)
带前后缀的引用:\citep[e.g.][Ch. 2]{Gea97} 生成 (e.g. Governato et al., 1997, Ch. 2)

应用方案配置

elsarticle 默认以数字方式加载natbib包
可以通过在类加载命令中添加authoryear选项来改为作者-年份方案
可以使用\biboptions命令配置更多natbib选项

使用流程

  • 在文档前导部分设置

在LaTeX 文档前导部分(preamble)添加以下代码:

1
2
3
4
\documentclass[authoryear]{elsarticle}

% 如果需要更多 natbib 选项,可以添加:
\biboptions{authoryear,round,comma,sort&compress}

关键是使用 authoryear 选项加载 elsarticle 文档类。

  • 设置参考文献样式文件

在文档中(通常在 \begin{document} 之后,\end{document} 之前)添加:

1
2
\bibliographystyle{elsarticle-harv}
\bibliography{your-bib-file} % 替换为您的 .bib 文件名(不带扩展名)
  • 在正文中引用文献

要使用括号引用格式,在文本中使用 \citep{} 命令:

1
2
3
根据最新研究 \citep{WB96},这种方法可以显著提高效率。

多个引用可以这样使用:\citep{WB96,ESG96,Gea97}

这将生成类似 “(Wettig & Brown, 1996)” 的引用格式。

注意事项

确保您的 .bib 文件中包含所有引用的文献条目
编译时需要运行:pdflatex → bibtex → pdflatex → pdflatex
如果使用编辑器如Overleaf,通常会自动完成这些编译步骤

elsarticle editorialmanager 上传注意

将tex文件和bib文件都作为手稿类型manuscript上传
图片选择figure
就可以编译成功

参考视频:如何在EM中提交LaTeX文

附录

  • HelloLatex.tex
1
2
3
4
5
6
7
8
9
10
11
12
13
14
15
16
17
18
19
20
21
22
23
24
25
26
27
28
29
30
31
32
33
34
35
36
37
38
39
40
41
42
43
44
45
46
47
48
49
50
51
52
53
54
55
56
57
58
59
60
61
62
63
64
65
66
67
68
69
70
71
72
73
74
75
76
77
78
79
80
81
82
83
84
85
86
87
88
89
90
91
92
93
94
95
96
97
98
99
100
101
102
103
104
105
106
107
108
109
110
111
112
113
114
115
116
117
118
119
120
121
122
123
124
125
126
127
128
129
130
131
132
133
134
135
136
137
138
139
140
141
142
143
144
145
146
147
148
149
150
151
152
153
154
155
156
157
158
159
160
161
162
163
164
165
166
167
168
169
170
171
172
173
174
175
176
177
178
179
180
181
182
183
184
185
186
187
188
189
190
191
192
193
194
195
196
197
198
199
200
201
202
203
204
205
206
207
208
209
210
211
212
213
214
\documentclass[12pt, letterpaper, twoside]{article}
\usepackage[utf8]{inputenc}
%数学包%
\usepackage{amsmath}
%段落换行包%
\usepackage{parskip}

\title{Hello Latex}
\author{Hibisici Dai \thanks{funded by the SWPU}}
\date{\today}

\begin{document}
\maketitle

We have now added a title, author and date to our first \LaTeX{} document!

\par
~\\

%粗体%
Some of the \textbf{greatest}

%下划线%
discoveries in \underline{science}

%粗体、斜体%
were made by \textbf{\textit{accident}}.

\par
~\\

%正常斜体%
Some of the greatest \emph{discoveries}
in science were made by accident.

%斜体中标正常%
\textit{Some of the greatest \emph{discoveries}
in science were made by accident.}

%粗体中斜体%
\textbf{Some of the greatest \emph{discoveries}
in science were made by accident.}

\par
~\\

%无序列表%
\begin{itemize}
\item The individual entries are indicated with a black dot, a so-called bullet.
\item The text in the entries may be of any length.
\end{itemize}

\par
~\\

%有序列表%
\begin{enumerate}
\item This is the first entry in our list
\item The list numbers increase with each entry we add
\end{enumerate}

\par
~\\

%公式-inline%
In physics, the mass-energy equivalence is stated
by the equation $E=mc^2$, discovered in 1905 by Albert Einstein.

\par
~\\

%无编号-display%
The mass-energy equivalence is described by the famous equation
\[ E=mc^2 \]
discovered in 1905 by Albert Einstein.

\par
~\\

%有编号-display%
In natural units ($c = 1$), the formula expresses the identity
\begin{equation}
E=m
\end{equation}

\par
~\\

%基本数学符号案例%
Subscripts in math mode are written as $a_b$ and superscripts are written as $a^b$. These can be combined an nested to write expressions such as

\[ T^{i_1 i_2 \dots i_p}_{j_1 j_2 \dots j_q} = T(x^{i_1},\dots,x^{i_p},e_{j_1},\dots,e_{j_q}) \]

We write integrals using $\int$ and fractions using $\frac{a}{b}$. Limits are placed on integrals using superscripts and subscripts:

\[ \int_0^1 \frac{dx}{e^x} = \frac{e-1}{e} \]

Lower case Greek letters are written as $\omega$ $\delta$ etc. while upper case Greek letters are written as $\Omega$ $\Delta$.

Mathematical operators are prefixed with a backslash as $\sin(\beta)$, $\cos(\alpha)$, $\log(x)$ etc.

\par
~\\

%摘要%
\begin{abstract}
This is a simple paragraph at the beginning of the
document. A brief introduction about the main subject.
\end{abstract}

\par
~\\

%测试章节%
\section{Introduction}

This is the first section.

Lorem ipsum dolor sit amet, consectetuer adipiscing
elit. Etiam lobortisfacilisis sem. Nullam nec mi et
neque pharetra sollicitudin. Praesent imperdietmi nec ante.
Donec ullamcorper, felis non sodales...

\section{Second Section}

Lorem ipsum dolor sit amet, consectetuer adipiscing elit.
Etiam lobortis facilisissem. Nullam nec mi et neque pharetra
sollicitudin. Praesent imperdiet mi necante...

\subsection{First Subsection}
Praesent imperdietmi nec ante. Donec ullamcorper, felis non sodales...

\section*{Unnumbered Section}
Lorem ipsum dolor sit amet, consectetuer adipiscing elit.
Etiam lobortis facilisissem

\par
~\\

%简单工作表%
\begin{center}
\begin{tabular}{ c c c }
cell1 & cell2 & cell3 \\
cell4 & cell5 & cell6 \\
cell7 & cell8 & cell9
\end{tabular}
\end{center}

\par
~\\

%表边框1%
\begin{center}
\begin{tabular}{ |c|c|c| }
\hline
cell1 & cell2 & cell3 \\
cell4 & cell5 & cell6 \\
cell7 & cell8 & cell9 \\
\hline
\end{tabular}
\end{center}
\par
~\\

%表边框2%
\begin{center}
\begin{tabular}{||c c c c||}
\hline
Col1 & Col2 & Col2 & Col3 \\ [0.5ex]
\hline\hline
1 & 6 & 87837 & 787 \\
\hline
2 & 7 & 78 & 5415 \\
\hline
3 & 545 & 778 & 7507 \\
\hline
4 & 545 & 18744 & 7560 \\
\hline
5 & 88 & 788 & 6344 \\ [1ex]
\hline
\end{tabular}
\end{center}

\par
~\\

%表的标题、标签和参考%
Table \ref{table:data} is an example of referenced \LaTeX{} elements.

\begin{table}[h!]
\centering
\begin{tabular}{||c c c c||}
\hline
Col1 & Col2 & Col2 & Col3 \\ [0.5ex]
\hline\hline
1 & 6 & 87837 & 787 \\
2 & 7 & 78 & 5415 \\
3 & 545 & 778 & 7507 \\
4 & 545 & 18744 & 7560 \\
5 & 88 & 788 & 6344 \\ [1ex]
\hline
\end{tabular}
\caption{Table to test captions and labels}
\label{table:data}
\end{table}

\par
~\\

%目录%
\tableofcontents

\end{document}
  • HelloLatexPicture.tex
1
2
3
4
5
6
7
8
9
10
11
12
13
14
15
16
17
18
19
20
21
22
23
24
25
26
27
28
29
30
31
32
33
34
35
36
37
38
39
40
41
42
43
44
45
\documentclass[12pt, letterpaper, twoside]{article}
\usepackage[utf8]{inputenc}
%声明使用图片包%
\usepackage{graphicx}
%图片存放路径%
\graphicspath{ {images/} }

\title{Hello Latex Picure}
\author{Hibisici Dai \thanks{funded by the SWPU}}
\date{\today}

\begin{document}
\maketitle
The universe is immense and it seems to be homogeneous, in a large scale, everywhere we look at.

%图片名称%
\includegraphics{test}

There's a picture of a galaxy above.

\par

\begin{figure}[h]
\centering
\includegraphics[width=0.25\textwidth]{test}
\caption{a nice plot}
\label{fig:mesh1}
\end{figure}

As you can see in the figure \ref{fig:mesh1}, the
function grows near 0. Also, in the page \pageref{fig:mesh1}
is the same example.

\begin{figure}[h]
\centering
\includegraphics[width=0.25\textwidth]{test}
\caption{a nice plot}
\label{fig:mesh1}
\end{figure}

As you can see in the figure \ref{fig:mesh1}, the
function grows near 0. Also, in the page \pageref{fig:mesh1}
is the same example.

\end{document}
文章作者: HibisciDai
文章链接: http://hibiscidai.com/2022/01/02/LaTex入门/
版权声明: 本博客所有文章除特别声明外,均采用 CC BY-NC-SA 4.0 许可协议。转载请注明来自 HibisciDai!