
PyTorch-26H-2
PyTorch-26H-2
主页:https://www.freecodecamp.org/news/learn-pytorch-for-deep-learning-in-day/
youtub:https://youtu.be/V_xro1bcAuA
github:https://github.com/mrdbourke/pytorch-deep-learning
Learn PyTorch for Deep Learning: Zero to Mastery book:https://www.learnpytorch.io/
PyTorch documentation:https://pytorch.org/docs/stable/index.html
Chapter 1 – PyTorch Workflow Fundamentals
机器学习和深度学习的本质是从过去获取一些数据,建立一种算法(如神经网络)来发现其中的模式,并利用发现的模式来预测未来。
从一条直线开始,构建一个 PyTorch 模型来学习直线的模式并进行匹配。
What we’re going to cover

| 话题 | 内容 |
|---|---|
| 1. 准备数据 | 数据可以是任何东西,但首先我们要创建一条简单的直线 |
| 2. 建立模型 | 在这里我们将创建一个模型来学习数据中的模式,我们还将选择一个损失函数、优化器并建立一个训练循环。 |
| 3. 将模型拟合到数据(训练) | 我们有数据和模型,现在让我们让模型(尝试)在(训练)数据中寻找模式。 |
| 4. 做出预测并评估模型(推理) | 我们的模型在数据中发现了模式,让我们将它的发现与实际(测试)数据进行比较。 |
| 5. 保存和加载模型 | 在其他地方使用模型,或者稍后再回来。 |
| 6. 综合起来 | 让我们把以上所有内容结合起来。 |
Where can you get help?
本课程的所有材料均可在 GitHub 上找到。
如果您遇到麻烦,您也可以在讨论页面上提问。
还有PyTorch 开发者论坛,这是一个对所有 PyTorch 相关事宜非常有用的地方。
1 | what_were_covering = {1: "data (prepare and load)", |
1 | what_were_covering = {1: "数据(准备和加载)", |
模块导入
我们将获得torch,torch.nn(nn代表神经网络,这个包包含在 PyTorch 中创建神经网络的构建块)和matplotlib。
1 | import torch |
1 | '2.4.1' |
1. Data (preparing and loading)
机器学习中的“数据”几乎可以是任何你能想象到的东西。数字表(比如一个大的 Excel 电子表格)、任何类型的图像、视频(YouTube 上有大量数据!)、歌曲或播客等音频文件、蛋白质结构、文本等等。
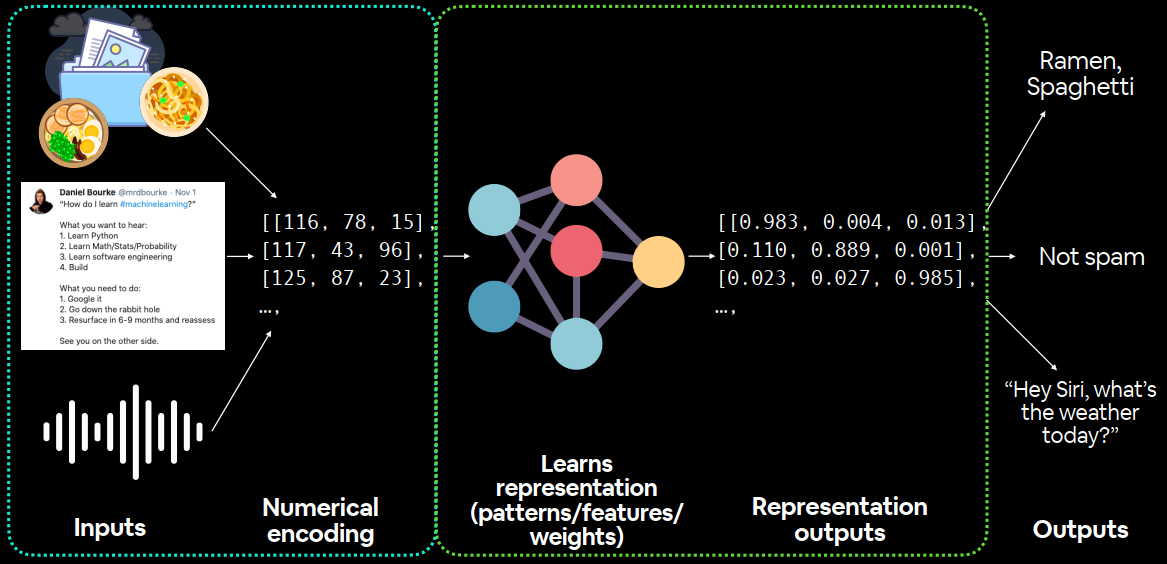
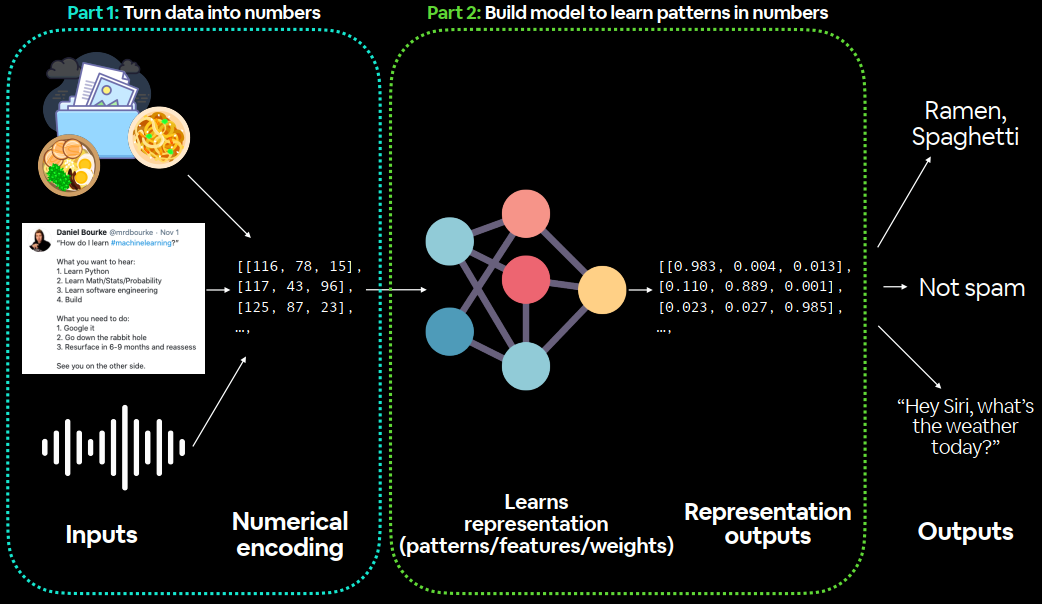
机器学习是一个由两部分组成的游戏:
1、数据(无论它是什么)转换为数字(一种表示)。
2、选择或建立一个模型来尽可能好地学习表示。
有时一项和两项可以同时进行。但是如果没有数据怎么办?嗯,这就是我们现在的情况。没有数据。但我们可以创造一些。我们将数据创建为一条直线。
我们将使用 线性回归 来创建具有已知参数(模型可以学习的东西)的数据,然后我们将使用 PyTorch 来查看是否可以构建模型来使用 梯度下降 来估计这些参数。
1 | # Create *known* parameters |
1 | (tensor([[0.0000], |
开始构建一个可以学习X(特征)和y(标签)之间关系的模型。
Split data into training and test sets
在建立模型之前,我们需要将其拆分。
机器学习项目中最重要的步骤之一是创建训练和测试集(必要时还要创建验证集)。

| 分类 | 目的 | 总数据量 | 使用频率 |
|---|---|---|---|
| 训练集 | 模型从这些数据中学习(例如您在学期期间学习的课程材料)。 | ~60-80% | Always |
| 验证集 | 模型会根据这些数据进行调整(就像期末考试之前进行的模拟考试一样)。 | ~10-20% | Often but not always |
| 测试集 | 模型会根据这些数据进行评估,以测试其所学到的知识(就像学期末参加的期末考试一样)。 | ~10-20% | Always |
只使用训练和测试集,这意味着我们将拥有一个数据集供我们的模型学习和评估。
通过分割X和Y张量来创建它们。
处理真实数据时,此步骤通常在项目开始时完成(测试集应始终与所有其他数据分开)。我们希望我们的模型从训练数据中学习,然后在测试数据上对其进行评估,以了解它对未见过的示例的推广效果如何。
1 | # Create train/test split |
1 | len(X_train), len(y_train), len(X_test), len(y_test) |
40 个样本用于训练(X_train & y_train)和 10 个样本用于测试(X_test & y_test)。
创建的模型将尝试学习X_train & y_train之间的关系,然后我们将评估它在 X_test 和 y_test 上的学习内容。
创建函数可视化数字:
1 | def plot_predictions(train_data=X_train, |

2. Build model
建立一个模型,使用蓝点来预测绿点。
1 | # Create a Linear Regression model class |
Start with random values (weight & bias)
从随机值开始(权重和偏差)
Look at training data and adjust the random values to better represent (or get closer to) the ideal values (the weight & bias values we used to create the data)
查看训练数据并调整随机值以更好地表示(或更接近)理想值(我们用于创建数据的权重和偏差值)
Through two main algorithms:
通过两种主要算法:
- Gradient descent:https://youtu.be/IHZwWFHWa-w
- 梯度下降:https://youtu.be/IHZwWFHWa-w
- Backpropagation:https://youtu.be/llg3gGewQ5U
- 反向传播:https://youtu.be/llg3gGewQ5U

Subclass nn.Module(this contains all the building blocks for neural networks)子类 nn.Module(包含神经网络的所有构建块)
Initialise model parameters to be used in various computations (these could be diMerent layers from torch.nn, single parameters, hard-coded values or functions)初始化用于各种计算的模型参数(这些参数可能是来自 torch.nn 的不同层、单个参数、硬编码值或函数)
requires_grad =True means PyTorch will track the gradients of this speciLc parameter for use with torch.autograd and gradient descent (for many torch.nn modules, requires_grad =True is set by default)require_grad =True 表示 PyTorch 将跟踪此特定参数的梯度,以便与 torch.autograd 和梯度下降一起使用(对于许多 torch.nn 模块,requires_grad =True 是默认设置的)
Any subclass of nn.Module needs to override forward() (this deLnes the forward computation of the model)nn.Module 的任何子类都需要重写 forward()(这定义了模型的前向计算)
PyTorch model building essentials PyTorch 模型构建要点
PyTorch 有四个(大约)基本模块,torch.nn、torch.optim、torch.utils.data.Dataset、torch.utils.data.DataLoader你可以用它们来创建几乎任何你能想到的神经网络。
| PyTorch模块 | 作用 |
|---|---|
| torch.nn | 包含计算图的所有构建块(本质上是以特定方式执行的一系列计算)。 |
| torch.nn.Parameter | 存储可以与 一起使用的张量nn.Module。如果requires_grad=True梯度(用于通过梯度下降更新模型参数)是自动计算的,这通常被称为“autograd”。 |
| torch.nn.Module | 所有神经网络模块的基类,神经网络的所有构建块都是子类。如果你在 PyTorch 中构建神经网络,你的模型应该是子类nn.Module。需要forward()实现一个方法。 |
| torch.optim | 包含各种优化算法(这些算法告诉存储的模型参数nn.Parameter如何最好地改变以改善梯度下降并进而减少损失)。 |
| def forward() | 所有nn.Module子类都需要一种方法,它定义了传递给特定的数据(例如上面的线性回归公式)forward()将进行的计算。nn.Module |

PyTorch 神经网络中的几乎所有内容都来自torch.nn。
nn.Module包含较大的构建块(层)nn.Parameter包含较小的参数,如权重和偏差(将它们放在一起形成nn.Module(s))forward()告诉较大的块如何在 nn.Module(s) 内对输入(充满数据的张量)进行计算torch.optim包含关于如何改进参数nn.Parameter以更好地表示输入数据的优化方法

子类 nn.Module(包含神经网络的所有构建块)
初始化用于各种计算的模型参数(这些参数可能是来自torch.nn 的不同层、单个参数、硬编码值或函数)require_grad=True 表示 PyTorch 将跟踪此特定参数的梯度,以便与 torch.autograd 和梯度下降一起使用(对于许多 torch.nn 模块,requires_grad=True 是默认设置)nn.Module 的任何子类都需要重写 forward()(这定义了模型的前向计算)
通过子类化创建 PyTorch 模型的基本构建块nn.Module。对于子类化的对象nn.Module,forward()必须定义方法。
在 PyTorch Cheat Sheet 中查看更多这些基本模块及其用例。
Checking the contents of a PyTorch model 检查 PyTorch 模型的内容
1 | # Set manual seed since nn.Parameter are randomly initialized由于 nn.Parameter 是随机初始化的,因此请设置手动种子 |
1 | [Parameter containing: |
我们还可以使用 获取模型的状态(模型包含的内容).state_dict()
1 | # List named parameters |
1 | OrderedDict([('weights', tensor([0.3367])), ('bias', tensor([0.1288]))]) |
注意 model_0.state_dict() 中的权重和偏差的值是如何作为随机浮点张量出现的吗?
这是因为我们上面使用 torch.randn() 初始化了它们。
本质上,我们希望从随机参数开始,并让模型将它们更新为最适合我们数据的参数(我们在创建直线数据时设置的硬编码 weight 和 bias)。
尝试改变上面两个单元格的 torch.manual_seed() 值,看看权重和偏差值会发生什么变化。
因为我们的模型从随机值开始,所以现在它的预测能力较差。
Making predictions using torch.inference_mode()
将测试数据传递给它,X_test 看看它的预测有多接近 y_test。
将数据传递给模型时,它将通过模型的 forward() 方法并使用我们定义的计算产生结果。
1 | # Make predictions with model |
使用 torch.inference_mode() 作为上下文管理器(这就是 torch.inference_mode(): 的作用)来进行预测。
顾名思义,torch.inference_mode() 用于使用模型进行推理(做出预测)。
torch.inference_mode() 关闭了许多功能(例如梯度跟踪,这对于训练是必需的,但对于推理不是必需的),以使前向传递(数据通过 forward() 方法)更快。
在较旧的 PyTorch 代码中,您可能还会看到 torch.no_grad() 用于推理。虽然 torch.inference_mode() 和 torch.no_grad() 的作用类似,但 torch.inference_mode() 较新,可能更快且更受欢迎。有关更多信息,请参阅 Tweet from PyTorch 。
1 | # Check the predictions |
1 | Number of testing samples: 10 |
请注意每个测试样本有一个预测值。
这是因为我们使用的数据类型。对于我们的直线,一个X值对应一个y值。
然而,机器学习模型非常灵活。可以将 100 个X值映射到一个、两个、三个或 10 个y值。这完全取决于正在处理的内容。
预测仍然是页面上的数字,使用plot_predictions()上面创建的函数将它们可视化。
1 | plot_predictions(predictions=y_preds) |

对比预测结果:
1 | y_test - y_preds |
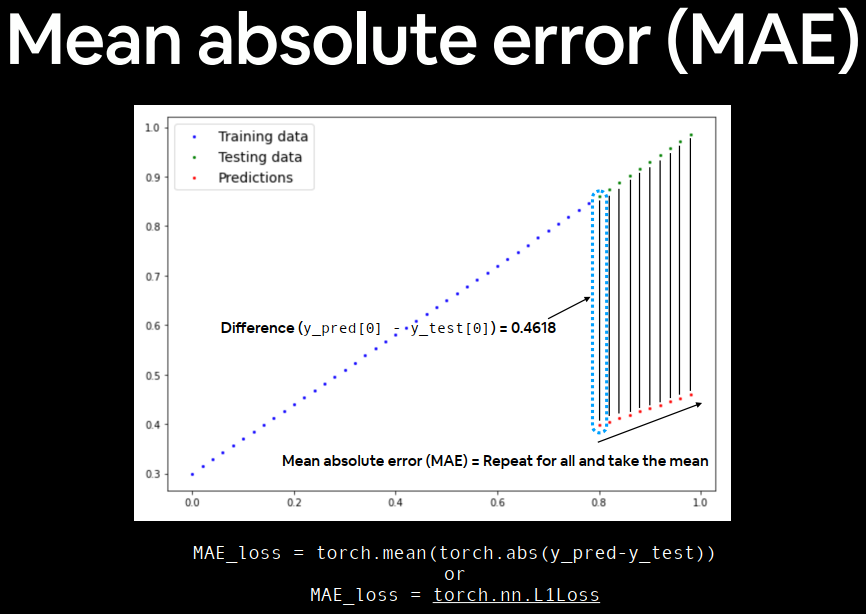
1 | tensor([[0.4618], |
使用随机参数做出预测,没有进行观察的结果,差距很大。
3. Train model 训练模型
模型正在使用随机参数进行计算进行预测,这基本上是猜测(随机)。
更新其内部参数(将参数称为模式),使用weights和bias随机设置的值nn.Parameter(),torch.randn()以便更好地表示数据。
可以对此进行硬编码(默认值weight=0.7和bias=0.3)
Creating a loss function and optimizer in PyTorch 在 PyTorch 中创建损失函数和优化器
| 功能 | 作用 | 位置 | 价值 |
|---|---|---|---|
| 损失函数 | 衡量模型预测与真实标签相比的误差程度。误差越低越好。 | 内置损失函数torch.nn |
回归问题平均绝对误差(MAE)torch.nn.L1Loss(),二元分类问题的二元交叉熵torch.nn.BCELoss() |
| 优化器 | 告诉模型如何更新其内部参数以最好的降低损失。 | 优化函数实现 torch.optim |
随机梯度下降 torch.optim.SGD() , Adam优化器torch.optim.Adam() |
据处理的问题类型,将决定使用的损失函数和优化器。
经验:SGD(随机梯度下降)或 Adam 优化器,效果很好。用于回归问题(预测数字)的 MAE(平均绝对误差)损失函数或用于分类问题(预测一件事或另一件事)的二元交叉熵损失函数。
对于我们的问题,因为我们正在预测一个数字,所以我们使用 PyTorch 中的 MAE(位于 torch.nn.L1Loss() 下)作为我们的损失函数。
平均绝对误差 (MAE,在 PyTorch 中为:torch.nn.L1Loss) 测量两点(预测和标签)之间的绝对差异,然后对所有示例取平均值。
我们将使用 SGD,torch.optim.SGD(params, lr),其中:
params 是您想要优化的目标模型参数(例如我们之前随机设置的weights和bias)。lr 是您希望优化器更新参数的学习率,越高意味着优化器将尝试更大的更新(这些更新有时可能太大,优化器将无法工作),越低意味着优化器将尝试较小的更新(这些更新有时可能太小,优化器将花费太长时间才能找到理想值)。学习率被视为超参数(因为它是由机器学习工程师设置的)。学习率的常见起始值为 0.01、0.001、0.0001,但是,这些值也可以随着时间的推移进行调整(这称为学习率调度)。
1 | # Create the loss function 创建损失函数 |
Creating an optimization loop in PyTorch 在 PyTorch 中创建优化循环
训练循环涉及模型 遍历训练数据并学习features和labels之间的关系。
测试循环涉及检查测试数据并评估模型在训练数据上学习到的模式的优劣(模型在训练期间永远不会看到测试数据)。
每个都称为一个“循环”,因为我们希望我们的模型查看(循环)每个数据集中的每个样本。
PyTorch training loop PyTorch 训练循环
训练步骤:
| 序号 | 步骤 | 作用 | 示例 |
|---|---|---|---|
| 1 | Forward pass | 该模型会遍历所有训练数据一次,并执行其 forward() 函数计算。 |
model(x_train) |
| 2 | Calculate the loss | 将模型的输出(预测)与基本事实进行比较,并进行评估以查看其错误程度。 | loss = loss_fn(y_pred, y_train) |
| 3 | Zero gradients | 优化器的梯度设置为零(默认情况下是累积的),因此可以针对特定的训练步骤重新计算它们。 | optimizer.zero_grad() |
| 4 | Perform backpropagation on the loss(Loss backward) | 计算每个要更新的模型参数的损失梯度(每个参数的 require_grad=True)。这称为反向传播,因此是“向后”的。 |
loss.backward() |
| 5 | Update the optimizer (gradient descent) | 使用 require_grad=True 来根据损失梯度更新参数,以改进它们。 |
optimizer.step() |
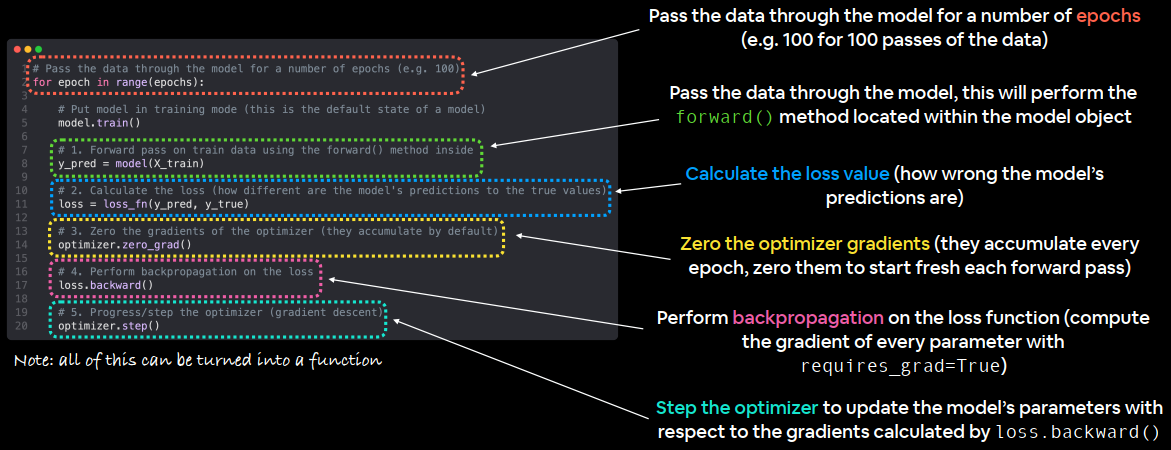
Pass the data through the model for a number of epochs (e.g. 100 for 100 passes of the data)
将数据通过模型传递若干个时期(例如,100 次数据传递为 100 个时期)
Pass the data through the model, this will perform the forward() method located within the model object
通过模型传递数据,这将执行位于模型对象内的 forward() 方法
Calculate the loss value (how wrong the model’s predictions are)
计算损失值(模型预测的错误程度)
Zero the optimizer gradients (they accumulate every epoch, zero them to start fresh each forward pass)
将优化器梯度归零(它们在每个时期都会累积,在每次前向传递时将它们归零以重新开始)
Perform backpropagation on the loss function (compute the gradient of every parameter with requires_grad=True)
对损失函数进行反向传播(使用 require_grad=True 计算每个参数的梯度)
Step the optimizer to update the model’s parameters with respect to the gradients calculated by loss.backward()
让优化器根据 loss.backward() 计算出的梯度来更新模型的参数
1 | epochs = 1 |
以上只是步骤排序或描述的一个例子。随着经验的积累,你会发现制作 PyTorch 训练循环可以非常灵活。
训练循环歌曲:
The Unofficial PyTorch Optimization Loop Song
1 | It's train time! |
至于事物的顺序,以上是一个很好的默认顺序,但你可能会看到略有不同的顺序。一些经验法则:
- 在对损失执行反向传播
(loss.backward())之前,先计算损失(loss = ...)。 - 在针对每个模型参数
(loss.backward())计算损失的梯度之前,先将梯度归零(optimizer.zero_grad())。 - 在对损失执行反向传播
(loss.backward())之后,逐步执行优化器(optimizer.step())。
有关帮助理解反向传播和梯度下降幕后情况的资源,请参阅课外部分。
PyTorch testing loop PyTorch 测试循环
| 序号 | 步骤 | 作用 | 例子 |
|---|---|---|---|
| 1 | Forward pass | 该模型会遍历所有测试数据一次,并执行其 forward() 函数计算。 |
model(x_test) |
| 2 | Calculate the loss | 将模型的输出(预测)与基本事实进行比较,并进行评估以查看其错误程度。 | loss = loss_fn(y_pred, y_test) |
| 3 | Calulate evaluation metrics (optional) | 除了损失值之外,您可能还想计算其他评估指标,例如测试集的准确性。 | Custom functions |
请注意,测试循环不包含执行反向传播(loss.backward())或步进优化器(optimizer.step()),这是因为在测试期间模型中的任何参数都不会改变,它们已经被计算出来了。对于测试,我们只对通过模型的前向传递的输出感兴趣。

1 | # Setup empty lists to keep track of model progress |
Create empty lists for storing useful values (helpful for tracking model progress)
创建空列表来存储有用的值(有助于跟踪模型进度)
Tell the model we want to evaluate rather than train (this turns off functionality used for training but not evaluation)
告诉模型我们想要评估而不是训练(这会关闭用于训练但不用于评估的功能)
Turn on torch.inference_mode() context manager to disable functionality such as gradient tracking for inference (gradient tracking not needed for inference)
打开 torch.inference_mode() 上下文管理器以禁用推理的梯度跟踪等功能(推理不需要梯度跟踪)
Pass the test data through the model (this will call the model’s implemented forward() method)
通过模型传递测试数据(这将调用模型实现的 forward() 方法)
Calculate the test loss value (how wrong the model’s predictions are on the test dataset, lower is better)
计算测试损失值(模型对测试数据集的预测错误程度,越低越好)
Display information outputs for how the model is doing during training/testing every ~10 epochs (note: what gets printed out here can be adjusted for speciLc problems)
每~10 个时期显示模型在训练/测试过程中的运行情况的信息输出(注意:此处打印的内容可针对具体问题进行调整)
1 | torch.manual_seed(42) |
1 | Epoch: 0 | MAE Train Loss: 0.31288138031959534 | MAE Test Loss: 0.48106518387794495 |
查看损失函数:
1 | # Plot the loss curves |

损失曲线显示损失随时间下降。请记住,损失是衡量模型错误程度的指标,因此损失越低越好。
由于损失函数和优化器,模型的内部参数(weights 和 bias)得到了更新,以更好地反映数据中的底层模式。
让我们检查模型的 .state_dict() 来查看模型与我们为权重和偏差设置的原始值有多接近。
1 | # Find our model's learned parameters |
1 | The model learned the following values for weights and bias: |
我们的模型非常接近计算weight和的精确原始值bias(如果我们训练更长时间,它可能会更加接近)。
当epochs=200:
1 | Epoch: 0 | MAE Train Loss: 0.024458957836031914 | MAE Test Loss: 0.05646304413676262 |

1 | The model learned the following values for weights and bias: |
4. Making predictions with a trained PyTorch model (inference) 使用训练好的 PyTorch 模型进行预测(推理)
使用 PyTorch 模型进行预测(也称为执行推理)时,需要记住三件事:
- 将模型设置为评估模式 (
model.eval())。 - 使用推理模式上下文管理器进行预测(使用
torch.inference_mode(): ...)。 - 所有预测都应使用同一设备上的对象进行(例如,仅在 GPU 上的数据和模型或仅在 CPU 上的数据和模型)。
前两项确保 PyTorch 在训练期间在后台使用但对推理不必要的所有有用计算和设置均已关闭(这可加快计算速度)。第三项确保您不会遇到跨设备错误。
1 | # 1. Set the model in evaluation mode |
1 | tensor([[0.8141], |
1 | plot_predictions(predictions=y_preds) |
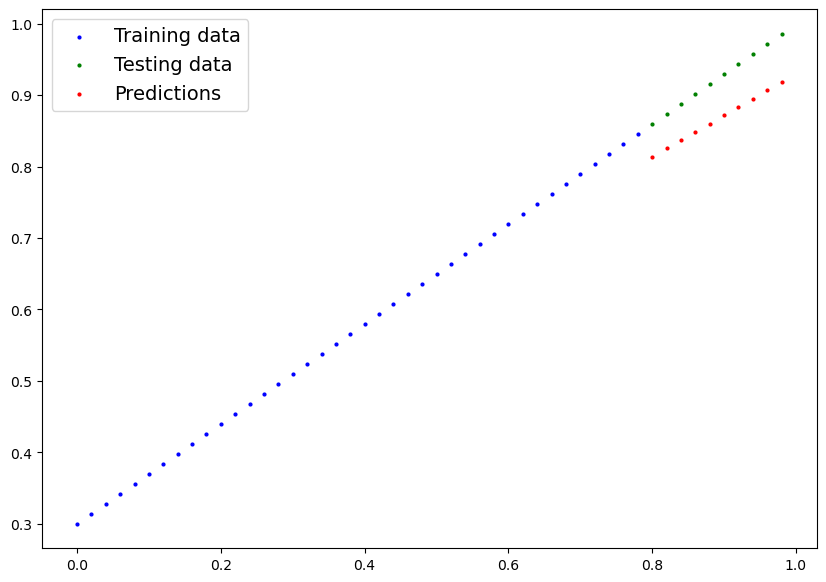
5. Saving and loading a PyTorch model 保存和加载 PyTorch 模型
如果您已经训练了 PyTorch 模型,那么您可能会想要保存它并将其导出到某个地方。
例如,您可能在 Google Colab 或使用 GPU 的本地机器上训练它,但现在您想将其导出到其他人可以使用的某种应用程序中。
或者您可能想保存模型的进度,稍后再回来加载它。
对于在 PyTorch 中保存和加载模型,您应该了解三种主要方法(以下所有内容均取自 PyTorch 保存和加载模型指南):
| 方法 | 作用 |
|---|---|
torch.save |
使用 Python 的 pickle 实用程序将序列化对象保存到磁盘。可以使用 torch.save 保存模型、张量和各种其他 Python 对象(如字典)。 |
torch.load |
使用 pickle 的 unpickling 功能对 pickle 的 Python 对象文件(如模型、张量或字典)进行反序列化并将其加载到内存中。您还可以设置将对象加载到哪个设备(CPU、GPU 等)。 |
torch.nn.Module.load_state_dict |
使用已保存的 state_dict() 对象加载模型的参数字典 (model.state_dict())。 |
正如 Python 的 pickle 文档所述,pickle模块实现了用于序列化和反序列化 Python 对象结构的二进制协议,pickle 模块并不安全。这意味着您只应解开(加载)您信任的数据。这也适用于加载 PyTorch 模型。只使用您信任的来源保存的 PyTorch 模型。
Saving a PyTorch model’s state_dict() 保存 PyTorch 模型的state_dict()
什么是state_dict()?
在 PyTorch 中,模型的可学习参数(即权重和偏差) torch.nn.Module包含在模型的参数中(通过 访问model.parameters())。 Astate_dict只是一个 Python 字典对象,它将每个层映射到其参数张量。state_dict 对象是 Python 字典,因此可以轻松保存、更新、更改和恢复它们,从而为 PyTorch 模型和优化器增加大量模块化。请注意,只有具有可学习参数(卷积层、线性层等)和已注册缓冲区(batchnorm 的 running_mean)的层才会在模型的 state_dict 中拥有条目。优化器对象 (torch.optim) 也有一个 state_dict,其中包含有关优化器状态以及所用超参数的信息。
保存和加载模型进行推理(进行预测)的推荐方法是保存和加载模型的 state_dict()。
让我们看看如何通过几个步骤做到这一点:
- 我们将使用 Python 的
pathlib模块创建一个目录,用于将模型保存到调用的模型中。 - 我们将创建一个文件路径来保存模型。
- 我们将调用
torch.save(obj, f),其中obj是目标模型的state_dict(),f是保存模型的文件名。
注意:PyTorch 保存的模型或对象通常以 .pt 或 .pth 结尾,例如 saved_model_01.pth。
1 | from pathlib import Path |
1 | Saving model to: models\01_pytorch_workflow_model_0.pth |
Loading a saved PyTorch model’s state_dict() 加载已保存的 PyTorch 模型的 state_dict()
由于我们现在在 models/01_pytorch_workflow_model_0.pth 处有一个保存的模型 state_dict(),我们现在可以使用 torch.nn.Module.load_state_dict(torch.load(f)) 加载它,其中 f 是我们保存的模型 state_dict() 的文件路径。
为什么在 torch.nn.Module.load_state_dict() 里面调用 torch.load()?
因为我们只保存了模型的 state_dict()(它是学习参数的字典)而不是整个模型,所以我们首先必须使用 torch.load() 加载 state_dict(),然后将该 state_dict() 传递给我们模型的新实例(它是 nn.Module 的一个子类)。
为什么不保存整个模型?
保存整个模型而不是仅仅保存 state_dict() 更为直观,但是,引用 PyTorch 文档:
保存整个模型的缺点是序列化数据与保存模型时使用的特定类和确切的目录结构绑定在一起……
因此,在其他项目中使用或重构后,您的代码可能会以各种方式中断。
因此,我们使用灵活的方法来保存和加载 state_dict(),它基本上是一个模型参数的字典。
让我们通过创建另一个 LinearRegressionModel() 实例来测试它,它是 torch.nn.Module 的一个子类,因此具有内置方法 load_state_dict()。
1 | # Instantiate a new instance of our model (this will be instantiated with random weights) |
1 | <All keys matched successfully> |
PyTorch 推理规则:
- 将模型设置为评估模式 (
model.eval())。 - 使用推理模式上下文管理器进行预测(使用
torch.inference_mode(): ...)。 - 所有预测都应使用同一设备上的对象进行(例如,仅在 GPU 上的数据和模型或仅在 CPU 上的数据和模型)。
1 | # 1. Put the loaded model into evaluation mode |
现在我们已经使用加载的模型做出了一些预测,让我们看看它们是否与之前的预测相同。
1 | # Compare previous model predictions with loaded model predictions (these should be the same) |
1 | tensor([[True], |
看起来加载的模型预测与之前的模型预测(保存前所做的预测)相同。这表明我们的模型正在按预期保存和加载。
还有更多方法可以保存和加载 PyTorch 模型,但我将把这些方法留到课外和进一步阅读中。有关更多信息,请参阅 PyTorch 保存和加载模型指南。
6. Putting it all together
首先导入所需的标准库。
1 | # Import PyTorch and matplotlib |
1 | '2.4.1' |
通过设置来使我们的代码与设备无关,device=”cuda”如果它可用,否则它将默认为device=”cpu”。
1 | # Setup device agnostic code |
1 | Using device: cuda |
6.1 Data
首先,我们将对一些权重和偏差值进行硬编码。
然后,我们将在 0 到 1 之间设置一个数字范围,这些数字将是我们的 X 值。
最后,我们将使用 X 值以及权重和偏差值,通过线性回归公式 (y = 权重 * X + 偏差) 创建 y。
1 | # Create weight and bias |
1 | (tensor([[0.0000], |
现在我们有了一些数据,让我们将其分成训练集和测试集。
我们将使用 80/20 的分割方式,即 80% 的训练数据和 20% 的测试数据。
1 | # Split data |
1 | (40, 40, 10, 10) |
太好了,让我们将它们可视化以确保它们看起来不错。
1 | # Note: If you've reset your runtime, this function won't work, |
6.2 Building a PyTorch linear model
太棒了,让我们来看一下。我们已经有了一些数据,现在是时候创建一个模型了。
我们将创建与以前相同风格的模型,只是这次,我们不再使用 nn.Parameter() 手动定义模型的权重和偏差参数,而是使用 nn.Linear(in_features, out_features) 来为我们完成这项工作。
其中 in_features 是输入数据的维度数,out_features 是您希望输出到的维度数。
在我们的例子中,这两个都是 1,因为我们的数据每个标签 (y) 有 1 个输入特征 (X)。对它们进行大小调整以确保它们看起来不错。
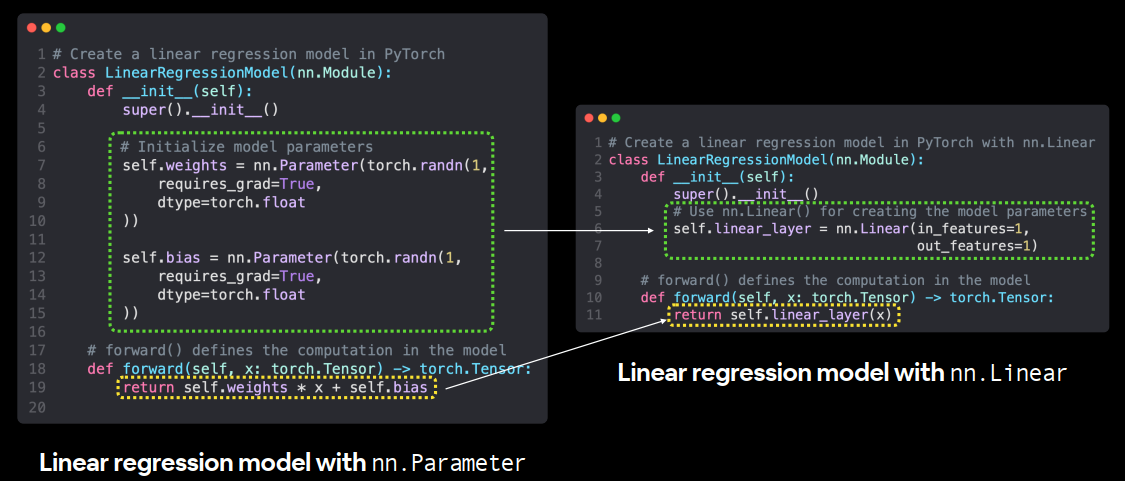
使用 nn.Parameter 创建线性回归模型,而不是使用 nn.Linear。torch.nn 模块具有预构建计算的示例还有很多,包括许多流行且有用的神经网络层。
1 | # Subclass nn.Module to make our model |
1 | (LinearRegressionModelV2( |
注意model_1.state_dict()的输出,nn.Linear()层为我们创建了一个随机权重和偏差参数。
现在让我们将模型放到 GPU 上(如果可用)。
我们可以使用 .to(device) 更改 PyTorch 对象所在的设备。
首先让我们检查模型的当前设备。
1 | # Check model device |
1 | device(type='cpu') |
太棒了,看起来模型默认在 CPU 上运行。
让我们将其改为在 GPU 上运行(如果可用的话)。
1 | # Set model to GPU if it's available, otherwise it'll default to CPU |
1 | device(type='cuda', index=0) |
太棒了!由于我们的代码与设备无关,因此无论 GPU 是否可用,上述单元都可以工作。
6.3 Training
是时候构建训练和测试循环了。
首先,我们需要一个损失函数loss function和一个优化器optimizer。
让我们使用之前使用的相同函数,nn.L1Loss() 和 torch.optim.SGD()。
我们必须将新模型的参数 (model.parameters()) 传递给优化器,以便它在训练期间进行调整。
0.01 的学习率之前也很好用,所以让我们再次使用它。
1 | # Create loss function |
损失函数和优化器已准备就绪,现在让我们使用训练和测试循环来训练和评估我们的模型。
与之前的训练循环相比,我们在此步骤中要做的唯一不同的事情是将数据放在目标设备上。
我们已经使用 model_1.to(device) 将我们的模型放在目标设备上。
我们可以对数据执行相同的操作。
这样,如果模型在 GPU 上,数据就在 GPU 上(反之亦然)。
这次让我们更进一步,设置 epochs=1000。
如果您需要 PyTorch 训练循环步骤的提醒,请参见下文。
PyTorch 训练循环步骤
- 前向传递 - 模型对所有训练数据进行一次遍历,执行其 forward() 函数计算 (model(x_train))。
- 计算损失 - 将模型的输出 (预测) 与基本事实进行比较,并进行评估以查看它们的错误程度 (loss = loss_fn(y_pred, y_train)。
- 零梯度 - 优化器梯度设置为零 (默认情况下是累积的),因此可以为特定的训练步骤重新计算它们 (optimizer.zero_grad())。
- 对损失执行反向传播 - 针对要更新的每个模型参数 (每个参数的 require_grad=True) 计算损失的梯度。这称为反向传播,因此是“向后”(loss.backward())。
- 步进优化器 (梯度下降) - 使用 require_grad=True 更新参数,以根据损失梯度来改进它们 (optimizer.step())。
1 | torch.manual_seed(42) |
1 | Epoch: 0 | Train loss: 0.5551779866218567 | Test loss: 0.5739762187004089 |
注意:由于机器学习的随机性,您可能会得到略有不同的结果(不同的损失和预测值),具体取决于您的模型是在 CPU 还是 GPU 上训练的。即使您在任一设备上使用相同的随机种子,情况也是如此。如果差异很大,您可能需要查找错误,但是,如果差异很小(理想情况下很小),您可以忽略它。
检查一下模型学习到的参数,并将它们与我们硬编码的原始参数进行比较。
1 | # Find our model's learned parameters |
1 | The model learned the following values for weights and bias: |
请记住,在实践中,你很少会提前知道完美的参数。
如果你提前知道了模型必须学习的参数,机器学习还有什么乐趣呢?
此外,在许多现实世界的机器学习问题中,参数的数量可能超过数千万。
6.4 Making predictions
现在我们已经有一个训练好的模型,让我们打开它的评估模式并做出一些预测。
1 | # Turn model into evaluation mode |
1 | tensor([[0.8600], |
如果您使用 GPU 上的数据进行预测,您可能会注意到上面的输出在末尾有 device=’cuda:0’。这意味着数据位于 CUDA 设备 0 上(由于零索引,您的系统可以访问的第一个 GPU),如果您将来最终使用多个 GPU,这个数字可能会更高。
现在让我们绘制模型的预测。
注意:许多数据科学库(例如 pandas、matplotlib 和 NumPy)无法使用存储在 GPU 上的数据。因此,当您尝试使用其中一个库中的函数处理未存储在 CPU 上的张量数据时,可能会遇到一些问题。要解决此问题,您可以在目标张量上调用 .cpu() 以返回 CPU 上的目标张量的副本。
1 | # plot_predictions(predictions=y_preds) # -> won't work... data not on CPU |

6.5 Saving and loading a model 保存和加载模型
1 | from pathlib import Path |
1 | Saving model to: models\01_pytorch_workflow_model_1.pth |
为了确保一切正常,我们将其重新加载。
- 创建
LinearRegressionModelV2()类的新实例 - 使用
torch.nn.Module.load_state_dict()加载模型状态字典 - 将模型的新实例发送到目标设备(以确保我们的代码与设备无关)
1 | # Instantiate a fresh instance of LinearRegressionModelV2 |
1 | Loaded model: |
现在我们可以评估加载的模型,看看它的预测是否与保存之前的预测一致。
1 | # Evaluate loaded model |
1 | tensor([[True], |
Exercises
1、使用线性回归公式 () 创建直线数据集weight * X + bias。
- 设置
weight=0.3并且bias=0.9总共应该至少有 100 个数据点。 - 将数据分成 80% 用于训练,20% 用于测试。
- 绘制训练和测试数据,使其变得可视化。
2、通过子类化构建 PyTorch 模型nn.Module。
- 里面应该有一个随机初始化
nn.Parameter()的requires_grad=True,一个为weights,一个为bias。 - 实现
forward()在1中创建数据集时使用的计算线性回归函数的方法。 - 一旦构建了模型,就创建它的一个实例并检查它的
state_dict()。 - 注意:如果您愿意,
nn.Linear()也nn.Parameter()可以使用。
3、nn.L1Loss()分别使用和创建损失函数和优化器torch.optim.SGD(params, lr)。
- 将优化器的学习率设置为 0.01,要优化的参数应该是您在 2 中创建的模型的模型参数。
- 编写一个训练循环来执行 300 个时期的适当训练步骤。
- 训练循环应该每 20 个时期在测试数据集上测试模型。
4、使用训练好的模型对测试数据进行预测。
- 根据原始训练和测试数据对这些预测进行可视化(注意:如果您想使用不支持 CUDA 的库(例如 matplotlib 来绘图,则可能需要确保预测不在GPU 上)。
5、将您训练的模型保存state_dict()到文件中。
- 创建您在 2 中创建的模型类的新实例,并加载
state_dict()您刚刚保存的内容。 - 使用加载的模型对测试数据执行预测,并确认它们与 4 中的原始模型预测相匹配。
Extra-curriculum
- 阅读Jeremy Howard 的《到底是什么
torch.nn?》,以更深入地了解 PyTorch 中最重要的模块之一的工作原理。 - 花 10 分钟浏览并查看PyTorch 文档备忘单,了解您可能会遇到的所有不同 PyTorch 模块。
- 花 10 分钟阅读PyTorch 网站上的加载和保存文档,以熟悉 PyTorch 中的不同保存和加载选项。
- 花费 1-2 小时阅读/观看以下内容,了解梯度下降和反向传播的内部原理,这两种主要算法一直在后台运行,帮助我们的模型学习。
- 梯度下降的维基百科页面
- 梯度下降算法——Robert Kwiatkowski 的深入探讨
- 梯度下降,神经网络如何学习视频(3Blue1Brown 拍摄)
- 反向传播到底在做什么?视频由 3Blue1Brown 提供
- 反向传播维基百科页面
